Configuring Phases
What are Phases?
Phases allow you to track applicants during each stage of your review process. Each phase represents a specific stage or step of the review process, such as initial screening, faculty review, interview scheduling, rejection, etc.
Phases are for internal use only. Applicants cannot see what phase they have been placed in from the FellowshipsCAS application.
Working with Phases
Phases help to structure the review process by breaking it down into manageable steps, allowing for systematic evaluation and tracking of applicants. After you configure your phases, you can begin working with them by:
- Placing applicants in phases individually.
- Moving applicants in phases in bulk.
- Attaching an evaluation form and reviewers to the phase.
- Note: you can automate your workflow by connecting reviewers and evaluation forms to specific phases. When you move applicants into a phase, the designated reviewers are automatically assigned to review the applicants and complete the evaluation form.
Placing Applicants in Phases Individually
To place an individual applicant in a phase, click the applicant from the application grid. If you're viewing the application preview, use the drop-down to select your desired phase.

Similarly, if you're viewing the information sidebar, use the drop-down to select your desired phase.
Placing Applicants in Phases in Bulk
You can also place multiple applicants in a phase at once. To move applicants to phases in batch:
- Navigate to the applications grid.
- Use the checkboxes to the left of each applicant (or the checkbox at the top of the applicant list) to select which applicants should be included in your batch action.
- From the bottom menu, click Phase, then choose the phase and click apply.

Configuring Phases
You can customize phases to match your review process.
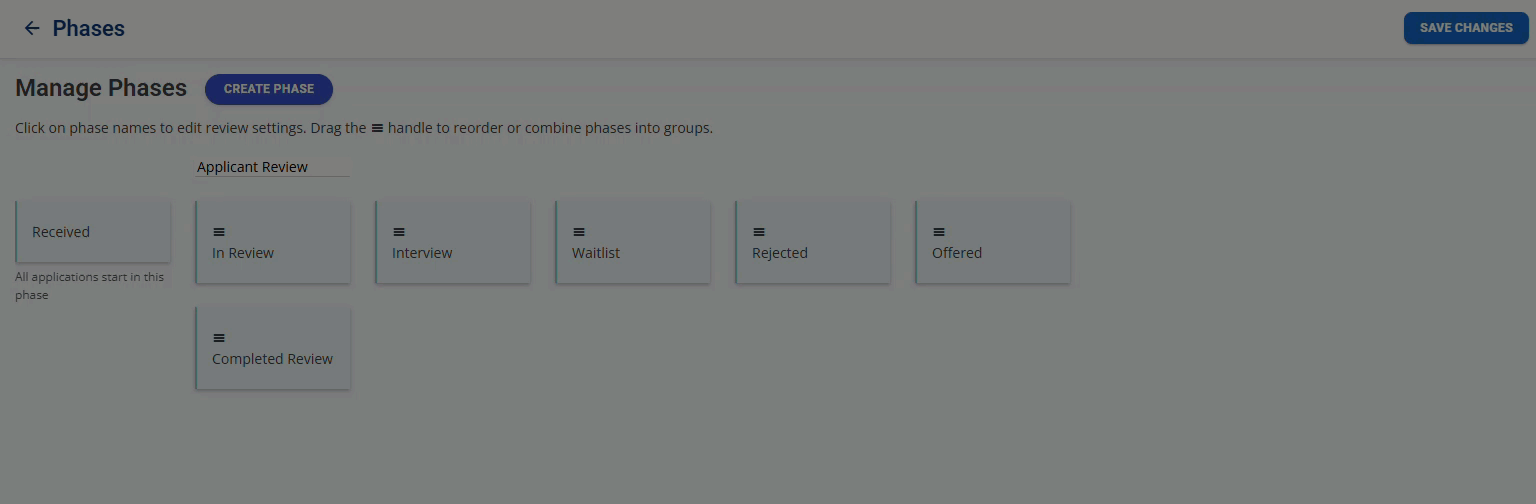
- From the Settings menu, open the Application Review section, then select Phases. Here you can review the current setup. Click the pencil icon to make changes.

- To create a new phase, click Create Phase. After naming the phase, click Add. You can rearrange the order of your phases by dragging the phase to the desired location. When you place multiple phases in vertical order, you create a Group, which you will rename for your applicant review. Be sure to save any changes.
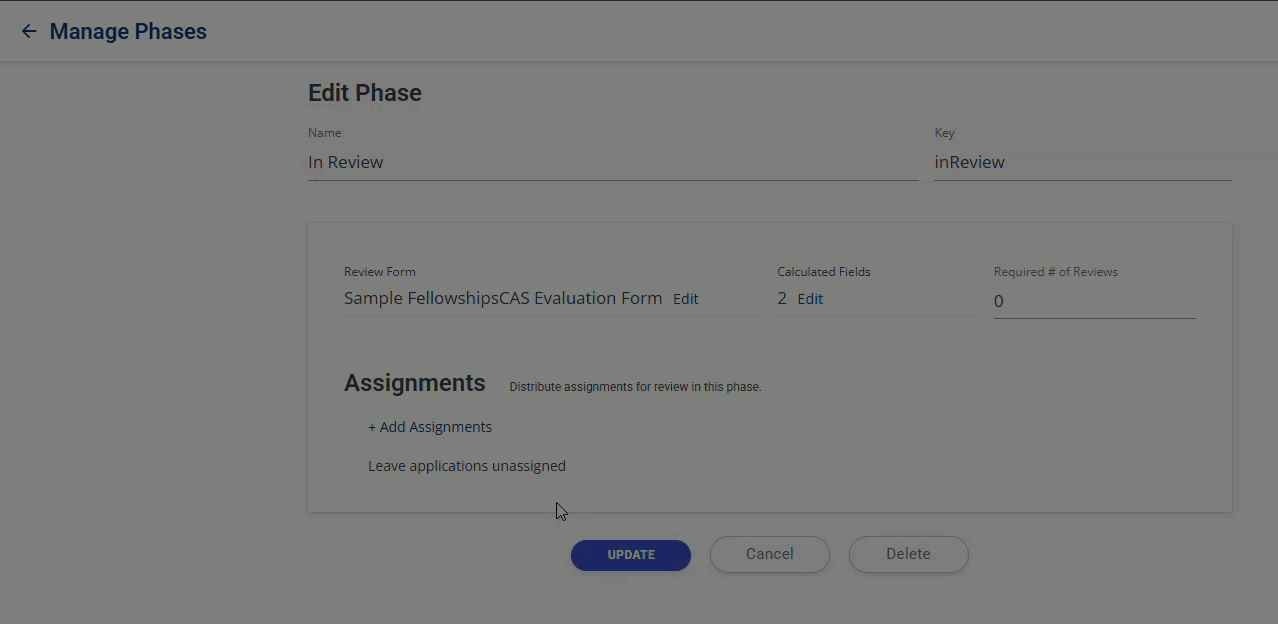
Attaching Evaluation Forms and Reviewers to Phases
- When creating a new phase or editing an existing one, you can associate a review form with the phase. This way, when you place an applicant into the phase, the form becomes available for reviewers to record their evaluations.

- When you add a review form, you can also use the + Add Assignments feature to assign specific reviewers. This ensures that when an applicant is placed in the phase, the review form is automatically assigned to the designated reviewers.
- Click + Add Assignments. Assignments are by segment – you assign applications to different reviewers based on the segments applicants are part of. For example, you might add an assignment so that applicants in the Current Resident in Training segment are sent to the selected reviewers, while applicants in the Applicants with all Evaluations segment are sent to a review team. Generally, most programs will use the All Applications segment, but this feature can be especially helpful if you're managing multiple programs.
Note: if an assignment is configured for a specific segment and an applicant not belonging to that segment is placed in that phase, no action will occur. For example, suppose you have a "Primary Review" phase that includes a review assignment for applicants in the Current Resident in Training segment. If you move "Aimee Applicant" into that phase but Aimee is not part of the Applicants with all Current Resident in Training segment, no assignment will be sent.
- Next, choose how you'd like to assign the applications (you can add as many assignments as needed). You can:
- Distribute to Selected Users: this option allows you to assign applications in this phase to one or more specific users.

- Distribute to a Team: this option allows you to assign applications in this phase to one or more teams. When you select a team, you can then choose to assign the review to all team members or balance across team members. Balancing across team members helps distribute reviews. If you choose to balance across team members, you can balance using:
- Random order: for example, if your team has 2 reviewers and you move 20 applications into the phase, each reviewer will receive 10 random applications for review.
- Specific criteria: for example, if you select residency training in the Midwest as the balancing criteria, the system will distribute the applications as evenly as possible.

- Distribute Using a Routing Table: this option allows you to assign applications in this phase to specific users based on a routing table with predefined criteria. Routing tables are created in Settings > Application Review > Review Routing Tables. When creating a routing table, you can use criteria like applicants’ permanent state of residence to assign applications to specific reviewers. For example, applicants from FL could be routed to Reviewer A, applicants from GA to Reviewer B, and applicants from all other states to Reviewer C.
Note: historically, some programs balanced applications by distributing them according to applicants’ last names (for example, A–E to Reviewer 1, F–J to Reviewer 2, etc.). In FellowshipsCAS, a more efficient and flexible way to achieve the same goal is to use the Distribute to a Team option described above.
- Distribute to Selected Users: this option allows you to assign applications in this phase to one or more specific users.
- After you add an assignment, click Update.
- Be sure to Save Changes after adding all assignments.
Note: to unassign a reviewer from a Phase, edit the phase and remove the user. After clicking Run Rules, applicants will be automatically reassigned to the remaining reviewers.
