EMP to TargetX Integration
Overview
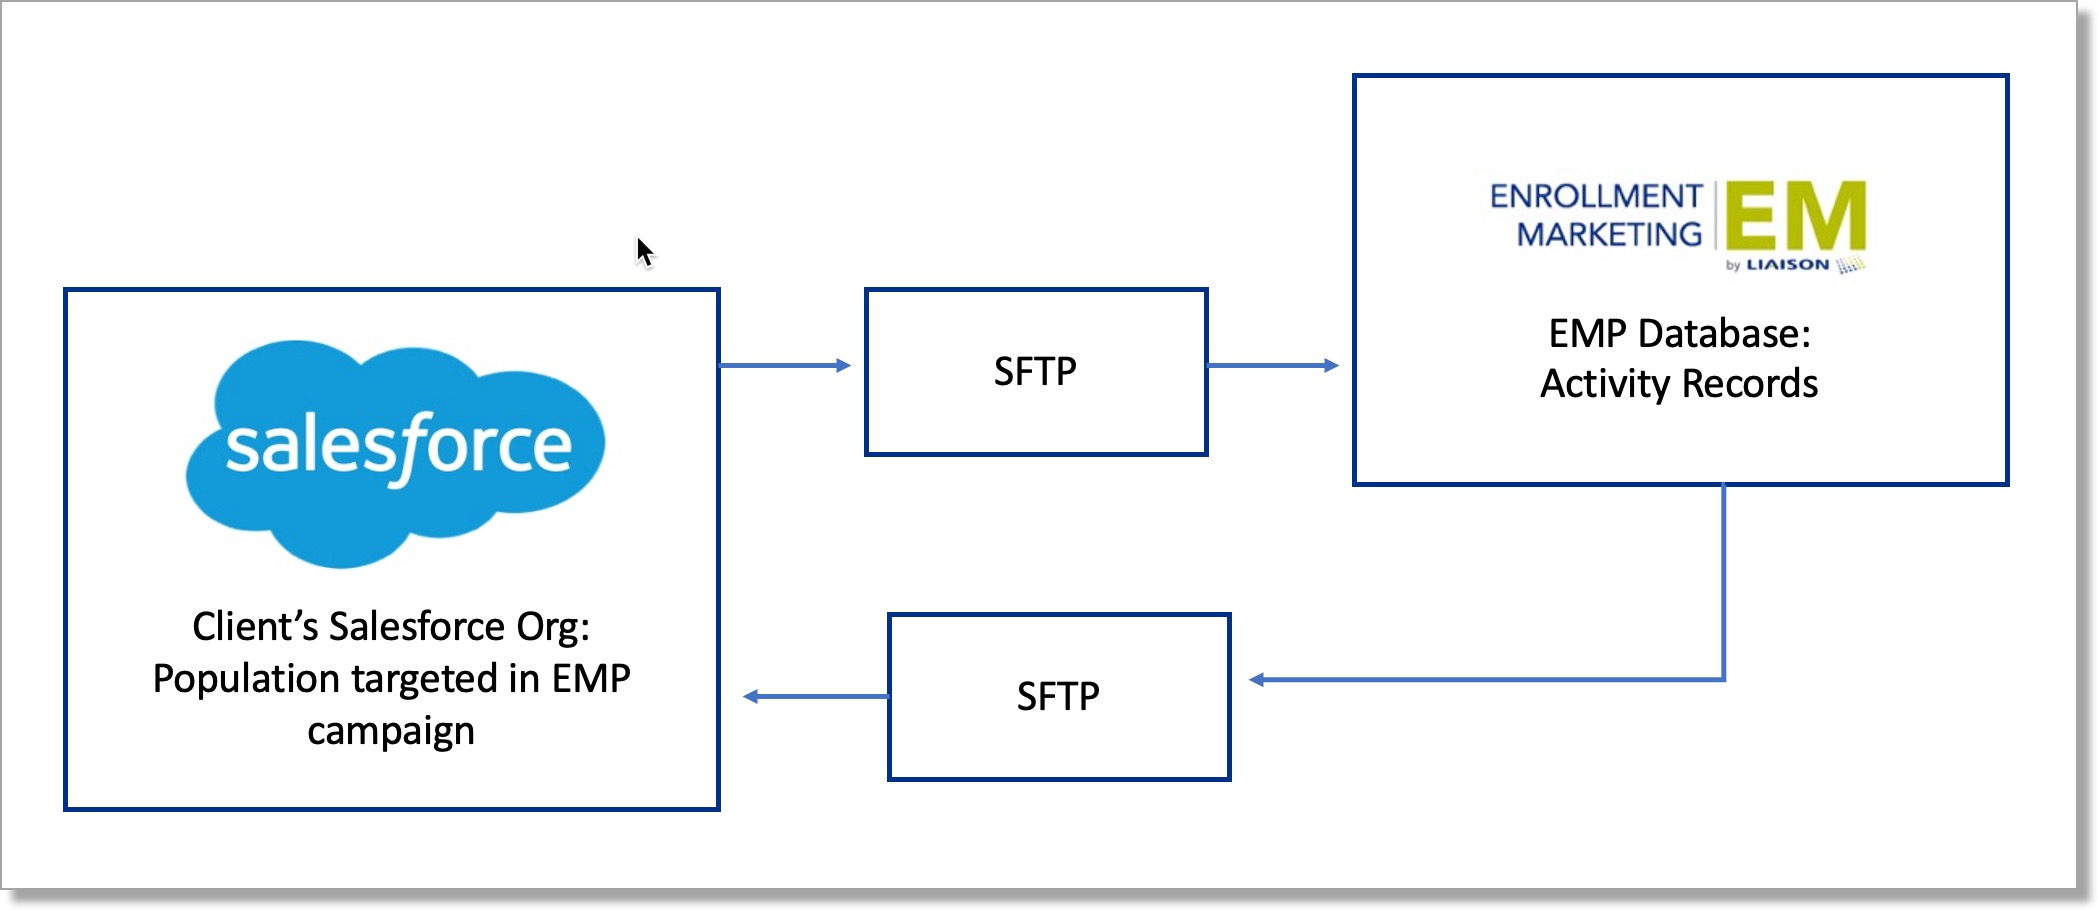
The TargetX and EMP Prospect Integration exports Salesforce prospect Contacts from the TargetX CRM to EMP via Informatica. EMP users can then include prospects in EMP Search campaigns (e.g., personalized print, email, and digital campaigns) to convert prospects to inquiries. EMP sends TargetX a nightly file of newly generated inquiries through this integration. Users in the TargetX CRM can then focus on building relationships with students who are further along the enrollment funnel and more likely to apply.
The TargetX/EMP Integration works as follows:
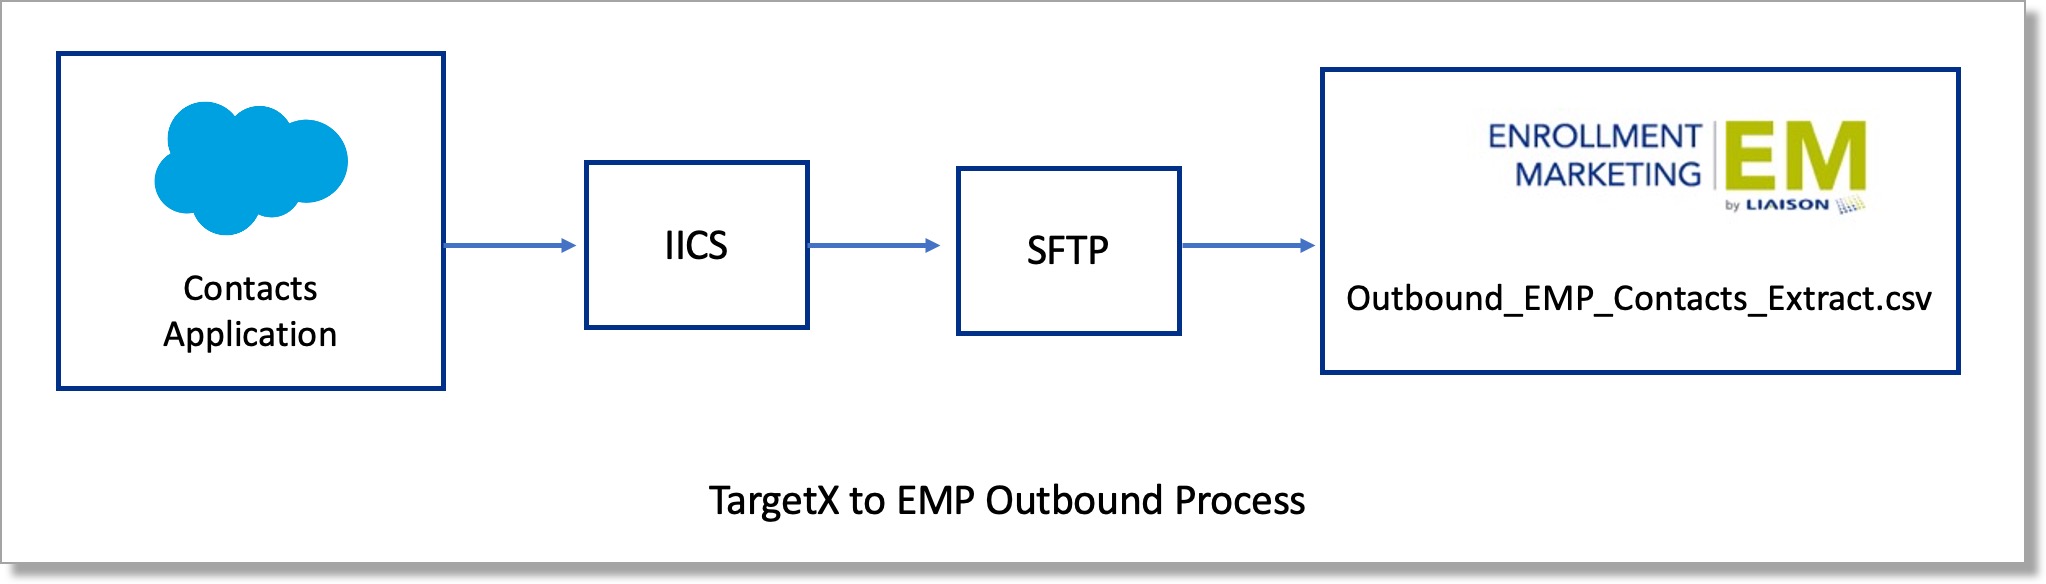
- TargetX to EMP Outbound process extracts Contact and Application records from your Salesforce instance, creating CSV files that are placed in the SFTP site. This captures details of all Contacts for up to ten applications per Contact, consolidating data into a single record with multiple fields, including user application info and relevant Status.
- Informatica Task Scheduler processes the SCH_EMP_Outbound_Process once a day at midnight ET. You can change the schedule if you prefer the process to run at a different time, either by yourself or through Liaison.
- TargetX to EMP Inbound process loads Activity/Task records into your TargetX Salesforce instance.
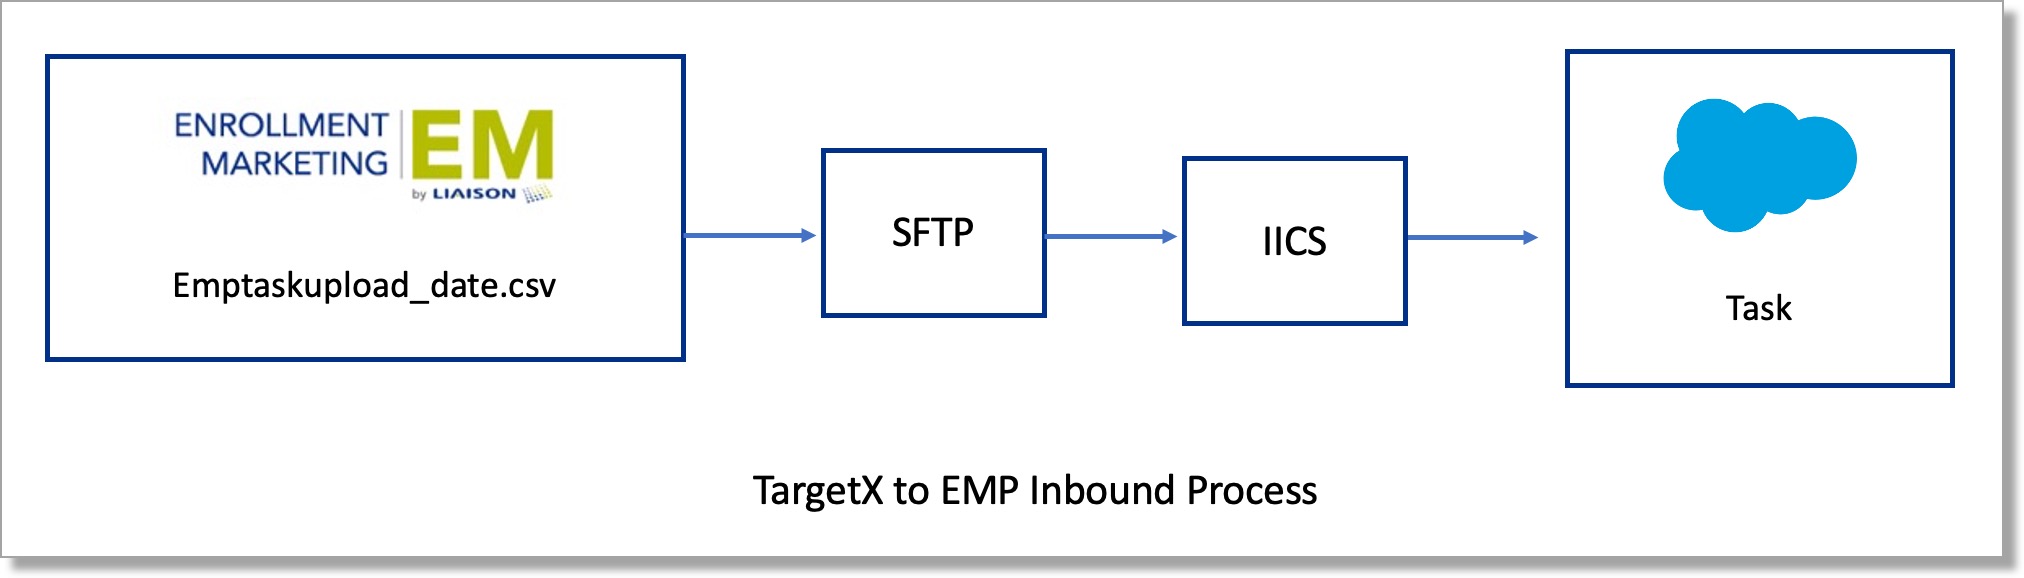
- TargetX to EMP Inbound process loads Activity/Task records into your TargetX Salesforce instance.
Setup
Before You Begin
You'll need to:
- Contact your EMP Marketing Technologist on the EMP Team to verify they can access your SFTP information.
- Ensure you have an Informatica Admin to provide information on Connectors, update Data Synchronization Tasks and Taskflows, configure Allowed Users, and update Query parameters.
Step 1: Create EMP Directory Structure in Informatica
Identify an Informatica user with access to the server where the Informatica Secure Cloud Secure Agent resides. The EMP Team will provide this zip file which will need to be downloaded and then extracted to the EMP Directory Structure (zip file), which will result in the following file paths:
- Dropbox Path: C:\Informatica\EMP\dropbox
- Archive Path: C:\Informatica\EMP\archives
- Lookup Path: C:\Informatica\EMP\lookup_files
- The script required for inbound task: C:\Informatica\EMP\Informatica_Scripts\Inboundprocess.bat
If your file paths differ, make a note of those. File paths will vary when a different drive has been used (e.g., D: or E: ) or the folder structure is within another folder (e.g., C:\TargetX\Informatica\EMP\dropbox). A successful connection will require multiple updates, which will be identified when you review the Connector File Paths.
Step 2: Submit TargetX Support Case (optional)
Submit a case to TargetX Support and request the EMP Interactions Template be imported into your Informatica Org.
Check with the EMP Team to determine if you need to complete this step.
Step 3: Configure EMP-SFTP Site Information in EMP
- Your EMP Marketing Technologist should provide the following items:
- Username
- Hostname
- port 22
- After receiving the EMP account creation email (make sure to check your spam folder), download the Private Key File:
- Log in to EMP.
- Click Account.
- Click EMP Settings.
- Click SFTP Account.
- Click Create New SSH Key Pair.
- Click Create.
- Click Download Private Key File and save it to the server that has the Informatica Agent installed. Be sure to make a note of the resulting file path.
Step 4: Identify Salesforce Connectors, File Paths, and Your Informatica Runtime Environment in Informatica
Provide your EMP Marketing Technologist with the following information from Informatica:
- Runtime Environment Name
- Salesforce sandbox Connector Name
- Salesforce production Connector Name
- The IP address of the server where the Secure Agent is installed
- File path where the private key file is stored (e.g., C:\Informatica\EMP\lookup_files\privkey.pem)
Step 5: Review Connector File Paths in Informatica
Review the Dropbox Path
- Click the Data Integration drop-down and select the Administrator service.
- Click Connections from the Administrator Services Menu on the left.
- Ensure the following three connectors are present:
- cn_File_processor_EMP_Inbound_SFTP
- cn_File_processor_hoh_Outbound_SFTP
- EMP_FlatFile_Connector
- Click the EMP_FlatFile_Connector.
- Click Test Connection.
- If you receive a success message, skip to Review the Lookup Path.
- If the Directory path is set to C:\Informatica\EMP\dropbox, continue to the next step. Otherwise, click Edit to update to the custom path indicated in the EMP Directory structure section above. Confirm the update by clicking Test Connection again.
Review the Lookup Path
- Click the Administrator drop-down and select the Data Integration service.
- Click Explore from the menu on the left.
- Using the Find function in the top right corner, search for mt_hoh_Contacts_Outbound_File.
- Scroll to the Parameter File section and confirm that the Parameter File Directory path matches the information provided in the EMP Directory structure section above. If the path is different, then follow the steps below:
- In the top-right corner, click Edit.
- On the next page, click Schedule.
- Scroll to the Parameter File Location section and update the custom Parameter File Directory.
- Click Finish in the bottom-right corner.
Step 6: Update EMP-SFTP Site References in Informatica
In this step, you will update the various Data Synchronization Tasks:
Update st_hoh_Outbound_dropbox_SFTP Data Synchronization Task
- From the Data Integration Services Menu on the left, click Explore.
- Using the Find function in the top right corner, search for st_hoh_Outbound_dropbox_SFTP.
- Click the asset name, then click Edit in the top right.
- Click Step 4 Data Filters option from the wizard to display the following list of filter options:
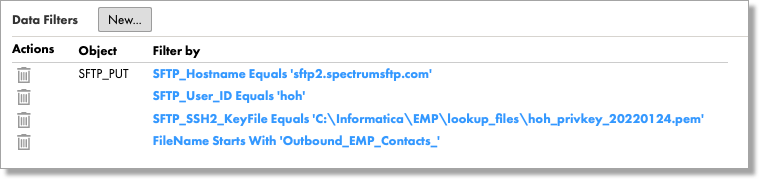
- Click the SFTP_User_ID Equals' hoh' filter, updating the filter with your value from the EMP Directory structure section above, then click OK.

- Click the SFTP_SSH2_KeyFile Equals' C:\Informatica\EMP\lookup_files\hoh_privkey_20220124.pem' filter, updating the filter with the value you provided in the step to Identify Salesforce Connectors, then click OK.
- Click Finish in the bottom right corner after completing these two steps.
Update st_hoh_Inbound_SFTP_dropbox Data Synchronization Task
- From the Data Integration Services Menu on the left, click Explore.
- Using the Find function in the top right corner, search for st_hoh_Inbound_SFTP_dropbox.
- Click the asset name, then click Edit in the top-right.
- Click Step 4 Data Filters option from the wizard to display the following list of filter options:
- Click the SFTP_User_ID Equals' hoh' filter, updating the filter with your value from the EMP Directory structure section above, then click OK.
- Click the SFTP_SSH2_KeyFile Equals' C:\Informatica\EMP\lookup_files\hoh_privkey_20220124.pem' filter, updating the filter with the value you provided in the step to Identify Salesforce Connectors, then click OK.
- Click Finish in the bottom right corner after completing these two steps.
Update st_hoh_Inbound_SFTP_delete Data Synchronization Task
- From the Data Integration Services Menu on the left, click Explore.
- Using the Find function in the top right corner, search for st_hoh_Inbound_SFTP_delete.
- Click the asset name, then click Edit in the top-right.
- Click Step 4 Data Filters option from the wizard to display the following list of filter options.
- Click the SFTP_SSH2_KeyFile Equals' hoh' filter, updating the filter with the value you provided in the step to Configure EMP-SFTP Site Information, then click OK.
- Click the SFTP_SSH2_KeyFile Equals' C:\Informatica\EMP\lookup_files\hoh_privkey_20220124.pem' filter, updating the filter with the value you provided in the step to Identify Salesforce Connectors, then click OK.
- Click Finish in the bottom right corner after completing these two steps.
Step 7: Support for Attachments
For the integration to support attachments larger than 5MB, Administrators must complete the following in Informatica:
Increase Informatica's Secure Agent memory
To increase Informatica's secure Agent's memory, follow the steps outlined in the article Increasing the Secure Agent memory.
Note: you need to restart your Secure Agent as part of this process. Ensure no other processes accessing the Secure Agent are running during the restart.
Increase Field Buffer Size to Handle Large Attachments
You must increase the precision on the base64 string that houses the PDF data for Informatica's Source and Target field mapping . The precision value must be increased to 17340032. Follow the steps outlined in Informatica's article HOW TO: Increase Field Buffer size to handle large attachments using File IO connector in IICS.
Step 8: Configure Allowed Users in Informatica
Define the Allowed Users field for users to access taskflows. Add users, user groups, and permission sets.
Step 9: Update Query Parameters in Informatica
- Open the EMP_Source_Query file on the Secure Agent server (e.g., C:\Informatica\EMP\lookup_files\EMP_Source_Query). Use the Review Lookup Path step to identify the exact file path.
- Update the query to pull the population you want. If you wish to include all records, leave the parameters blank; if you want specific groups (Fall 2023), then update the parameters.
Query Parameters Example
$$CUSTOM_OPT_IN=0
$$in_Contact_SOQL_Data_Filter= ID = '0033j00003ioxDNAAY'AND TargetX_SRMb__Start_Term_And_Year='Fall 2022'
$$in_Application_SOQL_Data_Filter= TargetX_SRMb__Start_Term_And_Year='Fall 2022'
Step 10: Schedule the EMP to TargetX File Listener in Informatica
In this step, you will schedule the EMP - > TargetX file listener configured in fl_inbound_hoh_Salesforce File Listener:
- From the Data Integration Services Menu on the left, click Explore.
- Using the Find function in the top right corner, search for fl_inbound_hoh_Salesforce.
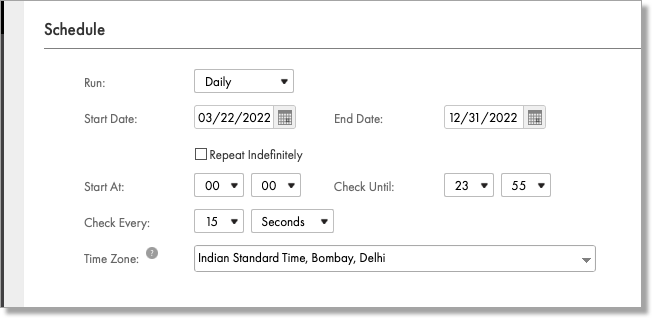
- Click Edit, scroll to the Schedule section, and configure the details:
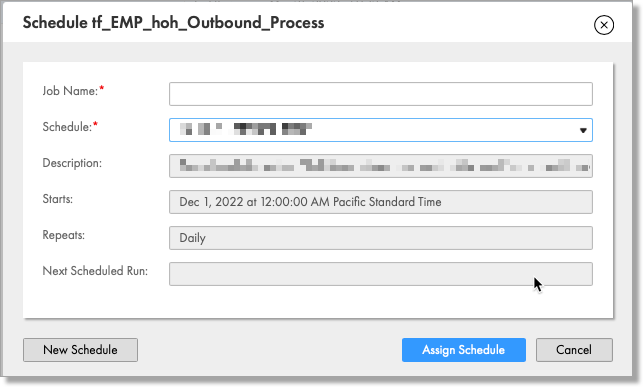
Step 11: Schedule the TargetX to EMP Taskflow in Informatica
In this step, you will schedule the TargetX -> EMP in the tf_EMP_hoh_Outbound_Process taskflow.
- From the Data Integration Services Menu on the left, click Explore.
- Using the Find function in the top right corner, search for tf_EMP_hoh_Outbound_Process.
- Click the Vertical ellipses and select Schedule.
- Configure your schedule details.