Data Integrity Tools
WebAdMIT to TargetX Data Integrity tools
To validate data integrity on the data migrated from CAS to TargetX, you'll utilize Reports in Salesforce/TargetX.
Prerequisites to Validate Data Integrity
Documents like the full Application PDF, Foreign Evaluation, Transcripts, and Recommendation Letters can't be reported on; so you need to create custom fields for the full Application PDF and Foreign Evaluation, to mark items received. For transcripts, use the Official Transcripts Received flag; for recommendation letters, use the Applies to Requirement or Completes Requirement flag.
|
Data to Validate |
Prerequisite |
Field for Reporting |
|---|---|---|
| Full Application PDF | Create a new checkbox field | CAS Full App PDF Received* |
| Foreign Evaluation | Create a new checkbox field | Foreign Evaluation Received* |
| Transcripts | none | Official Transcripts Received |
| Recommendation Letters | none | Applies to Requirement or Completes Requirement |
*suggested field name
Create a checkbox for Full App PDF received
- Navigate to Setup and select Object Manager.
- Locate the Application object (TargetX_SRMb__Application__c).
- Click Fields & Relationships in the left side panel.
- Click the New button.
- Select Checkbox on the next page and click Next.
- Enter your field label (eg. CAS Full App PDF Received).
- Tab to the next field. It automatically populates an API name.
- Click Next.
- Leave the next page as-is and click Next. (This allows the selected profiles to access the field.)
- The next page determines which page layouts to add it to. Uncheck Community Layout and click Save.
Create a checkbox for Foreign Evaluation received
- Navigate to Setup and select Object Manager.
- Locate the object where this flag should be placed. (Contact, Application, or Enrollment History).
- Click Fields & Relationships in the left side panel.
- Click the New button.
- Select Checkbox on the next page and click Next.
- Enter your field label (eg. Foreign Evaluation Received).
- Tab to the next field. It automatically populates an API name.
- Click Next.
- Leave the next page as-is and click Next. (This allows the selected profiles to access the field.)
- The next page determines which page layouts to add it to. Uncheck Community Layout and click Save.
Creating Reports to Validate Data Integrity
Once you've completed the Prerequisites, you can build Reports to validate your data.
Creating a report for Full Application PDF received
- In TargetX, search for Reports in the App picker on the Top left:

- Once in the Reports tab, click New Report in the top right corner:

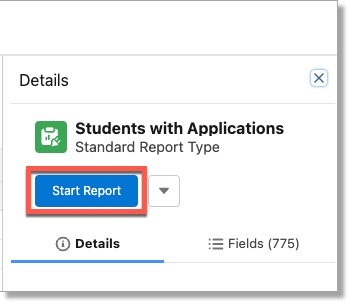
- Reports are built based on categories. Select All in the Category list, and search for the sub-category Students with Applications. Click Student with Applications report type.
- Once selected, click Start Report on the right of the page to create the report and define the parameters for required columns and filters.

- In the Outline tab, clear the columns by selecting the dropdown next to the column section and selecting Remove All Columns:

- Include the following fields:
- CAS Applicant ID
- First Name
- Last Name
- Application Process
- CAS Full App PDF Received
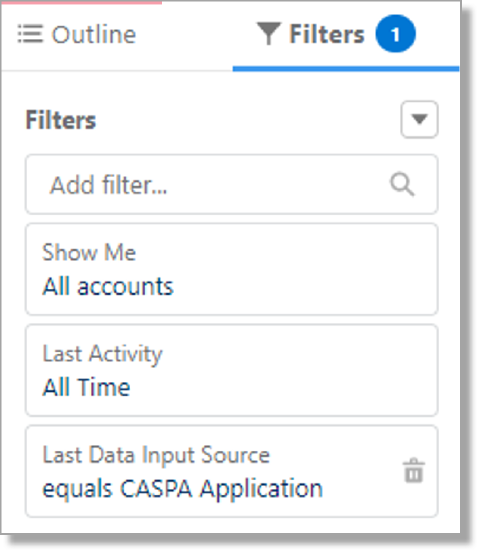
- Navigate to Filters and set the filters as:
- Show me: All Accounts
- Last Activity: All Time
- Last data input source: Set this to the CAS application that was used in your Informatica task for this field (For example, CASPA Application).

- Click Save in the top right corner to open the Save Report dialog box.
- Set the report name as “CAS Full App PDF Received” and click Select Folder to create a folder specifically for CAS Reports if one does not already exist.

- Click Run to view the results.
Creating a report for official transcripts received
- In TargetX, search for Reports in the App picker on the Top left:
- Once in the Reports tab, click New Report in the top right corner:
- Reports are built based on categories. Select All in the Category list, and search for the sub-category Students with Enrollment History. Click Student with Enrollment History.
- Once selected, click Start Report on the right of the page to create the report. This will open the window to define the parameters for required columns and filters.

- For the columns, clear the columns by selecting the dropdown next to the column section and selecting Remove All Columns:
- Include the following fields:
- First Name
- Last Name
- School
- School Name Other\Other Name\Other School
- Official Transcripts Received
- Group these fields by the CAS Applicant ID by setting the Group rows attribute:

- Navigate to Filters and set the filters as:
- Show me: All Accounts
- Last Activity: All Time
- Last data input source: This should be set to whatever CAS application was used in your Informatica task for this field (For example, CASPA Application)
- Click Save in the top right corner to open the Save Report As dialog box.
- Set the report name as “CAS Transcripts” and click Select Folder to create a folder specifically for CAS Reports if one does not already exist.
- Click Run to view the results.
Creating a report for Foreign Transcript received
- In TargetX, search for “Reports” in the all apps section on the Top left.
- Once in the “Reports” app, click on “New Report” in the top right corner.
- Reports are built based on categories, hence select All in the category list and then search for the sub-category Students with Applications. Click Student with Applications report type or you can search for the sub-category Students with Enrollment History and then click Student with Enrollment History.
- Once selected, click Start Report on the right of the page to create the report. This will open the window to define the parameters for required columns and filters.
- This will open the window that allows you to define the parameters required to create the report in terms of required columns and filers.
- For the columns, clear the columns by selecting the dropdown next to the column selection as shown below:
- Include the following fields:
- CAS Applicant ID
- First Name
- Last Name
- Application Process\School Name
- Foreign Evaluation Received
- Navigate to Filters and set the filters as:
- Show me: All Accounts
- Last Activity: All Time
- Last data input source: This should be set to whatever CAS application was set in your Informatica task for this field (For example, CASPA Application)

- Click Save in the top right corner to open the Save Report As dialog box.
- Set the report name as “Foreign Transcripts” and click Select Folder to create a folder specifically for CAS Reports if one does not already exist.
- Click Run to view the results.
Creating a report for Recommendation letters received
- In TargetX, search for “Reports” in the all apps section on the Top left.
- Once in the “Reports” app, click on “New Report” on the top right corner.
- Reports are built based on categories. Select All in the Category list, and search for the sub-category Students with Recommendations and Application, and click Students with Recommendations and Application.
- Once selected, click Start Report on the right of the page to create the report. This will open the window to define the parameters for required columns and filters.

- This will open the window that allows you to define the parameters required to create the report in terms of required columns and filers.
- For the columns, clear the columns by selecting the dropdown next to the column selection as shown below
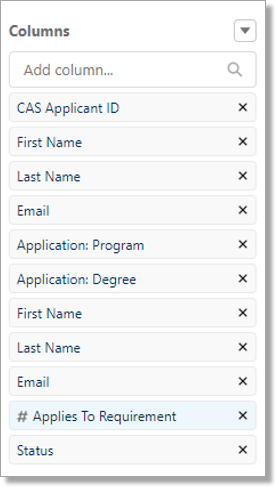
- Include the following fields:
- Navigate to Filters and set the filters as:
- Show me- All Accounts
- Last Activity- All Time
- Last data input source- This could be set to whatever CAS application was set in your Informatica task for this field (For example, CASPA Application)
- Application: Application Stage- Submitted
- Click Save in the top right corner to open the Save Report As dialog box.
- Set the report name as “CAS Applications Recommendation Letter” and click Select Folder to create a folder specifically for CAS Reports if one does not already exist.
- Click Run to view the results.
Creating a report for CAS Applicant Count comparison
This report compares the count of applicants between CAS\WebAdMIT to what was loaded into TargetX.
- Login to WebAdMIT prod.
- Impersonate the user\organization of the school you are working with.
- Once logged in, you will see the CAS applicant count for the different stages on the right side.
- In TargetX, search for “Reports” in the all apps section on the top left.
- Once in the “Reports” app, click on “New Report” in the top right corner.
- Reports are built based on categories. Select All in the Category list, search for the sub-category Students with Applications, and click Students with Applications report type.
- Once selected, click Start Report on the right of the page to create the report. This will open the window to define the parameters for required columns and filters:
- For the columns, clear the columns by selecting the dropdown next to the column selection:
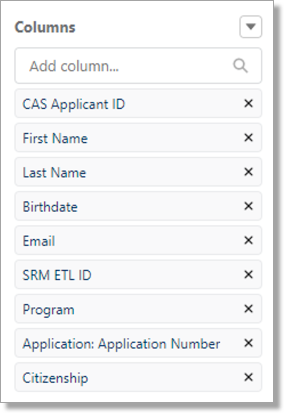
- Include the following fields:
- Navigate to Filters and set the filters as:
- Show me: All Accounts
- Last Activity: All Time
- Last data input source: This should be set to whatever CAS application was set in your Informatica task for this field (For example- “CASPA Application”).
- Click Save in the top right corner to open the Save Report As dialog box.
- Set the report name as “CAS Applications Count” and click Select Folder to create a folder specifically for CAS Reports if one does not already exist.
- Click Run to view the results.