Migrating SSN Data from CAS to TargetX
Planning
If your CAS allows applicants to record their SSN information as a part of their application submission, then retrieving the SSN information to load into TargetX requires a data integration setup.
Prerequisites
If you want to retrieve encrypted SSNs through the WebAdMIT API, you must first install a version of PGP (Pretty Good Privacy) software. This software creates a public and private key:
- The public key is used by Liaison to encrypt the SSN for you.
- The private key is retained by key contact(s) at your institution and is used to decrypt the SSN.
You should never share the private key with anyone outside of your institution. You may use any PGP encryption software. This software must be installed on at least one computer that you'll routinely use to decrypt the SSN. If your institution collects official GRE or TOEFL scores from ETS, you may already have PGP software, as this is the same method ETS uses to transmit scores to institutions.
Email the Public Key to the Client Support Specialist Team
Once you have the public key as a .txt file, email it to the Client Support Specialist team at webadmitsupport@liaisonedu.com and identify the CAS and cycle it can be used for.
Saving the Private Key
As a best practice, you should back up your PGP private key, as without it you cannot open any encrypted files. If your private key is lost, you must generate a new public and private key pairing and resend the new public key to Liaison for setup.
Save the private key file on your Informatica server at CAS\dropbox location.
WebAdMIT User Identities
To access the WebAdMIT API, you need an Institution Manager in WebAdMIT that can access data for all departments and programs at the university. You should have an Institution Manager account in the prelaunch and production environments. Once that is in place, complete the following steps in both environments:
- Log in to WebAdMIT with the Institution Manager account.
- Click Account on the top right to view Account Details.
- Click Edit My Account on the top right.
- Verify that your account has the correct organization assignments and program assignments.
- In the API Key section, click Generate New Key to generate a unique API key for your account.
- Click Show Key to view your API Key.
- Make note of the API Key, which is required for the script and retrieving your User identity ID.
Retrieving Your User Identity ID
Make the following API call to retrieve your User Identity ID.
Use CURL or POSTMAN to make the below API calls:
PRODUCTION
$ curl -n https://api.webadmit.org/api/v1/user_identities \

  -H "x-api-key: <ENTER YOUR API KEY>"
PRELAUNCH
$ curl -n https://prelaunch.webadmit.org/api/v1/user_identities \
-H "x-api-key: <ENTER YOUR API KEY>"
Make sure to use the correct API Keys for PRELAUNCH and PRODUCTION.
A successful API call should generate a status code of “200” with the following example response body:
{
"href": "/api/v1/user_identities",
"user_identities": [
{
"id": 42,
"type": "Admissions User",
"association": "SOPHAS",
"institution": "Demo University",
"organization": "Demo University School of Public Health",
"cycle": "2014 - 2015"
}
]
}
Make note of the number after "id":. Corresponding to the cycle for which you want to extract SSN, this is the Identity ID and is needed for prelaunch and production. This “id” will be used in the swagger file required for setting up this integration.
If the API call is unsuccessful, then it will return a status code of 401. This means the user is not authorized to gain access to the API. Verify the user’s permissions in WebAdMIT and ensure the user has the correct organization and program assignments.
Download Required Jars
The decryption process is handled by Informatica using Informatica’s Java transformation. To support the decryption process, certain JAR files are required to be placed on the Informatica server.
- Download the JarsRequiredforSSN.zip file and place it on your Informatica server.
- Extract the zip file which should have 3 Jar files:
- bcpg-jdk15on-1.62.jar
- bcprov-jdk15on-1.62.jar
- commons-io-2.11.0.jar
- Place the Jar files in the following location on your Informatica server:
C:\Program Files\Informatica Cloud Secure Agent
Setting JVMClassPath in Informatica
- Login to your Informatica instance.
- Navigate to Administrator > Runtime Environments:
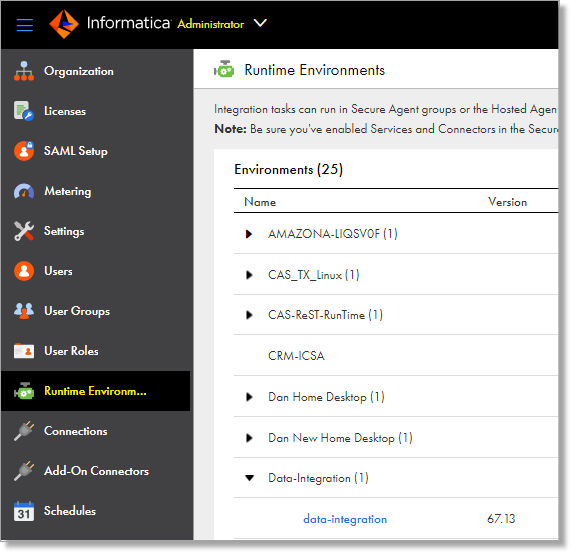
- Edit your Runtime environment.
- The Edit page should bring you to the following page:

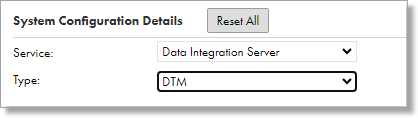
- Change the Service dropdown to Data Integration and the Type to DTM, as shown below:
- Click the pencil icon next to the JVMClassPath to edit its value.

- Replace the existing value with the following:
'pmserversdk.jar;C:\Program Files\Informatica Cloud Secure Agent\bcpg-jdk15on-1.62.jar;C:\Program Files\Informatica Cloud Secure Agent\bcprov-jdk15on-1.62.jar;C:\Program Files\Informatica Cloud Secure Agent\commons-io-2.11.0.jar;'
- Once changed, click the Save icon on the top right of the screen.
- Close out of the edit window. This restarts the Data Integration service for your runtime environment.
- Verify the service starts up successfully.
Execution
Initial Setup
- Create a few test applications in the Prelaunch environment that would have SSNs.
- Download the SSNinformaticaSwagger.json file.
- Make two copies of the SSNinformaticaSwagger.json file and place them on your Informatica server in the CAS\dropbox location.
- Rename them to PrelaunchSSNinformaticaSwagger.json and ProdSSNinformaticaSwagger.json.
- Edit both the JSON files.
- For the line “/user_identities/[user_identity_id]/social_security_numbers”, replace the value with the user identity id generated for Prelaunch and Production in the step Retrieving Your User Identity ID.
- Save both JSON files.
Setting Up the Rest V2 Connector in Informatica
- Login to your Informatica instance.
- Navigate to Administrator > Connections.
- Click New Connection in the top right corner.
- Give your connection a name to identify it to be a prelaunch connection.
- Type: REST V2 (Informatica).
- Runtime Environment: use the dropdown to select your runtime environment.
- Authentication: select “API Key” from the dropdown.
- Key: set this to “x-api-key”.
- Value: set this to be your API key for Prelaunch which was identified in the section WebAdMIT User Identities.
- Add API Key to: set this to “Request Header”.
- Swagger File Path: set this to be the path to your prelaunch swagger file. Like: “C:\Informatica\CAS\dropbox\ PrelaunchSSNinformaticaSwagger.json”
- Leave the rest of the values as is and click Test Connection in the top right corner.
- A successful connection results in this message: The test for this connection was successful.
- Repeat steps 2-6 to create a production connection with the difference being the Value field and the Swagger File Path, both of which should be production-based.
- Save both connections.
Informatica Mapping Import
- Download the SSN_Import_Informatica_Mappings.zip file.
- Login to your Informatica instance.
- Click Explore > Your Project folder.
- Click Import in the top right corner.
- Choose the SSN_Import_Informatica_Mappings.zip file in the next step.
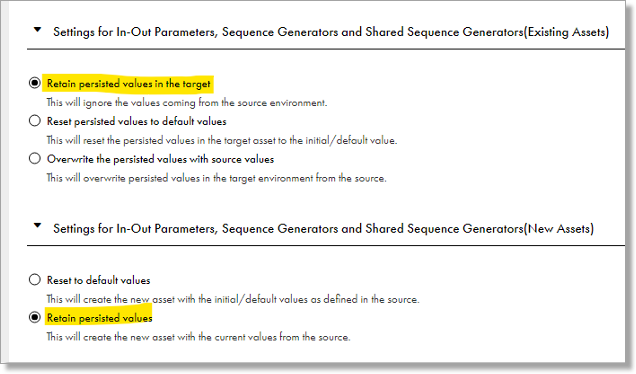
- On the import screen select the following values for in and out parameters:
- In the Review Locations section, select your folder in the Target Project 1 dropdown.
- In Review Connections set Target Connection 1 as your Rest V2 connector for Prelaunch setup in the step Rest V2 connector setup in Informatica.
- Set Target Connection 2 as your Sandbox Salesforce Connector.
- In the Review Runtime Environments section, select your Target Runtime Environment.
- Click Test in the top right corner to make sure the import parameters are correct.
- If it shows successful, click Import in the top right corner.
Setting Up Informatica Mappings and Sandbox Testing
- If the imported mappings do not show in your desired folder, you will need to move them there.
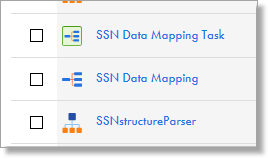
- You should see the following 3 mappings:
- Click the SSN Data Mapping, which opens the mapping.
- Click APISource.
- In the Properties section, click Source.
- For Connection, select your REST V2 connection for prelaunch.
- For Operation, click Select, and choose the GetSSN2 object.
- Click Save in the top right corner.
- Under Request Options configure the Request Message
{
"x-api-key" : "InsertValueForPreLaunchAPIkey"
}
- Click Save.
- Click Field Mapping within the source.
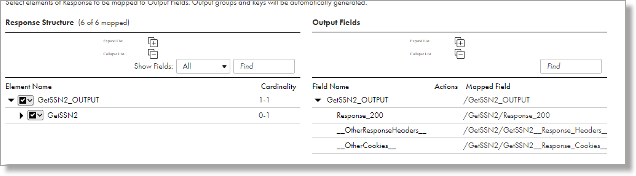
- Under Response Structure, map all the descendants of the Element Name GETSSN2_OUTPUT.
- The result should look like below:

- Click Save.
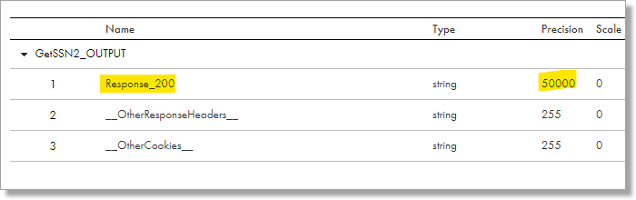
- Next, click fields and change the precision value of the field Response_200 to 50000:

- Click Save.
- Click Java transformation.
- Click Java under Properties.
- Select your runtime environment in the top right corner.
- In the Java code, under Helper code, change the following:
- filePath: this should be the path to your key file, similar to “C:\\Informatica\\CAS\\dropbox\\privateKeyFile.txt”. Note: Double slashes are required for the file path.
- passphraseText: If your private key has a passphrase then that value should be captured here. If it does not then you can leave it blank:

- After making this change you must compile the Java code by clicking on Compile in the top right corner of the Properties screen.
- If there are no errors based on the changes you made, the compilation results were successful.
- Click Save.
- Run a Preview on the Java Transformation. The result should look like below:
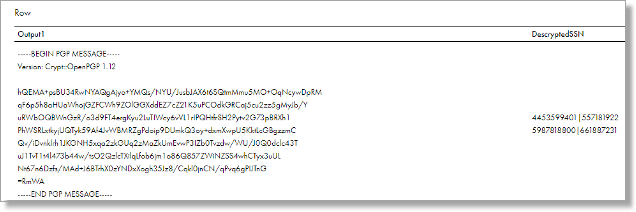
- This shows that the decryption process was successful.
- Click the Lookup Transformation.
- Under Properties > Lookup Object, change the connection to reflect your Sandbox Salesforce connector.
- Click Save.
- Click Target.
- Under Properties > Target, change the connection to reflect your Sandbox Salesforce Connector.
- Click Save.
- Close the mapping.
- Edit the SSN Data Mapping Task.
- Verify your Target value points to your Sandbox Salesforce connection.
- Verify your Input Parameters are validated.
- Click Save.
- Run the SSN Data Mapping Task.
Note: applicants must exist in the sandbox environment before running this task.
- Login to your Sandbox Salesforce environment and check the applicants for which you expected to see SSN.
Moving to Production
- Copy over the following tasks from your Sandbox testing folder in Informatica to your production folder:

- Click the SSN Data Mapping to open the mapping.
- Click APISource.
- In the Properties section, click Source.
- For Connection, select your REST V2 connection for Production.
- For Operation, click Select and choose the GetSSN2 object.
- Click Save in the top right corner.
- Under Request Options, configure the Request Message:
{
"x-api-key" : "InsertValueForProductionAPIkey"
}
- Click Save.
- Click Field Mapping within the source.
- Under Response Structure, map all the descendants of the Element Name GETSSN2_OUTPUT.
- The result should look like below:
- Click Save.
- Click the fields and change the precision value of the field Response_200 to 50000:
- Click Save.
- Click Lookup Transformation.
- Under Properties > Lookup Object, change the connection to the connection for your Production Salesforce connector.
- Click Save.
- Click Target.
- Under Properties > Target, change the connection to the connection for your Production Salesforce Connector.
- Click Save.
- Close the mapping.
- Edit the SSN Data Mapping Task.
- Verify your Target value points to your Production Salesforce connection.
- Verify the Input Parameters are validated.
- Click Save.
- You can now include this mapping task in your Linear flow that runs the other tasks to load Contact/Application/Enrollment History etc. The SSN task should be the last task to run in such a linear flow.
- Continue post-launch monitoring.
Cycle Over Cycle Changes
- Cycle over Cycle the User Identity ID retrieved in the step Retrieving Your User Identity ID does change.
- You must repeat the steps documented under Retrieving Your User Identity ID to get the User Identity ID corresponding to your new cycle.
- Edit the ProdSSNinformaticaSwagger.json file found in your CAS\dropbox folder on the Informatica Server.
- For the line /user_identities/[user_identity_id]/social_security_numbers, replace the value with the user identity id for your new cycle.
- Save the ProdSSNinformaticaSwagger.json file.
Frequently Asked Questions
|
Question |
Answer |
|---|---|
What is the trigger for the SSN to be included in the export? |
Only applications that have been submitted will have an SSN delivered in the encrypted export. The following statuses make an application eligible for SSN encyrption:
|
| Does the SSN keep getting sent so that the file is cumulative? | Yes – the SSN encrypted file is cumulative and will always include all applicants’ SSNs for the given organization and CAS/cycle. |