
Migrating Decisions from Third-Party Software to WebAdMIT
If you're using a third-party software and you'd like to transfer its decisions to WebAdMIT, you can do so using the WebAdMIT data migration process. This process uses a Python script to move data to custom fields in WebAdMIT. Note the following:
- If you're migrating decisions from Slate to WebAdMIT, see the Migrating Decisions from Slate to WebAdMIT article.
- If you're migrating decisions from TargetX to WebAdMIT, see the Migrating Decisions from TargetX to WebAdMIT article.
- If you're migrating decisions from Outcomes to WebAdMIT, see the Mirgrating Decisions from Outcomes to WebAdMIT article.
- If you're migrating decisions from any other system, review the guidance below.
For guidance on migrating other data, see Migrating Data from Third-Party Software to WebAdMIT.
Overview
If you'd like to transfer decisions to WebAdMIT, you can do so using the WebAdMIT data migration process. This process uses a Python script to move decisions data from your third-party system to update decisions in WebAdMIT.
This works by following these steps:
- You export a CSV file to an SFTP location.
- The Python script picks up the CSV file and uses the WebAdMIT API to update decisions in WebAdMIT.
- The script archives the file for data retention and auditing purposes.
Prerequisites
To set up this migration process, you'll need to have the following in place:
- A Windows server to host the Python script. To set up the server, you'll need to:
- Establish an account with admin rights on the server.
- Install Notepad++ on the server to edit the Python script.
- Install Pythonon the server that hosts the script.
- Optional: If the SFTP server and the Python script are on two different servers, you'll need a script or batch file to move the data from the SFTP to the script server.
WebAdMIT User Identities
Retrieving Your User Identity ID
You can retrieve your User Identity ID in two different ways, either with or without Postman.
Retrieving Your User Identity ID with Postman
To use Postman to retrieve your User Identity ID, follow these steps:
- Download the WebAdMIT API collection (updated 9/22/25).
- Download the WebAdMIT API Prelaunch environment and the WebAdMIT API Production environment (updated 9/22/25).
- From your Workspace, select the Collections tab and click Import.

- Select the WebAdMIT API collection and WebAdMIT API environments from your computer. It will automatically import. You should now see a collection created in the Collections section and an environment created in the Environments section.
- Click Environments, then the WebAdMIT Prelaunch environment. Add the API key you generated for your WebAdMIT account to the environment.

- Repeat step 5 for the production environment.
- Click Collections, then in the WebAdMIT API Decisions grouping, select GET User Identities. In the dropdown in the upper right corner, select your WebAdMIT API Prelaunch environment.
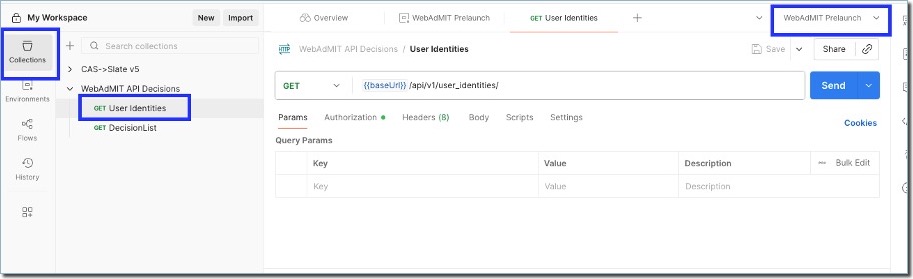
- Click Send to retrieve the User Identities.

- Copy the number after “id” for the CAS and cycle you want your applicant decisions updated and add this number to your environment in the “UserIdentityID” variable.

- Make note of the value for cycle. You will need to insert this value into a query (e.g., "2026 - 2027" with spaces surrounding the dash) so the export includes only applicants for the appropriate application cycle.
- If the API call fails, it will return a status code of 401. This indicates that the user is not authorized to access the API. Check the user’s permissions in WebAdMIT and verify that the user has the correct organization and program assignments.
Retrieving Your User Identity ID without Postman
To retrieve your User Identity ID without using Postman, follow these steps:
- Use CURL or POSTMAN to make the below API calls:
- PRODUCTION
$ curl -n https://api.webadmit.org/api/v1/user_identities \
  -H "x-api-key: <ENTER YOUR API KEY>"
- PRELAUNCH
$ curl -n https://prelaunch.webadmit.org/api/v1/user_identities \
-H "x-api-key: <ENTER YOUR API KEY>"
- Make sure to use the correct API Keys for PRELAUNCH and PRODUCTION.
- A successful API call should generate a status code of “200” with the following example response body:
{
"href": "/api/v1/user_identities",
"user_identities": [
{
"id": 42,
"type": "Admissions User",
"association": "SOPHAS",
"institution": "Demo University",
"organization": "Demo University School of Public Health",
"cycle": "2014 - 2015"
}
]
}
- Make note of the number after "id":. Corresponding to the cycle for which you want your applicant decisions updated, this is the identity ID and is needed for prelaunch and production. This “id” is needed to retrieve the Decision IDs in the next section.
- Make note of the value for cycle. You will need to insert this value into a query (e.g., "2026 - 2027" with spaces surrounding the dash) so the export includes only applicants for the appropriate application cycle.
- If the API call is unsuccessful, then it will return a status code of 401. This means the user is not authorized to gain access to the API. Verify the user’s permissions in WebAdMIT and ensure the user has the correct organization and program assignments.
Retrieving Decision IDs in WebAdMIT
You can retrieve the Decision IDs in WebAdMIT either with or without using Postman.
Retrieving Decision IDs with Postman
To use Postman to retrieve the Decision IDs, follow these steps:
- In Collections, under the WebAdMIT API Decisions grouping, select GETDecisionList.
- Ensure that the correct environment is selected (prelaunch or production) in the upper right corner and click Send.

- Note all the IDs as they are listed one after the other. You will need the IDs to build the export.
Retrieving Decision IDs without Postman
To retrieve the Decision IDs without Postman, proceed as follows:
- Make the following API calls to retrieve decision IDs in WebAdMIT. The examples below are for production WebAdMIT. To use the below code for prelaunch, please use the following base URL:
https://prelaunch.webadmit.org - Retrieve the Decision ID by making the following call:
$ curl -n https://api.webadmit.org/api/v1/user_identities/:<ENTER USER_IDENTITY_ID>/decisions/
 -H "x-api-key: <ENTER YOUR API KEY
- A successful API call should generate a status code of “200” with the following example response body:
{
  "href": "/api/v1/user_identities/1/decisions",
  "decisions": [
    {
      "id": 42,
      "name": "Offer Accepted"
    }
  ]
}
- Note all the IDs as they are listed one after the other. You will need the IDs to build the export.
Export Configuration
To configure the export:
- Ensure that the Program Unique Identifier String is mapped in the source database.
- When loading data into a database using the CAS API, you will need to create a new field to store the Program Unique Identifier String and map it to progMate.progSele0.uniqueIdentifier.
- If you are loading application data from WebAdMIT, and you are not already loading the Program Unique Identifier String (in WebADMIT the field is called Program ID (for WebAdMIT API) (program_id), add a new field for CAS Program Unique Identifier String and map it to program_id.
- Create an export in the source database. The custom field IDs retrieved previously will be needed for this step. The script expects the exports in the query in the following order:
- CAS ID
- Program Unique Identifier String (field mapped in Step 1)
- Cycle
- Association
- Decision
The value of the cycle must correspond with the cycle as it appears in WebAdMIT (e.g., "2026 – 2027", with spaces surrounding the dash). Enter the CAS name for the Association field (e.g., PTCAS). The name of the CAS should match the “association” found with the User Identity. Decisionvalues should correspond with the decision IDs available in WebAdMIT.
- The script expects a CSV (Comma Separated Format) and the file should contain headers. See the WebAdMIT Decisions Template for an example file.
Python Configuration
Next, you'll need to complete several steps involving Python. This includes installing Python, editing its script, creating an executable, and other configuration and testing.
Installing Python
You'll need to install Python on the server that will be hosting the script. To do so:
- Download the software from https://www.python.org/downloads/.
- Download the latest release for Windows (based on whether the server is a 32-bit or 64-bit).
- Once downloaded, run the Python install file as an administrator.
- This opens an installation window:

- Click Customize Installation to display Optional Features:

- Ensure that pip is selected.
- The next page displays advanced installation options:

- Select the path to install Python and click Install.
- Once Python is successfully installed, restart the server.
- Once restarted, navigate to your system environment variables to ensure Python is appended to the end of the PATH variable. If it is not, you will need to add it. The path should be the path to the Python executable, such as C:\Users\username\AppData\Local\Programs\Python\Python310
-
To test that your Python installation was successful and added successfully to your PATH variables, run Command Prompt as an administrator, type python, and hit enter:

- If the response is similar to “Python is not recognized as an internal or external command”, it could mean that the PATH variable is not correctly set up or your Python was not correctly installed.
Editing the Python script
- Download the Python script and config.json file from Integration Help Center and place it on the windows server meant to host the script.
- On the server, create a folder called DecisionsToWebAdMIT.
- Create a sub-folder called Archive.
- Place the Python script and the config.json file in the DecisionsToWebAdMIT folder.
- The CSV file must also be dropped in the DecisionsToWebAdMIT folder.
- Edit the config.json file in the DecisionsToWebAdMIT folder using Notepad++ or Notepad and make the following changes:
- Change the api_key value to your API key for prelaunch or production.
- Change the url_link value to prelaunch or production URL.
- Change working_dir to the full directory path of your DecisionsToWebAdMIT folder. Note that the directory separations use "/".
- Set file_name to the name of the incoming CSV file.
- Save the file.
Creating a Python executable
Next, you'll need to create a Python executable that will run the script. To do so:
- Open Command Prompt as an administrator.
- Run the following command:
pip install pyinstaller- If you get an error message that pip is not recognized as an internal or external command, this means your Python installation did not include the pip package.
- The article How to Install PIP on Windows provides guidance on installing pip.
- Once installed, type pip –version in Command Prompt to verify if the installation was successful.
- If pip installation was successful, rerun the
pipinstall pyinstallercommand.
- Run the following command:
pip install requestsand ensure the requests module gets installed correctly. - If pyinstaller and requests installation was successful, in Command Prompt, navigate to the DecisionsToWebAdMIT directory.
- Type the following command:
pyinstaller --onefile Decisions.pyand press enter. - This command converts the script into an executable.
- The executable is found in the \DecisionsToWebAdMIT\dist\ folder.
- Copy the config.json file from the DecisionsToWebAdMIT folder to \DecisionsToWebAdMIT\dist\ folder.
Testing the executable
The following should be completed for prelaunch WebAdMIT:
- Navigate to the \DecisionsToWebAdMIT\dist\ folder in Windows Explorer and double-click main.exe to open a running Command Prompt window.
- If the Command Prompt window closes immediately after opening, then there is an issue with your Python code or the config.json file. In that case, navigate to the DecisionsToWebAdMIT \dist folder and check the main.log file. If this file shows HTTP connection errors, this could mean that your API key, URL, or Cycle is incorrect.
- Edit the config.json file to make sure the file name, directory paths, API keys, base URL, and cycle are correct.
- Once verified, run the executable again.
- If the executable continues to run, this means the JSON file is correct.
- Drop a CSV export to the DecisionsToWebAdMIT folder. The file will be picked, processed, and archived by the executable.
- Navigate to the Archive folder under DecisionsToWebAdMIT\Archive folder. You will see a timestamped_yourfilename.csv file.
- Open the file, and you will see HTTP status codes printed in each row.
- Successful loads would have a status code of 200, while unsuccessful loads would have a status code of 404 or 422.
- The 404 status code could indicate several issues, including the Decision ID not existing in WebAdMIT, incorrect authentication methods (api_key), or CASID not found in WebAdMIT.
- If error 422 is thrown, the applicant has already has a local status associated with their record.
- Note that Decision Codes in WebAdMIT can only be updated via API for applicants that do not already have a Local Status associated with them.
- If all rows show a 200 for each field, then the next step is to check prelaunch WebAdMIT to ensure the decision data was correctly applied in WebAdMIT.
- If all looks good, then close the running executable command prompt window and delete the archived file.
Setting the Python Executable as a Windows Service
To keep the script running indefinitely, the following steps are required to set up the Python executable as a windows service. For this purpose, you'll need to install a tool called NSSM (Non-Sucking Service Manager).
- On your web browser on the Windows server meant to host the script, navigate to https://nssm.cc/download
- Download the latest release of NSSM which is nssm 2.24.
- This should download a zip file called nssm-2.24.zip.
- Extract the zip file in the DecisionsToWebAdMIT folder.
- Open Command Prompt as an administrator, and within Command Prompt, navigate to DecisionsToWebAdMIT\nssm-2.24\win64 (or win32, depending on your windows server).
- Run the following command by replacing the paths to your python executable and python (.py) file:
nssm install "DecisionsToWebAdMIT"
"PathTo\DecisionsToWebAdMIT\dist\Decisions.exe"
"PathTo\DecisionsToWebAdMIT\Decisions.py"
- If the service is successfully installed, it displays the following message in command prompt Service "DecisionsToWebAdMIT" installed successfully!
- Open services.msc in Windows as an admin and locate the DecisionsToWebAdMIT service.
- Start the DecisionsToWebAdMIT service.
Testing the DecisionsToWebAdMIT Service
- To test the service, navigate to Testing the executable and perform steps 6 to 14.
- If the test is successful, then stop the DecisionsToWebAdMIT service in services.msc and make sure to delete the archived file.
- After all testing is completed and preparations are being made to move to production then perform the following steps to remove the service:
- Open Command Prompt as an administrator, and within Command Prompt navigate to DecisionsToWebAdMIT\nssm-2.24\win64 (or win32 depending on your Windows server).
- Run the following in Command Prompt:
nssm remove “DecisionsToWebAdMIT” - A dialog box will open to ask if you want to remove the service, click yes, and it should say the service was successfully removed.
- Open services.msc as an admin and refresh the services to ensure the DecisionsToWebAdMIT service is not in the list of services.
Moving the Script to Production
- If all testing has been completed in the prelaunch environments, then it is time to prepare the script for production use.
- Navigate to the DecisionsToWebAdMIT folder in Windows Explorer.
- Delete the following file and folders:
- Build folder.
- Dist folder.
- Main.spec file.
- Edit the config.json file found in the DecisionsToWebAdMIT folder.
- In the file, change the API key, URL, and cycle to production values.
- Save the file.
- Perform the steps found in Creating a Python executable section.
- Perform the steps found in Setting the Python executable as a Windows Service section.
- Start the DecisionsToWebAdMIT service.
- Drop a CSV file to the DecisionsToWebAdMIT folder.
- Check the archived file for status codes for a successful load.
Cycle Over Cycle Changes and Special Considerations
Review the following information regarding maintaining this process from cycle to cycle, and other considerations.
Non-Overlapping Cycles
It is important to note that Decision IDs in Prelaunch and Production WebAdMIT change cycle to cycle. In preparation for the next cycle, complete the following steps:
- Revisit the Retrieving the Decision IDs in WebAdMIT section to grab the new Decision IDs.
- Update the decision field with the new Decision IDs.
- In the export, update the Cycle value to the new years (e.g., "2026 – 2027", with spaces surrounding the dash).
- The DecisionsToWebAdMIT service may continue to run; no changes are needed to the script or the config file.
Overlapping Cycles
If a new cycle opens while the previous cycle is still active, a new query, translation table, and schedule will be required. Complete the following steps to add a new cycle:
- Copy the existing export and update the cycle (e.g., "2026 – 2027", with spaces surrounding the dash).
- Copy the existing decision Translation Table and update the IDs for the new cycle.
- Add a schedule to the new cycle’s export that runs at a different time than the existing export. The DecisionsToWebAdMIT service is looking for a specific file name, and while both queries can export the same file name, they cannot be on the SFTP at the same time without overwriting each other.
- The DecisionsToWebAdMIT service may continue to run; no changes are needed to the script or the config file.
Multiple CASs
If you have multiple CASs that need this script in WebAdMIT, you may run the same script with different exports that have the appropriate information configured. The file name will need to be the same across all exports. Have the exports run to the SFTP at different times.