Designing Workflows
In Outcomes, you can design workflows using the Workflow Automation feature. Workflows are sequences of actions that should occur at different stages throughout the application cycle. Workflow Automation allows you to build rules to launch desired actions when specific conditions are met. Workflows can be set to begin when a specified action has occurred, or they can be launched manually.
Workflows differ from Automation Rules in that workflows are run whenever your desired conditions are met. The scheduled updates that occur through Automation Rules can be configured to occur at a specific time and with the desired frequency.
You can design workflows to do many different things related to your applications or contacts. For example:
- Change the Phase on a specific set of applications
- Send an email to a group of applicants who've met some milestone
- Update internal fields on applications to indicate new information

Building a Workflow
To begin creating your workflow:
- Navigate to the Settings Menu and click Workflows in the Application Review section. For workflows related to your contacts, click Contact Workflows in the Contacts section.

- Here you can review your existing Workflows. Click the plus sign at the top right to begin working on a new Workflow.
- Name the workflow and click Add Trigger to begin configuring the Workflow.

- Select the type of trigger to add.
- Click the plus sign to add a step.

- Choose what type of step should take place at this point in the workflow.

- Next, indicate the specific step that should occur. Choose Decision if your step is dependent on some other conditions.

This creates a Yes/No path, allowing you to insert your desired steps in either branch. Click the plus sign on either side to add your step.

- If you're adding an Action, select from the displayed list.

- Continue adding steps as desired.

- Use the Wait step to add a delay. This is useful to provide yourself a buffer in case you need to stop the next action from occurring. For example, if your next step is to send an acceptance letter, you might add a delay of one or more days to allow yourself an opportunity to catch any inadvertent acceptances.
- To remove a step, hover over it and click the X.

- When you're done adding steps, click Save Changes at the top right.
Running Workflows
After you enable a Workflow, it runs automatically when your trigger occurs. Newly enabled Workflows do not run retroactively, so they will not impact applications that previously met the trigger criteria. You can also launch Workflows manually on your applications as needed. To do this:
- Navigate to the desired application.
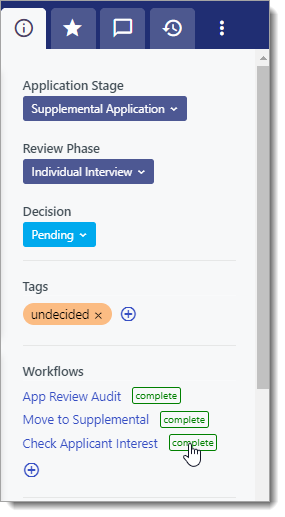
- Open the information pane and click the plus sign in the Workflows area.

- Select which Workflow you'd like to run on this applicant.
- Once the Workflow has started running, it appears in the Workflows area along with its status.
Reviewing Workflows
If you've started running Workflows, you can review them to determine which actions have taken place on each application, and to ensure that they have run as expected. You can do this from any application. To do so:
- Navigate to the desired application.
- Open the information pane, and review the Workflows area.

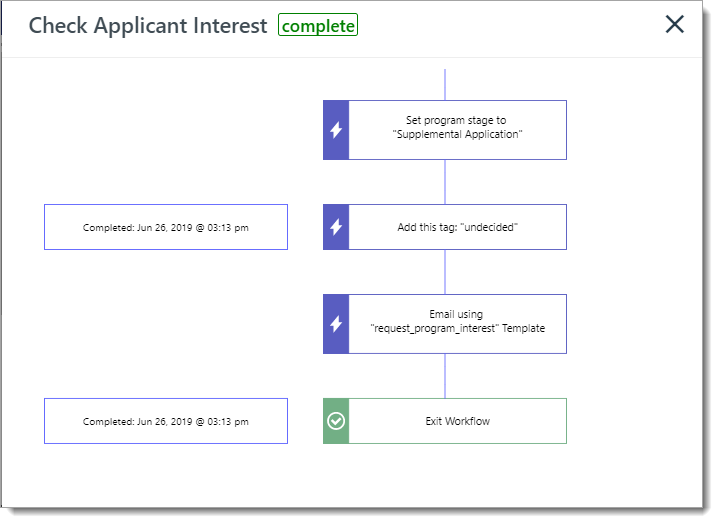
- To see what actions have taken place, click a Workflow.

- From here, you review each step. Hover over a step to see when it was completed.
Sample Workflow
In the following example, the program has created a Workflow to handle accepted applicants.

- Decision set to Accepted. When an Outcomes user changes an applicant's decision to Accepted, the workflow is initiated.
- Wait for Two Days. This Wait step is present to provide a buffer before the next actions are kicked off. Without this, if an Outcomes user were to accidentally set an applicant's decision to Accepted, the next steps would occur immediately. Depending on the circumstances, the wait step can be set for a number of minutes, hours, or days.
- Set Program Stage to Acceptance. In Outcomes, Program Stages allow you to establish what actions can occur on an application, and what applicants can interact with during different periods of the application process. Our example stage has been configured to provide the following items:
- A welcome message for applicants on the Application Portal, using the Content item.
- An acceptance letter, using the Documents item.
- A fee collection, through the Submit item.

- Email using Accept Template. This step sends an email to the applicant. In this case, the software sends an email informing the applicant they've been accepted.
- Exit Workflow. This step ends the workflow.
- Active Toggle. Use this toggle to turn the workflow on or off. With the workflow turned off, setting a decision to Accepted won't initiate the following actions. While the Workflow is disabled, it can still be manually launched as described above.