Managing Your Outcomes-Based Programs
In Outcomes, Programs are designations, or opportunities to which candidates can apply. Administrators in Outcomes can create programs and configure them as needed. Note that if you're a CAS user, your programs are imported from the Configuration Portal, so you won't need to create them, but you may still need to work with your Application Stages.
Creating Programs
By creating Programs in Outcomes, you can establish designations that applicants can select.
To create a Program:
- Navigate to the Application Setup area of the Settings menu and click Programs.

- From the Programs menu, you can see all of your existing programs. Click the plus sign to create a new program.
- Enter a name and description for your program. The Program Public Name is the name that is visible to applicants.
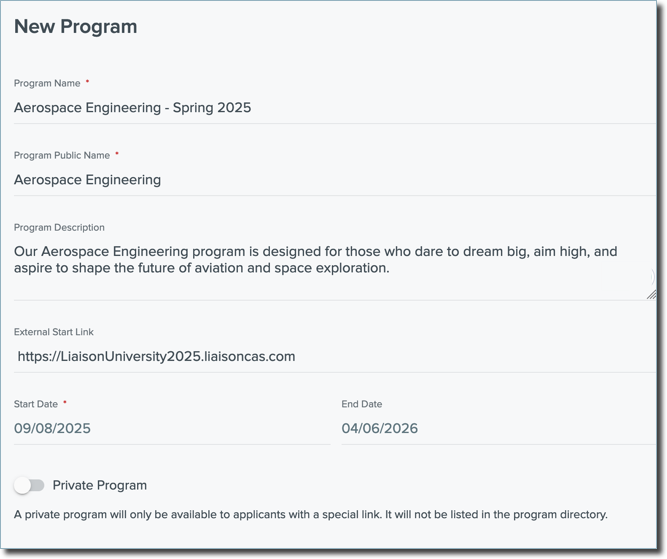
- Where applicable, enter an External Start Link. This is the link you want applicants to use to apply to your program. See Working with Your External Start Link for more information.
- Enter your program's start date and, if applicable, its end date.
- To create an unlisted program that can only be accessed by applicants to whom you provide a link, enable the Private Program option.
- Click Create Program to move to begin configuring the program's other settings.
Working with Your External Start Link
In your Program Settings, use the External Start Link field to indicate where applicants should be directed when they want to apply to your program. The link you add here is what will open when applicants click Apply, Continue, or Open Program External Link in your Student Portal when they are reviewing the program.
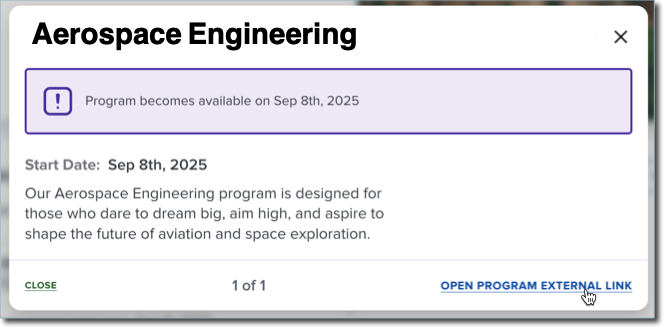
Note: For CAS programs, in the External Start Link field, paste the link to your CAS application. You may wish to add the deep link provided in the CAS Configuration Portal. If you need to add an External Start Link for many programs, contact support to have the fields populated automatically.
Configure Program Settings
Once your program has been created, you can configure more of its settings. From the Edit Program page:
- Configure your Application Stages.
- If your program is private, a link appears in the Settings area. You can provide this link to the applicants you wish to invite to apply. Use the applicable sliders to make the program public or to archive it. Archived programs are not listed and cannot be applied to.

- Click Edit near Program Properties to edit or establish the settings for each of your Program Properties. Program Properties are items that can be configured for each of your programs. Administrators can add or edit the available Program Properties.
- Use the Checklist to establish a list of items that should be completed by applicants to this program. Click Edit to work with an existing Checklist, or +Add Checklist to create a new list.
- Enter a Start and End Date, and select a Deadline Type. Click Update to keep your changes.

Add Checklists to Your Program
While configuring a program or Stage Template, you can add Checklists. Checklists allow you to provide applicants with a series of requirements they'll need to complete while applying to your program. You can also add Content Templates that display important information to applicants. To begin:
- Go to an existing Checklist or click +Add Checklist.
- Click Add Item to include an item to request from applicants.
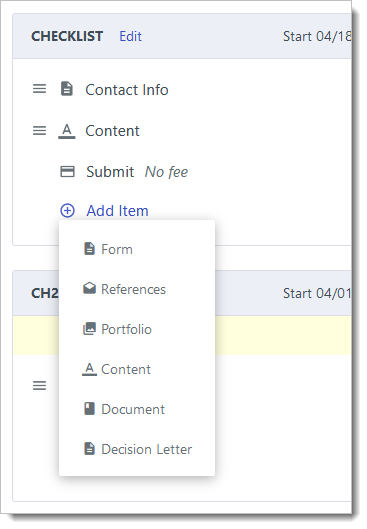
Options include:- Form - use this option to include an applicant form to collect additional applicant information.
- References - use this to include reference requests. This requires the setup of the Reference Portal.
- Portfolio - use this option to allow applicants to submit multiple items simultaneously as a portfolio. Options include images, videos, audio files, and documents.
- Content - use this option to add instructional text for applicants in between other program steps.
- Document - use this option to request a PDF document. If other document types are needed, select Portfolio instead.
- Decision Letter - use this option to present a decision letter to your applicants at the appropriate time. To use this, you'll need to set up a decision letter and link it here.
- Add and configure your Checklist items.
- Where needed, you can include additional Checklists by clicking +Add checklist.
- If desired, click +Add content block to include a previously created Content Template here.
Removing Older Programs or Cycles
Depending on how your organization is configured in Outcomes, you may want to hide programs using the archive feature. This can be useful if you have programs that are for a previous cycle or are otherwise no longer relevant. When you archive a program, the program and its applicants are no longer listed in Outcomes. It will no longer be available in filters on the Applications Grid, the dashboard, reports, etc.
To archive programs:
- Click Programs in the Application Setup section of the Settings Menu.
- Find the program that you'd like to remove and click its name.
- On the Edit Program page, find the Archive toggle in the Settings area.

- After enabling the Archive option, click Save Changes.
To make the program and its applicants visible again, return to the Edit Program page and disable the Archive option.
Application Stages
Application Stages can be established to separate the actions that take place at different times during the application process. For example, you can create stages for Pending Review, Supplemental Application Complete, Invited for Interview, Decision Made, etc. During each Application Stage, you can enable different things. For example, you may enable specific forms for applicants to complete on their portal once they reach the applicable stage (e.g., you may enable applicants to complete an Interview Schedule form once their application has entered the Invited for Interview stage.) Or, you may enable some reviewers to only see applications that are currently in a specific stage.
To create a new Application Stage for a given program, navigate to its Edit Program page. Here you'll see the current stages and the content associated with each one. To add a stage:
- Click the plus sign in the Application Stages area.

- Where applicable, choose from any of your Stage Templates, or click +Custom Stage to create a new Stage from scratch.
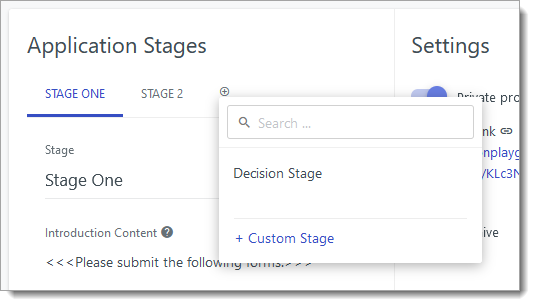
- Rename the stage, and begin adding content as desired. The content you add under each stage is only accessible to the applicants in that stage.
- Once you have multiple stages, use the Applicants start on the dropdown to select which stage applicants should start with.

- Click Save Changes to keep your new settings.
Building Stage Templates
Rather than building Application Stages from scratch each time, you can build Stage Templates. Stage Templates are a set of Stage configurations that you establish that can be applied to your programs. For example, you may have one or more Checklists or Content Blocks that you'd like to use with several programs. With this feature, when creating new programs, you can save time by selecting a Stage Template to populate your desired settings. You also can have your Stage Templates automatically added whenever you create a new program.
To build a Stage Template:
- Navigate to the Settings Menu and click Stage Templates.
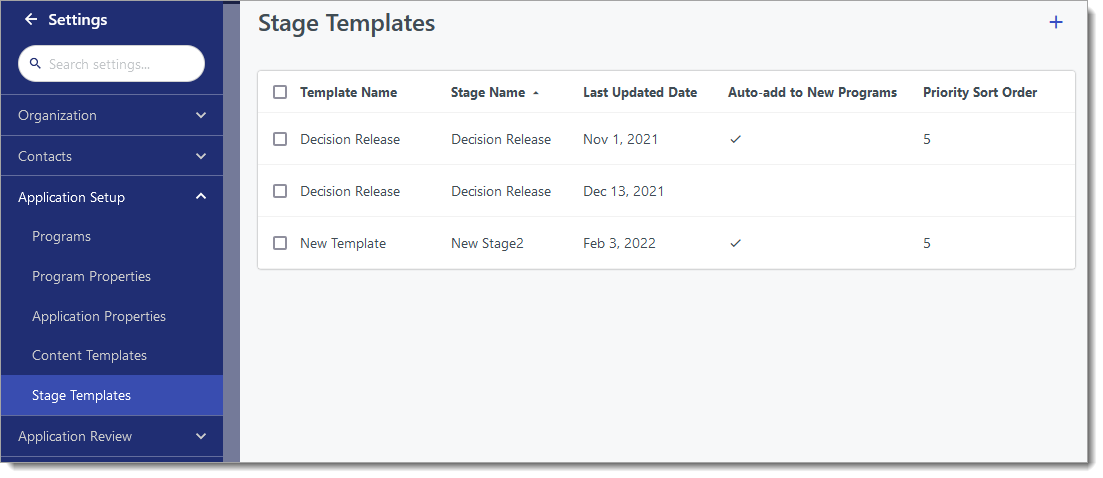
- Click the plus sign to create a new Stage Template.
- Complete the Template Name and Stage Name fields.
- Configure your Checklist items.
- To have this Stage Template automatically added to programs you create going forward, click the Auto-add to New Programs toggle. Then, determine where this Stage will be sorted in relation to other Stages by selecting a priority. For example, if this Stage should always be last, click 5. Stages with the same priority are sorted alphabetically.

- When you're done configuring, click Save Changes.
Working with Checklist Items
When configuring programs, you can establish a checklist where applicants are required to complete important steps during each Application Stage. If your program works with Application Stages and the Outcomes Applicant Portal, you can configure this checklist.
Note: If you only want to create a list of your program requirements and mark them off as you receive them from applicants, you can work with Tags or Application Properties instead.
If you are working with Application Stages and configuring your programs, each item you add to your Checklist becomes a Program Step. There are several item options available.
Adding Forms
From the Checklist area of the Edit Program page, you can add Forms to be completed by your applicants as a Program Step. To associate a Form with your program:
- From the Checklist area of the Edit Program page, click Add Item.

- Click Form.
- Enter a name for this checklist item, and click Choose Form to select which Form you'd like to add. The Forms listed here are those that you've previously created. You can also click Create New Form to build a new form from scratch.
- Check or Uncheck the Step Required checkbox to establish whether applicants will be required to complete this step to apply to your program.
- Once you've selected your desired Form, you can enter instructions to associate with this Program Step in the Instructions area.
- If desired, enter a JavaScript condition.
- Click Update to save your changes.
Requesting References
From the Checklist area of the Edit Program page, you can add Reference requests for your applicants as a Program Step. For References to be available here, you'll need to first configure your Reference Portal. To add a Reference request:
- From the Checklist area of the Edit Program page, click Add Item.

- Click References.
- If your Reference Portal has been configured, you're guided through adding references for the applicants to this program.
Requesting a Portfolio
From the Checklist area of the Edit Program page, you can add a Portfolio request for your applicants as a Program Step. With Portfolios, you can request that your applicants submit several file types all at once. To request a Portfolio:
- From the Checklist area of the Edit Program page, click Add Item.

- Click Portfolio.
- Enter a name for the Portfolio program step, and choose the minimum and maximum number of media types you'll accept.

- Add instructions to guide applicants, and check off your accepted media types.
- Click Formats & Sources to select which file formats are acceptable for each media type. Applicants can only upload files that match the checked formats.

- When finished, click Add.
Adding Content as a Program Step
The Content option in the Checklist area of the Edit Program page allows you to add instructional text or additional information for applicants in between the other steps. To add the Content item to your Checklist:
- From the Checklist area of the Edit Program page, click Add Item.

- Click Content.
- Add a name and a key for the content.
- Use the Content window to enter what you'd like to be displayed to applicants.

- When ready, click Add.
Requesting Documents
From the Checklist area of the Edit Program page, you can add a Document request for your applicants as a Program Step. With Documents, you can request that applicants submit Personal Statements, CV/Résumés, Test Score Reports, or other document types of your choice. To request a Document:
- From the Checklist area of the Edit Program page, click Add Item.

- Click Document.
- Check the Applicant Supplied box if applicable. Enter a Key for this document. This is used to refer to the document in exports.
- Enter the minimum and maximum number of accepted documents of this type.
- If desired, click Choose Form to associate a form with this document upload. The applicants will need to complete the form to finish this Program Step.
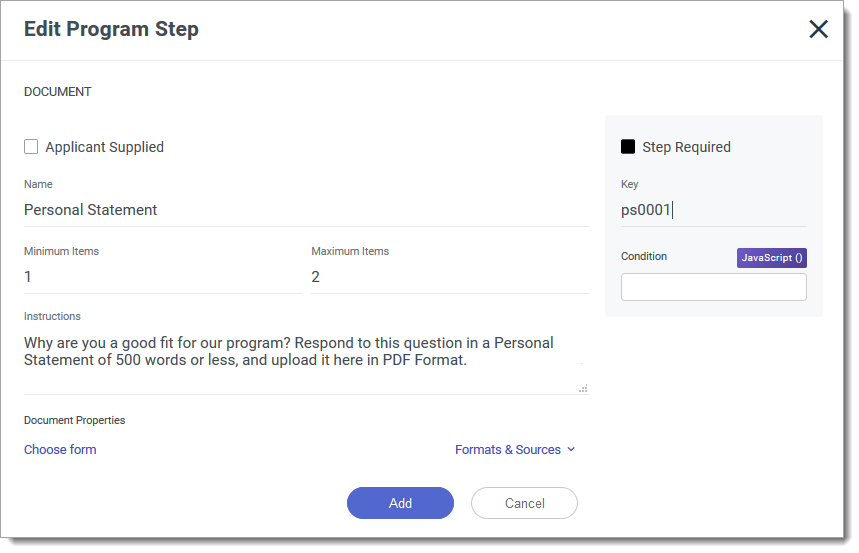
- When ready, click Add.
Adding Decision Letter as a Program Step
You can also add a Decision Letter as a Program Step. Decision Letters allow you to provide applicants with an official letter to inform them of your decision. For Decision Letters to be available here, you'll need to first configure Decision Letters. To add a Decision Letter step:
- From the Checklist area of the Edit Program page, click Add Item.

- Click Decision Letter.
- If desired, edit the Placeholder Content. This is the text that appears to applicants when you haven't generated a Decision Letter for them.

- Click Add to save this step.
Configuring the Submit Step
When you create a Checklist in your program configurations, a Submit step is included by default. With the Submit step, you can display a message to your applicants, send them an email, or request a payment. To configure the Submit step:
- Click Submit.

- Use the Submit Content Template to configure what message displays to applicants once they have submitted.
- If you want to establish a fee, enter its amount in the Fee field.

- To have an email sent to applicants upon submission, enable Send Custom Email On Submit and select which Email Template to want to send.
- Click Update to save your changes.
Tracking Payments Submitted by Applicants
If you've configured the Submit step with a Fee as described above, you can track applicants' payments in your Payment Journal. To do this:
- Click Payments in the System area of the Settings menu.
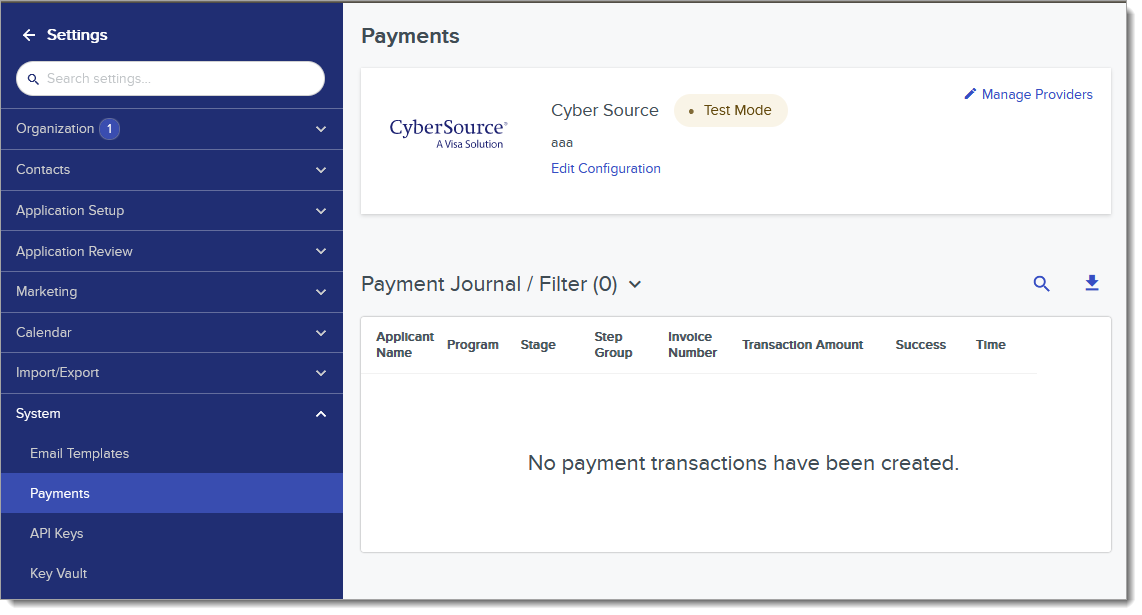
- From here, you can click Manage Provider to create or edit payment providers.
- You can also review the history of payments.

- Use the column headings to sort payments as desired, or use the Filter or Search options to find specific payments.
- Click Export to download a .csv file with your payment history.
Creating Applicant Forms
Applicant Forms are question sheets you create for applicants to complete. In these forms, you can ask your own customized questions. This is useful if you need applicants to complete a supplemental application, consent form, or some other form to provide needed information. These forms can be enabled on the Applicant Portal, so that applicants can complete them all in one place.
To create a Form:
- Go to your Settings menu and click Applicant Forms under Application Setup.

- Review your existing Forms, or click the plus sign to build a new Form.
- Enter a name and key, and click Create Form.
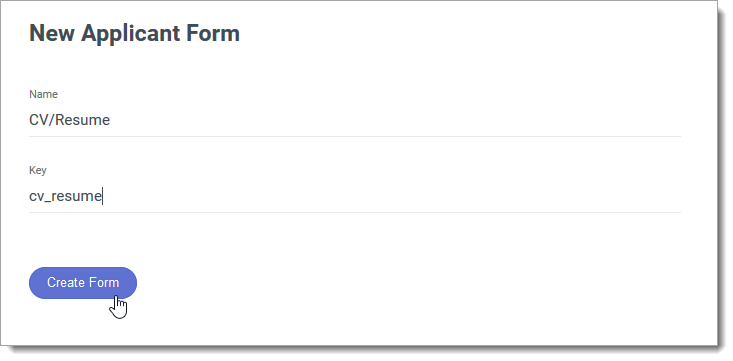
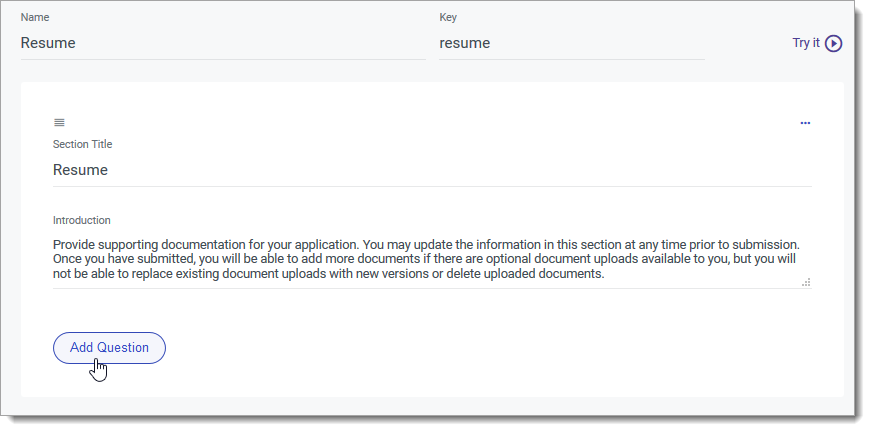
- By default, one section is included, but you can add as many sections as needed. Enter a title for the first section and add an introduction.
- Click Add Question to add a question.
- Enter the question and select a question type.
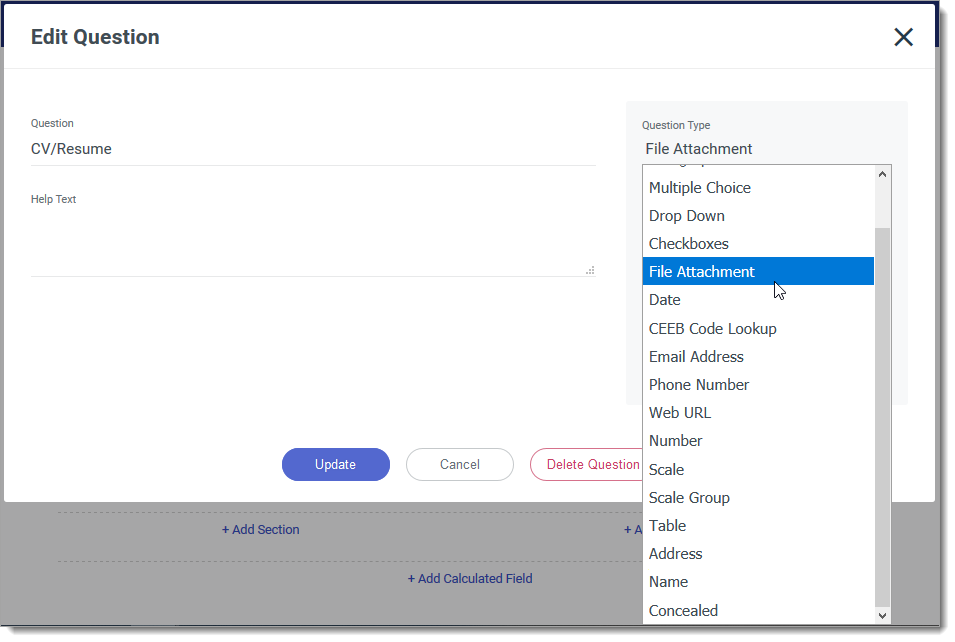
The following question types are available:- Text: Allows applicants to type in a text response. Selecting this option also requires setting the Max Length for a response. Use this option for questions requiring a short response.
- Paragraph Text: Allows applicants to type a paragraph-length reply.
- Multiple Choice: Presents applicants with multiple options to select from. When selecting this Question Type, enter each option individually in the Answer Option area, or add several answer options at once by clicking Paste Options and pasting the desired options in the text box. Each option must be separated by line breaks. Check the Allow Write In option to allow recommender to write in their own response.
- Drop Down: Works the same as the Multiple Choice option, except answer options are presented to applicants in a drop-down menu.
- Checkboxes: Works the same as the Multiple Choice and Drop Down options, except multiple answer options can be selected.
- File Attachment: Requests that applicants upload a file in response to the question.
- Date: Allows applicants to enter a date in response to the question.
- CEEB Code Lookup: Allows applicants to respond with a school name [?].
- Email Address: Allows applicants to respond with an email address.
- Phone Number: Allows applicants to respond with a phone number.
- Web URL: Allows applicants to respond with a URL.
- Number: Allows applicants to enter a numeric response.
- Scale: Allows applicants to rate the applicants on a scale of your choice. Scales can be up to 10. After selecting this option, choose your Scale range and how label will display.
- Table: Allows applicants to complete a table in response to a question. For example, entering their contact information.
- Address: Allows applicants to respond with an address.
- Name: Allows applicants to respond with a name.
- Concealed: This option is for questions that should remain hidden.
Click Add to add your question.
- Continue adding questions as desired.
- You can also separate questions into different sections. To add a new section, click Add Section. Then, add questions to each section as needed.

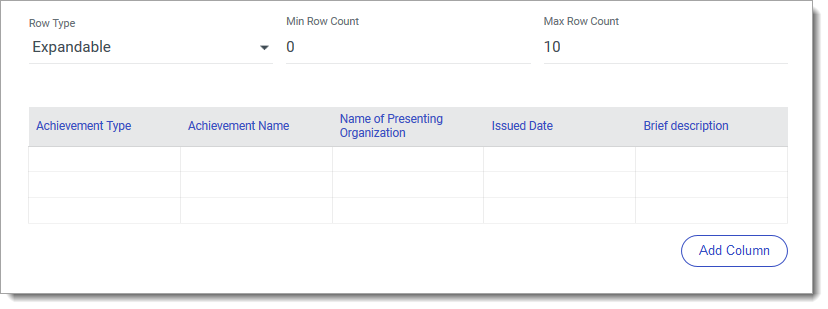
- Click Add Section Table to create a table for applicants to complete. This can be used for applicants to provide information on their Experiences, Achievements, Coursework, etc. Using a Section Table is similar to creating a question using the Table question type as described above. You might choose to add a Section Table if you need to record a lot of information for each applicant, e.g., Colleges Attended. Section Tables also have the benefit of allowing you to customize each column of the table and to specify a key for each column.
- Click Add Calculated Field to create your own internal field for use in calculating applicant data.
- When you're done adding questions, sections, and tables, click Save Changes.
Configuring Forms with Conditional Questions
In some cases, you may want to create forms containing questions that are only visible under certain circumstances. For example, if “Other” is an answer option for a “How did you hear about us?” question, you can create a conditional follow-up question, “If Other, please explain”, that only appears when an applicant selects “Other.”
To create a conditional question:
- You'll first need at least one question that serves as the condition for your conditional question. In the example above, the question How did you hear about us? serves as the condition that determines whether the question If Other, please explain appears.
- Next, add your conditional question. While configuring the conditional question, click Open Condition Builder on the right.
- From the Condition Builder, click Choose Field to select the field that you're using as a condition. Then, configure your condition. If necessary, click +condition to use more than one condition. If you've added more than one question in the Condition Builder, remember to select All of or Any of to indicate whether all (or just one) of the conditions need to be true for the conditional question to appear.
- Click Update to save your condition.
- Back on the Create Question page, once you're done configuring your question, click Add. Click Save Changes to save your form.
Note: if your forms have multiple sections, you can also make entire sections conditional. To do so, click the three dots icon at the top of the section, click Open Condition Builder, and follow the steps described above to configure your conditions.
Creating Content Templates
Outcomes allows you to design sections of content for applicants to interact with. Content Templates become available for use when creating or editing programs.
To create a Content Template:
- Go to the Application Setup section of the Settings menu and click Content Templates.

- From here you can review your existing Content Templates. Click Create Content Template to begin working on a new template.
- Enter a name for the template, then begin designing the template using the HTML Template box. From this area, you can type in your desired text. This can include HTML code, along with merge fields to pull in customized data for each applicant.

- If desired, you can configure the External Data area to include additional content for applicants to interact with. To do so, click Add External Data.
- Enter a key and the URL from which you will pull in data from.

- Click Add Header to create headers to correspond with the imported data.
- Click Transform Template Data to add code to use in adjusting or reformatting the imported data.

- When ready, click Save Changes at the top right.
- Once Content Blocks are created, they can be added to Programs on the Edit Program page by clicking Add content block.