
Creating an Informatica OAuth Connection to Salesforce
To comply with Salesforce’s updated security requirements, you may need to create a new OAuth 2.0 connection between Informatica and Salesforce. This guide walks you through the Salesforce-side setup and links to additional Informatica resources for completing the configuration.
For Salesforce’s official documentation, see Create a Connected App in Salesforce for OAuth.
Important Update
Informatica has confirmed that a plan is in place to support these Salesforce changes. However, guidance on updating existing Connections—or tasks that rely on them—has not yet been released.
We will share updates as soon as more information becomes available. In the meantime, we recommend proactively creating new OAuth 2.0 connections and updating your tasks to use them.

Before You Begin
You will need:
- Access to Salesforce App Manager
- Permissions to create and manage Connected Apps
- Access to your Informatica environment
For full configuration steps and video in Informatica, refer to How to create Salesforce OAuth connection in IICS.
Note: the Salesforce Connected App setup steps are included below for easier reference.
Step 1: Create an External Client App in Salesforce
- In Salesforce, navigate to Setup and search for External Client Apps, then select External Client App Manager.
- Click New External Client App.
- Complete the Basic Information section as required for your organization.
- Enable OAuth by selecting the Enable OAuth Settings checkbox.
Step 2: Configure OAuth Settings
Under API (Enable OAuth Settings), configure the following:
- Callback URL: https://localhost:8443/salesforce/receivecallback
- Selected OAuth Scopes:
- Manage user data via APIs (api)
- Manage user data via a web browser (web)
- Perform requests at any time (refresh_token, offline_access)

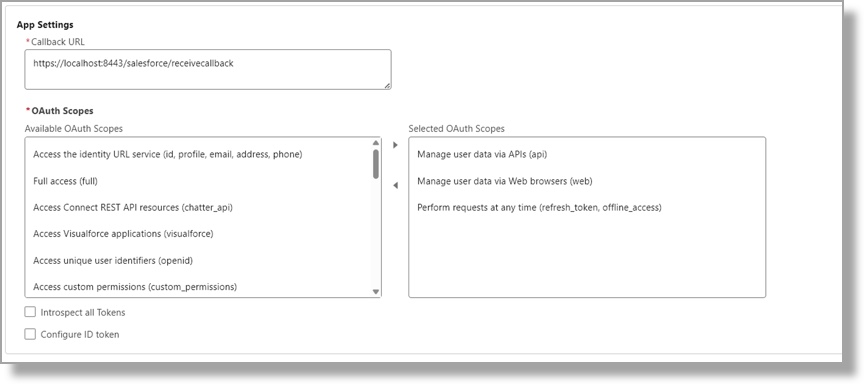
Note: the Security section should already have the required options enabled by default:

Step 3: Save and Edit OAuth Policies
- Click Save to create the Connected App.
- After saving, click Edit on the app details page.
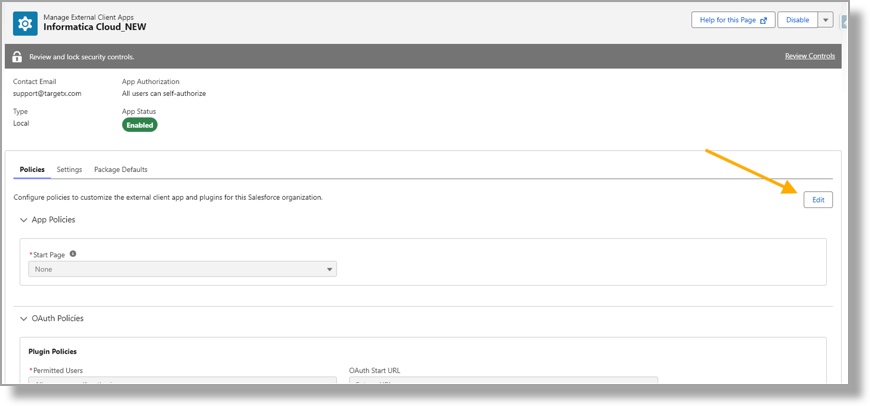
- Scroll to the OAuth Policies section and update the following:
- Permitted Users
- Refresh Token Policy
- IP Relaxation
Note: ensure these settings align with your organization’s requirements, then click Save.
.jpeg?revision=2)
Step 4: Retrieve Consumer Key and Secret
- Navigate to the Settings tab of the Connected App.
- Expand the OAuth Settings section.
- Click the option to reveal the Consumer Key and Consumer Secret.
Note: you will use these credentials in Informatica to complete the OAuth connection setup.

Step 5: Complete Setup in Informatica
Use the Consumer Key and Secret to complete the configuration of your Salesforce connection in Informatica.
For detailed steps and a walkthrough video, refer to Configuring OAuth Connectivity in IDMC CDI Salesforce Connector.