Creating Folders and Templates
Begin by defining Folders for your templates and campaigns. Work with your internal teams to define naming conventions to organize your information. Once you’ve defined your Folders, build your Templates and then Campaigns.
Creating Folders
- Navigate to the Communication Planner tab.
- Click the Folders icon.
- Click the + in the top right.
- Enter a Folder Name and Description.
- Check the boxes for Available to indicate what components this folder can contain.
- Click Add Folder.
Note: folder sizes are currently limited to 15mb. Keep this in mind when saving multiple campaigns and templates to one folder.
Creating SMS Templates
- Navigate to the Communication Planner tab.
- Click the Templates icon, then choose SMS.
- Click the + to create a new SMS template.
- Enter the following:
- Name
- Description
- Folder
- Parent Object - The Parent object is utilized to display available merge fields.
- Message
- To add Merge Fields, click the Add a Merge Field link to display the Add Merge Field page.
- Select the Object and Field you want to merge, then click Add.
- Click Create or Save when you’ve finished.
Note: it is recommended that you include ‘Do Not Reply’ in your SMS message, as messages sent from campaigns are outgoing only at this time. You may also configure automated responses to incoming SMS messages. If you own your Twilio account, use the Twilio article Set up an Autorepsonder with Twilio Studio or contact Twilio support to create an Autoresponse for your users. If TargetX manages your Twilio account, you can put in a support/premier case, and we will assist you with setting up an autoresponse.
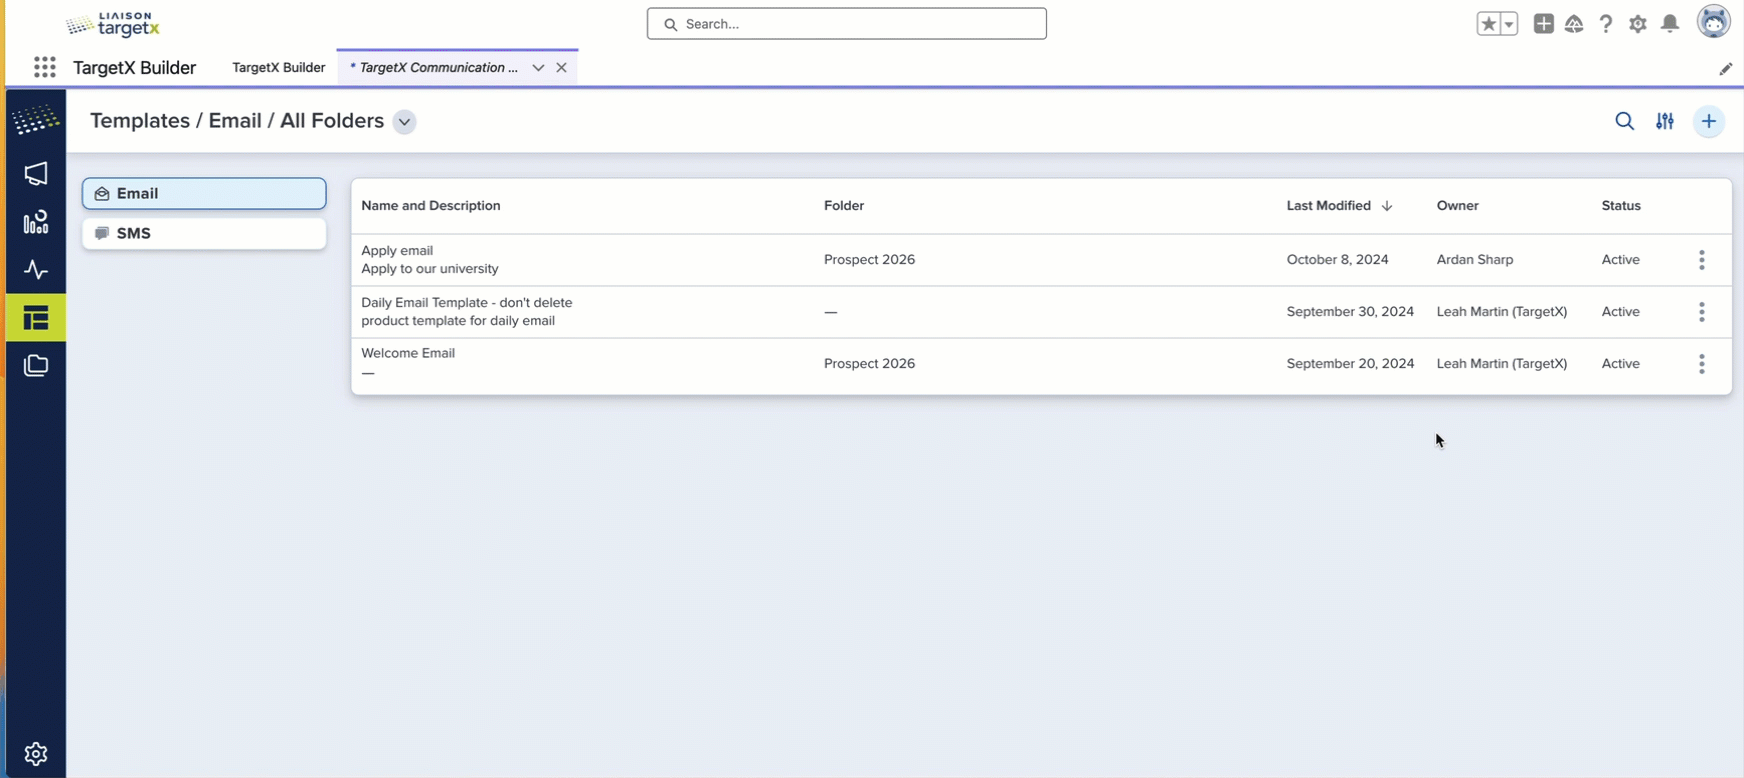
Creating Email Templates
- Navigate to the Communication Planner tab.
- Click the Templates icon, then choose Email.
- Click the + to create a new Email template.
- Enter the following:
- Name
- Description
- Folder
- Parent Object - The Parent object is utilized to display available merge fields. Choose either Lead for Lead fields in Lead Templates, or Contact for both Contact fields and its child objects for Contact Templates.
- Click Continue to launch the Editor and begin building your Template.
- A single row will default, and you can drag Content options onto the canvas.
- Click the Rows tab to add additional rows and layouts.
- Once you’ve added additional rows, return to the Content tab to add content blocks to the row.
- Click the Save icon in the top right to save your changes.
Note: you can edit the number of columns in a Row by selecting the row, locate the Columns Structure section, and then either Add New or drag the icon to change the size of columns.
You can toggle at the top of the window to display Structure, which displays dotted lines to show the alignment of content in your template.

AI Paragraph Assistant
When you add a Title, Paragraph, or List block to your template, the Write with AI button displays at the top of the Content tab. This launches the AI Paragraph Assistant page. Enter what you want to write about in the form, then click Generate. If you are satisfied with the results, click Apply or Regenerate if you want it to offer another suggestion.
Note: the AI Paragraph Assistant is unavailable on the Text content widget.
Adding Merge Fields
Once you’ve added a text Content block, you can add Merge fields by clicking on the block and selecting Add Merge Field in the pop-up menu. From here, select the Object and Field, then Add.

Note: the ID of every object you use for merge fields must be in your report.
When creating links that pull in recipient data to prefill a form, survey, or other TargetX tool, use this format:
{{Contact.TargetX_Base__Access_Key__c}}
For example, your URL might look like:
https://targetxu.my.salesforce-sites.com/TargetX_Base__InquiryForm#?formId=a0OUi000000YyyNAAA&formType=general&txf1={{Contact.TargetX_Base__Access_Key__c}}
For details on using Contact child object data in merge fields, see Using Contact Child Objects in Communication Planner.
Merge field page limitation
Some compound fields—such as Mailing Address—are not supported when adding merge information. Instead, recipients should add each part of the address separately (for example, Mailing City, Mailing State, and Mailing ZIP Code).
These compound field limitations also apply to TX Email and Comm Planner merge fields.
Adding Images
The Communication Planner package includes a File library called TargetX Communication Planner Images. When adding images to your templates, images will be accessed from this library. Users must have permission to the TargetX Communication Planner Images library.
Note: if new versions of an image are uploaded, the image must be reselected in your Templates.
The following file types are supported:
- Jpeg
- Png
- Gif
- Bmp
Notes:
- Images must be 3MB or smaller.
- File types are case-sensitive; therefore, the correct capitalization of the file extension is required for proper processing. For example, a file named image.Jpeg must have the correct capitalization to be processed correctly.
To add an image to your Email Template:
- Add a Row to your template.
- Drag an image content block onto a row.
- Drag and drop an image into the image content block or choose Browse to select an image from the TargetX Communication Planner Images library.
You can choose an image in several ways:
- Select Browse from the content block and select an image from the dropdown.
- Click Choose Image from the Content tab, then select an image from the dropdown.
- Enter a URL for your image.
Note: images must be saved in the TargetX Communication Planner Files Library, or you can add an image that is not stored in the Library using a URL.
You can also add an Action to an Image, such as:
- Open a web page.
- Send an email.
Creating Conditional Content
Conditional Content can be defined for Rows on your Template.
- Add a Row to your template.
- Add Content to your row.
- Click the Row tab and locate the Dynamic Content section:

- Click the Condition Builder button and enter a Condition Name and Description on the Details tab.
- Click the Conditions tab and enter the Object, Field, Operator, and value to base the condition on.
Notes:
- Fields that include parentheses are not supported in conditional content. For example, a field with picklist values such as ‘First Year (FTF)’ is unsupported.
- You can create customized criteria using the Advanced Expressions area.
Previewing Templates
Once you’ve built and Saved your template, select the Preview button to preview the template. Choose the Preview mode to display either All Conditions or each of the conditions you configured on the template:

Working with Reusable Content
The Email Template builder provides several options for reusing content: Saved Rows and Saved Synced Rows.
- Saved Rows are not synced across templates. When you add a Saved Row, you can edit its contents without affecting any other templates. This is useful for adding content such as a Department Header.
- Saved Synced Rows are synced across any templates that use it. This is useful for your institution’s header, such as your logo and name.
Once you’ve created your Saved row, click the Save icon for the row to display the ‘Create New Save Row’ screen:


To access a Saved Row, click the Rows tab, select Saved Rows from the picklist, and your Saved or Saved Synced Rows will display below. Drag your selection onto the template. You can edit the Name or delete the saved row from the Rows tab:
- Your Saved and Sync’d rows are searchable, so we recommend you implement naming conventions to organize your reusable content.
- When you edit a Saved Row, the changes are only saved if you create a new Saved row.
- When you edit a Saved Synced Row, you can update all templates that use the row or choose to Unsync the row.:
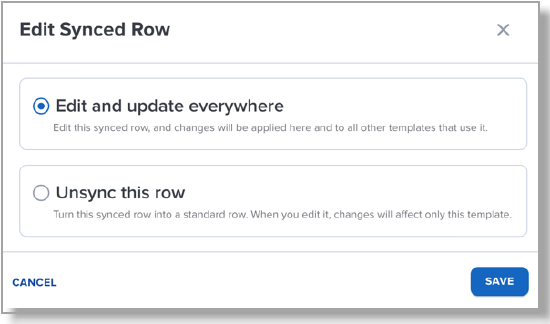
Note: unsyncing a row in one template does not affect the synced row in other templates.
Adding Comments to Email Templates
Anyone with access to your templates can add Comments.
- Navigate to a Template.
- Select to Edit the Template.
- Click a Row and select the Comment icon [
 ].
]. - Save the Template.
- To view Comments on a Template, click the Row and select the Comment icon.
- Click All Comments.
- Reply or Resolve the Comment and Save.
Note: emails are not sent to alert users that a new comment has been added.