Configuring EDA Settings
Adding a Zip Code to the list to ensure the MailingCounty is updated correctly
The Zip Codes referenced by Address Plus are entered in the Zip Code field on the Address Plus object and can be added to or updated manually in your org:
- Search for the Address Plus tab or ask your Administrator to create a tab for the Address Plus object.
- To create a NEW record, click New Address Plus.
- Add the following information:
- City
- State
- County
- Zip Code
- EPS Code
- Save your changes.
Configuring TargetX/HEDA Data Mirroring Custom Setting
- Navigate to Setup and search for Custom Settings.
- Click Manage to the left of TargetX/HEDA Data Mirroring.
- Click New.
- Enter the Name as ‘default.’
- Configure the remaining options based on your business needs.
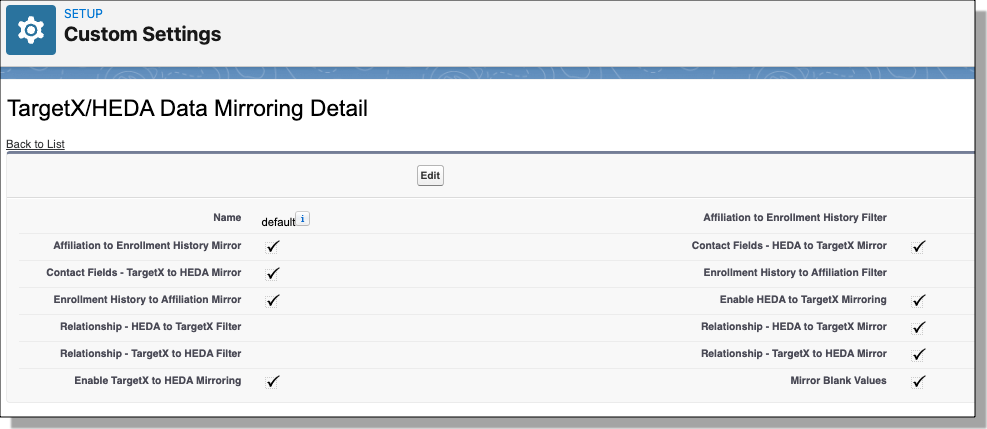
- Save your changes.
Disabling Affiliated Accounts for Enrollment History
You can enable and disable EDA functionality in two places:
TargetX/HEDA Data Mirroring Settings 
- Navigate to Setup and search for Custom Settings.
- Click Manage to the left of TargetX/HEDA Data Mirroring.
- Click the default record.
- Configure the options based on your business needs.
- Save your changes.
Trigger Handlers
Individual triggers can be enabled or disabled in the Trigger Handlers tab. Review the Salesforce Help & Training article, Manage Trigger Handlers for EDA, for details on managing trigger handlers.
TargetX-HEDA Trigger Mappings
The following is a list of the hard coded mappings between TargetX Recruitment CRM and EDA objects. Additional custom fields can be mapped by using the TargetX/HEDA Mappings object. However, the fields listed in this section will always be copied.
TargetX Enrollment History → HEDA Affiliations
| TargetX_SRMb__Account__c | hed__Account__c |
| TargetX_SRMb__Contact__c | hed__Contact__c |
| TargetX_SRMb__Description__c | hed__Description__c |
| TargetX_SRMb__End_Date__c | hed__EndDate__c |
| Id | TX_Enrollment_Id |
HEDA Affiliations → TargetX Enrollment History
| hed__Account__c | TargetX_SRMb__Account__c |
| hed__Contact__c | TargetX_SRMb__Contact__c |
| hed__Description__c | TargetX_SRMb__Description__c |
| hed__EndDate__c | TargetX_SRMb__End_Date__c |
| Id | HEDA_Affiliation_Id |
TargetX Relationship → HEDA Relationship
| TargetX_Base__ContactA__c | hed__Contact__c |
| TargetX_Base__ContactB__c | hed__RelatedContact__c |
| TargetX_Base__Contact_Role_B__c | hed__Type__c |
| Id | TX_Relationship_Id |
HEDA Relationship → TargetX Relationship
| hed__Contact__c | TargetX_Base__ContactA__c |
| hed__RelatedContact__c | TargetX_Base__ContactB__c |
| hed__Type__c | TargetX_Base__Contact_Role_B__c |
| Id | HEDA_Relationship_Id |
Creating the TargetX/HEDA Mappings tab
- Navigate to Setup and search for Tabs.
- In the ‘Custom Object Tabs’ section, click New.
- In the Object listing, click the TargetX/HEDA Mapping object.
- Choose a Tab Style.
- In the Description box, enter: “Used to create additional TargetX - HEDA Mappings.”
- Click Next.
- Apply visibility to the appropriate profiles.
- Click Next.
- Choose which application(s) where you would like to add this new tab.
- Click Save.
Creating additional TargetX/HEDA Mappings
Follow these steps to create additional mappings in the TargetX/HEDA Mappings object.
- In the Recruitment Manager application, click the TargetX/HEDA Mappings tab.
- Click New.
- Choose a Source object.
- Enter the API name of the Source Field from the Source Object.
- For example, if you choose Enrollment History in your Source Object, and you would like to mirror the Official GPA field, you would enter TargetX_SRMb__Official_GPA__c
- Enter the API of the Target Field.
- For example, if you created a custom GPA field in Affiliations, you would enter GPA__c.
- Click Save.
Note: the custom fields you mirror must be of the same data type.
For example, the TargetX_SRMb__Official_GPA__c is of the number data type, with a length of 3 and up to 3 decimal points. When you create the GPA__c field on the Affiliations object, it must have the same properties.
Once the custom setting is configured and additional mappings are set, the triggers will automatically mirror the data.