Managing Administrative Accounts
Understanding the EDA Account Model (Administrative Account)
EDA supports three distinct types of Accounts:
- Organizational Accounts - these are normal Salesforce Accounts, typically representing a business, organization, or government agency.
- Administrative Accounts - these are Accounts where each corresponds one-to-one with a Contact record.
- Household Accounts - these are Accounts whose Contacts are all members of the same Household.
Salesforce requires the use of Administrative Accounts with EDA. For more information, please refer to this Salesforce document - Education Data Architecture (EDA) Documentation. TargetX traditionally utilizes the organizational account model.
Transitioning to EDA Administrative Accounts
Institutions that are looking to utilize the Administrative account model will need to do the following:
- Create new or update existing Account Record Types
- Create or update User Profiles to ensure access to appropriate Account Record Types and appropriate fields in other objects.
- For institutions already utilizing Salesforce, update the account associated with each contact record. There are several approaches to doing this - please take the approach with which your institution is most comfortable. Here are two approaches that TargetX institutions have taken:
- Utilize the EDA Administrative Account creation Trigger
- Make sure the EDA Administrative Account Creation trigger is turned on.
- Export all existing contact records that will be linked to an Administrative Account.
- Mass create new contact records based on those that were exported. Ensure that the account name/ID field is blank when creating the new contact records. The trigger will thereby create Administrative Accounts for each of these contact records.
- Once uploaded, utilize a data merge tool such as DemandTools to merge the original contact records with the newly created records. When merging, make sure the original contact records remain the primary record. This will eliminate the impact on existing processes associated with the records. Also, make sure to merge in the new Account field (Administrative Account) to overwrite original accounts tied to the contact record.
- Turn off the Automatic School Matching trigger in “Recruitment Preferences.”
- Navigate to the “Recruitment Preferences” tab, the “Contextual Triggers” section, and UNCHECK the Automatic School Matching Field.
-
Update Account via imports
- Export all existing contact records that will be linked to an Administrative Account.
- Utilize Excel to create new Administrative Account records for each exported contact record.
- Upload newly created Administrative Accounts records into CRM.
- Update the account records for exported contacts with the appropriate Administrative Account records.
Working with the EDA Administrative Account for New Community Users
EDA's Administrative Account creation does not work when users self-register on a Salesforce community. TargetX's Communities package which was updated as part of the Summer '17 Release allows institutions to create an Administrative Account (named 'Lastname Administrative Account') and assign that Account to the new Contact created at registration. Existing Community user accounts will remain unchanged.
- Example Use Case: an applicant logs into TargetX Portal or Online Application for the first time and creates an account to apply to your institution.
Transitioning to EDA Administrative Accounts
- Install/upgrade to TargetX's Communities package to version 17.30000 (Summer '17 Release) or higher.
- Turn off the Automatic School Matching trigger in "Recruitment Preferences".
- Navigate to the "Recruitment Preferences" tab, go to the "Contextual Triggers" section and UNCHECK the Automatic School Matching box.
Managing EDA Administrative Account creation and assignment on registration
Communities is an unmanaged package. To access this functionality, you need to update the TX_CommunitiesSelfRegController.
Note: this update can only occur within sandbox, and then perform a change set to Production to save those changes.
For additional information, please see: Deploying from Sandbox with Change Sets.
- Navigate to Setup and search for Apex Classes.
- Locate TX_CommunitiesSelfRegController and select Edit.
- Search for: match existing contact and place your cursor after the line:
Contact[] cs =
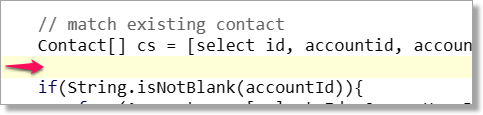
- Insert the following code:
// Uncomment the following line if you want to use HEDA's administrative accounts.
// NOTE: You will also need to make sure you have some way for account to be set to an owner with a role
// on creation. By default, accounts will be created by the guest user and fail.
//if(cs.size() == 0 && !hasDuplicateUser(email)) cs = insertContactFirst() ;
- Remove the '//' in front of the last line above, for example:
if(cs.size() == 0 && !hasDuplicateUser(email)) cs = insertContactFirst() ;
- Scroll to the top of the Apex Class.
- After the line public without sharing class TX_CommunitiesSelfRegController... add the following section of code:
private Contact[] insertContactFirst() {
Contact c = new Contact() ;
c.FirstName = firstName ;
c.LastName = lastName ;
c.Email = email ;
insert c ;
return [SELECT Id, AccountId, Account.OwnerId, Account.Owner.UserRoleId FROM Contact WHERE Id = :c.Id] ;
}
- Save your changes.
Note: you must ensure you have some way for accounts to be set to an owner with a role.