TX Print Overview
What is TX Print?
TX Print is a built-in tool within the TargetX suite (Recruitment Manager & Retention) that enables users to create, preview, schedule, and batch-print physical communications like letters, envelopes, or labels and generate Print Jobs to run immediately or on a set schedule.
Why TX Print?
Built-in Alternative to Conga Composer: TX Print eliminates the need for third-party tools, allowing you to create, manage, and print documents entirely within TargetX.
Flexible Data Sources: Generate print jobs using either Salesforce Reports or CSV files. No Salesforce login is required for CSV-based mailings, making it easy for non-Salesforce users to contribute.
Smart De-Duplication: TX Print automatically detects and filters out duplicate entries, ensuring that letters are printed only for new or updated records.
Scheduled Print Jobs with Automation: Streamline your mailing workflow by scheduling print jobs to run daily, weekly, or monthly. TX Print combines document creation with automatic de-duplication, so you’re always sending accurate, up-to-date communications without manual intervention.
Log Contact Activity: When you create a Print Job in TX Print, you can Log Contact Activity Records as part of the configuration. This will create a record on the Student’s Activity tab.
Accessing TX Print
Users are authenticated using TargetX User Management or Salesforce. TargetX recommends using Salesforce Authentication.
- Navigate to home.targetx.com
- Users can also bookmark your specific login URL, such as:
https://auth.targetx.com/<YOUR SHORT CODE>/sign-in
- If required, enter the Short Code for your institution and click Continue.
Note: If you use a bookmark to your login URL, you will not need to enter the Short Code. For example:
https://auth.targetx.com/<YOUR SHORT CODE>/sign-in
- Click Sign In with Salesforce or Sign In with TargetX.
- Enter your credentials.
- You may see multiple tiles depending on the products you have access to. Click the Print tile:
![]()
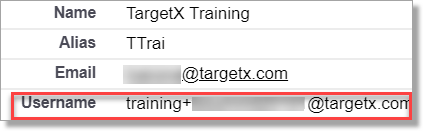
If you plan to authenticate with Salesforce, make sure Users sign up using their Salesforce Username, NOT the Salesforce Email:
Getting Started with TX Print
|
Step |
Description |
|---|---|
| 1 | Access TX Print via the TargetX home screen (Salesforce login recommended). |
| 2 | Create a report or CSV with recipients and merge field values. |
| 3 | Design templates:
|
| 4 | Preview using sample records. |
| 5 | Run Print Jobs manually or schedule with optional dedupe settings. |
| 6 | Track results via Salesforce activity logging. |