Expanding Communities Contact Matching
You MUST complete the steps in a Sandbox environment before pushing to production via an Outbound Change Set.
Adding First Name and Last Name to the matching
Adding First Name and Last Name to the Contact Matching will prevent duplicate Contact records being created when Email, First Name AND Last Name match.
- Navigate to Setup and search for Apex Classes.
- Select TX_CommunitiesSelfRegController and click Edit.
- Locate the following:
// match existing contact

Contact[] cs = [select id,...
- Add the following at the end:
AND FirstName =:firstName and LastName =:lastName
For example:
Contact[] cs = [select id, accountid, account.ownerid, account.owner.userRoleId from Contact where email = :email AND FirstName =:firstName and LastName =:lastName];
- Save your changes.
Adding additional contact field questions to the sign-up page
Administrators can add additional Contact fields to the Sign Up page and have the data populate on new Contact records.
The steps below will detail how to add the Birthdate and Department fields, but you can add any fields on the Contact object (Standard or Custom):
Step 1: Add variable with getter and setter and trim
In this step you’ll add variables with getter and setter along with .trim() for the Department field. The .trim() should be added only to String fields. These variables are referenced in the VF tags in Step 2:
- Navigate to Setup and search for Apex Classes.
- Select TX_CommunitiesSelfRegController and click Edit.
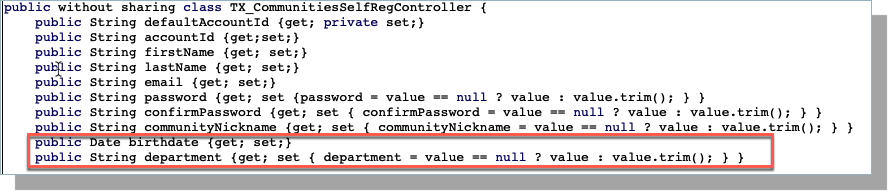
- Add the following near the top of the class:
Note: Enter the API Name where the first letter is lowercase and remove underscores and __c in the API name if applicable. For example: TargetX_SRMb__Athletic_Prospect__c would be entered as targetXSRMbAthleticProspect.
public Date birthdate {get; set;}

public String department {get; set { department = value == null ? value : value.trim(); } }
Example:
- Save your changes.
Note: For different data types, use Apex and Visualforce code rules.
Step 2: Add VF tags
- Navigate to Setup and search for Visualforce Pages.
- Select TX_CommunitiesSelfReg and click Edit.
- Locate docType="html" and change it to: docType="html-5.0"
- For date fields, you’ll need to add an extra div tag.
- Add the following after the Email Address code:
For Birthdate (Date Fields):
Note: Enter the API Name where the first letter is lowercase and remove underscores and __c in the API name if applicable. For example: TargetX_SRMb__Athletic_Prospect__c would be entered as targetXSRMbAthleticProspect.
<div class="targetx-input-label">
    <span>Birth Date :</span>
</div>
<label class="targetx-input-label targetx-required">
    <apex:input type="date" value="{!birthdate}" required="true" label="Birth Date"/>
</label>
For Department:
<label class="targetx-input-label targetx-required">
    <apex:inputText styleClass="targetx-input-text" value="{!department}" label="Department"/>
    <span>Department</span>
</label>
Example:

- Save your changes.
You can view examples of using different field types and adding multiple picklist or multi-picklist fields in the article: How To Add Different Data Type Fields.
Step 3: Add the new fields to the Update Command
- Navigate to Setup and search for Apex Classes.
- Select TX_CommunitiesSelfRegController and click Edit.
- You’ll need to add the following code for the updateContactFields method at the end of TX_CommunitiesSelfRegController.cls:
private void updateContactFields(String contactId, String userId) {
        if(String.isBlank(contactId)) {
            for(User u : [SELECT Id, ContactId FROM User WHERE Id =:userId]) {
                contactId = u.contactId;
            }
        }
        if(!String.IsBlank(contactId)){
            update new Contact(AccountId = accountId, Id = contactId, Birthdate = birthdate, Department = department);
        }
    }
Note: AccountId=accountId should be removed from the update new Contact method if your institution is not using the school picker and/or not using EDA Administrative Accounts. Instead, the code would be similar to the following:
update new Contact(Id = contactId, Birthdate = birthdate, Department = department);
Example:

- Locate the following:
String userId = Site.createPortalUser(u, String.isBlank(accountId) ? null : accountId, password);
- Add the following code right below:
updateContactFields(cs.isEmpty()? null : cs[0].Id ,userId);
Example:

- Update the following line with additional fields that will save data to the Contact record (areas in bold are the new fields):
update new Contact(Id=contactId, AccountId=accountId, Birthdate = birthdate, Department = department);
Notes:
AccountId=accountIdshould be removed from theupdate new Contactmethod if your institution is not using the school picker and/or not using EDA Administrative Accounts. Instead, the code would instead look similar to the following:
update new Contact(Id=contactId, Birthdate = birthdate, Department = department);
- Use the API Name of the Contact field. API Name = Variable Name.
Example

- Save your changes.
Note: Adding all new fields to the update command is required to prevent registration data loss.
Adding additional fields to Contact Matching
Once you've added additional Contact fields, you can add them to the Contact matching rule. In this example, we will add Department to the Contact Matching:
- Navigate to Setup and search for Apex Classes.
- Select TX_CommunitiesSelfRegController and click Edit.
- Locate the following:
// match existing contact

Contact[] cs = [select id,...
- Add the following at the end (where the bold is your new field):
and Department =: department
Notes:
- Use the API Name of the Contact field.
- Adding all new fields from the Update command to Contact Matching is NOT required. Only add fields from the Update command to be considered for Contact Matching.
Example:

- Save your changes.
Adding an Order By clause on a Contact field
If multiple contacts match, the first in the order by will be the match, you can specify the Order By clause to determine which record will be first. In this example we are going to sorting by LastModifieldDate in descending order:
- Navigate to Setup and search for Apex Classes.
- Select TX_CommunitiesSelfRegController and click Edit.
- Locate the following:
// match existing contact
- Add the following at the end of the line, where the item in bold is your Sort criteria:
ORDER BY LastModifiedDate DESC
Example:

- Save your changes.
Note: Any fields added to the sign-up page will require field-level permissions of Read/Edit to be added for the Online Application Guest Site User profile.