Testing your Community
To test the configuration of any given community, you will need to register as a new student, ensuring that the system creates a new Community user record, and related Contact record, sends the welcome email, allows the successful creation of a password, and redirects the user to the correct landing page.
Step 1: Register as a New Student
- Navigate to Setup and search for Sites.
- Locate the Site URL for the newly created experience and right click it to open in an incognito or private browser tab (this is important so that you are not testing against your standard user permissions).
- Click on Sign Up, complete the registration fields (use a real email address that is different from your standard user) and then click Submit.
- You should be redirected to a success page with the following message “Thank you for registering! You have been sent an email with a link to a page where you can set your password.“
Step 2: Create Confirmation of Records
- In the CRM view, navigate to Setup > Users, and search for a new user record with your Student Name, ensuring it was assigned to the Customer Community User (TargetX) profile that was created in Step 12 of the article Configuring Salesforce for TargetX Communities.

- Check that the Contact field is also populated. If you click this value it will navigate to the new or existing Contact record. (If the registration process found one existing Contact with the provided email address, it should link it to this user rather than create a new Contact. If no Contacts, or more than one Contact record is found to have the registration email address, then the process will create a new Contact record linked to this new User.)
Step 3: Set a Password
- Login to the email service you provided in the registration process and ensure you have received the Welcome Email.
- Right click the Create Password button to open it in an incognito or private browser (this is important so that you are not testing against your standard user permissions).
- You should be presented with a screen to Create and Confirm your new password; complete these fields and click Save Password.
Step 4: Confirm the Landing Page
After logging in, you will see a landing page dependent on the type of Digital Experience you have configured. Below you will find example screenshots from each type of Experience. Once you have confirmed it is correct, you can move forward with additional configurations, ensuring that you have tested the student-facing experience to ensure all permissions are correct for the Customer Community User (TargetX) profile.
- For an Applicant Dashboard based community, you should see the following screen:
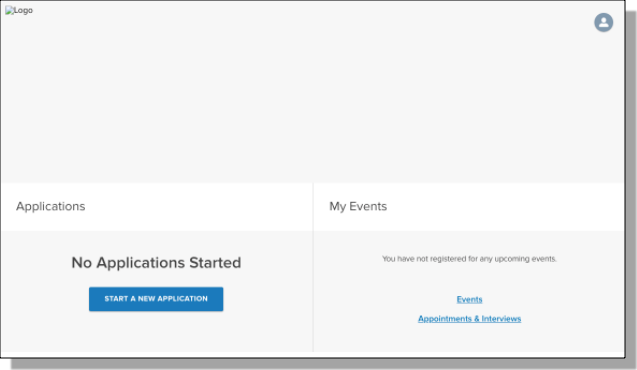
This page means that you have successfully completed the configuration steps and you can now move forward with adding branding and configuring the Online Application and/or Application Requirements Manager (Checklist Items).
- For a Dynamic Portal community, you should see the following message:

This message means you’ve successfully completed the configuration steps and you can now create a new Dynamic Portal and publish it to this Digital Experience.
- For an Events based community, you should see the following message:

This page means that you have successfully completed the configuration steps and you can now move forward with adding branding and building Organization Events.
- For an Appointment Scheduler based community, you should see the following page:

This page means that you have successfully completed the configuration steps and you can now move forward with adding advisor availability to the scheduler, or create Organization Events with a type of Interview selected on creation.
Step 5: Troubleshoot Using the TargetX Permissions Scanner
If you are unable to complete any one of the above steps, it is recommended that you use the TargetX Permission Scanner as a starting point for troubleshooting. If you are unable to register for your new Digital Experience, you should validate permissions for the Site User of the community. If you are unable to view options or take actions (i.e. start an application, schedule an appointment, register for an event or view portal content), then you should validate permissions for the Customer Community User (TargetX) profile. In either case, make sure that you remove the TXStandardPageStopper and grant access to the Apex Class and Visualforce page detailed in the instructions linked above.
Proceed to: Additional Recommended Configurations