Working with Condition Sets
Understanding Condition Sets
Conditional Content is Content that is displayed based on specific conditions. Like a merge field, you add a code or reference number to your template, and then data from Salesforce is merged. The code or reference number is called a Condition set, and rather than merge data from a field, the Email tool merges in a separate paragraph based on those conditions.
Condition Sets are accessed by selecting a Section and then navigating to the Condition Sets accordion on the Content tab or by clicking the Condition Sets button on the section header icon:
![]()
A 'Default Version' is created automatically. This version will display if no other conditions are created or met. Select Add Condition Set to add another condition for the section. Editing a Condition Set will highlight the section in the canvas. Each Condition Set provides options to Clone, Edit, and View.
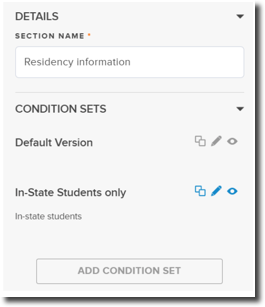
The system evaluates each Condition set in the order they are listed. You can drag and drop the Condition Sets to change the order. Section Labels indicate which version of the Condition Set you are viewing in the Canvas, and the related Condition Set will display in blue in the right-hand pane.
Note: The Section header will display as follows:
- <section title, first 20 characters followed by … > | <condition title, first 20 characters followed by …> (<number of conditions>)
Example:
TOP BANNER FOR CITY… | CONDITION: NEW YORK (3)
Select other Condition sets to preview them in the Canvas:

Note: Multi-select picklists will populate Conditional Content if a student matches One or Multiple values defined in the Condition Set.
For additional information on Condition Sets, see Adding Conditional Content to an Email Template, Writing a condition set in Email, Portal, or Group Assignment
Enabling 'Content Blocks'
If you are using the 'legacy email' interface, you must enable Content blocks in Email Preferences:
- Select the Email Preferences tab.
- Scroll to the 'Advanced' section.
- Select the 'Enable Merged Content Blocks' checkbox.
Writing a condition set in Email
Note: This section covers the legacy TargetX Email tool. For details on the different versions of TargetX Email tools, see Understanding the TargetX Email Tools.
The TargetX Email tool is designed with the power of the TargetX Builder's intuitive user interface and advanced query engine.
- Navigate to TargetX Builder.
- Select Campaign Builder, then select Templates in the bottom navigation bar.
- Create a new template or select the pencil icon to edit an existing template.
- Click the Section where you want to add a condition set and select the appropriate widget, such as Text widget.
- Enter your 'default' content. You can change this at any time.
- Click the Condition Set icon in the Section header:

- Click Add Condition Set and add the relevant widget from the Layout tab. Click the pencil/edit icon to define your condition details:

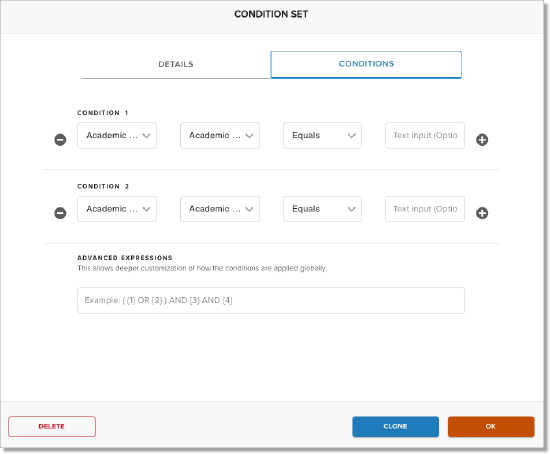
- Click the Conditions tab to define your criteria:
Notes:
- The Default Version in Email Template condition sets should not be renamed; it should never have conditions applied and should be ordered as the last section where multiple condition sets are used in a section.
- Negative number values are not currently supported.
Supported Operators
When writing Condition sets for Email, the following operators are supported. Operators vary depending on which Object is selected:
- Equals - supports a single value, includes records that match exactly, case sensitive.
- Does not equal - supports a single value, excludes records that match exactly, case sensitive.
- Greater than - supports number, currency, date/datetime, and percent fields
- Greater than or equal to - supports number, currency, date/datetime, and percent fields
- Less than - supports number, currency, date/datetime and percent fields
- Less than or equal to - supports number, currency, date/datetime and percent fields
- Starts with - supports a single value, includes records where the CRM field value begins with the specified string of characters.
- Ends with - supports a single value, includes records where the CRM field value ends with the specified string of characters.
- Contains - supports comma-separated values, includes records where the string is contained in the CRM field value, case sensitive for Email Template conditions, case insensitive for Recipient Query Builder.
- Not Contains - supports comma-separated values, excludes records where the string is contained in the CRM field value, case sensitive for Email Template conditions, case insensitive for Recipient Query Builder.
- Includes - supports multi-picklist values and includes records where the CRM field value is one of the values in the list.
- Excludes - supports multi-picklist values and excludes records where the CRM field value is one of the values in the list.
Note: Blank values are supported by:
- Equals
- Not Equals
- Datetime fields do not support blank input values
These will look to match null/blank values in the system. To query against a blank, leave the final value box empty. All other operators require an input value to save your query.
Adding Multiple Criteria Lines
When adding conditions, you can include multiple criteria lines by clicking the to add and the
to remove.
Using Advanced Expression Logic
You can use the Advanced Expression editor to support additional filter logic. Each criteria line in the Condition Set is given a numerical value using advanced expressions. The Advanced Expression editor then uses that number in a boolean expression.
For example, if your query had the following criteria and you wanted to look for EITHER Pennsylvania or New York students who had the listed majors and were interested in Main Campus, you could use advanced logic.
Criteria:
- Mailing State/Province Equals PA
- Anticipated Major IS INCLUDED IN 'English',' History',' Philosophy'
- Mailing State/Province Equals NY
- Campus Does not Equal Main
Advanced Expression Logic:
( {1} OR {3} ) AND {2} AND {4}
Advanced Expression Formatting
When adding advanced logic, you must surround all criteria numbers with curly brackets { } and use parentheses to group. The following are examples of how to write advanced logic:
- OR logic: {1} OR {2} OR {3} OR {4}
- Parenthetical groups: ({1} AND {2}) OR {3} OR {4}
- Nested parenthetical groups: ({1} AND ({2} OR {3})) OR {4}
- Multiple parenthetical groups: ({1} AND {2}) OR ({3} AND {4})
- NOT logic: {1} AND NOT({2}) AND ({3} OR {4})
Writing a condition set in Portal or Group Assignment
This section applies ONLY to writing condition sets in Portal and Group Assignment. For information on writing Condition sets for Email, see Writing a condition set in Email.
The TargetX Portal and Group Assignment tools are all designed with the power of the TargetX Builder's intuitive user interface and advanced query engine.
Notes:
-
If the default condition set contains criteria, all other Condition sets within the same template section should also have unique criteria before saving. Only the default condition set can have no criteria.
-
Treat merge fields as case-sensitive to prevent rendering issues when building complex condition sets. Example:
-
Incorrect:
&tfa_63={{ ID }} -
Correct:
&tfa_63={{ Id }}
-
Supported Operators
When writing Condition sets for these tools, the following operators are supported, with product-specific operators noted where necessary. Operators will vary depending on which Object is selected:
- Equals - supports a single value and includes records that match exactly.
- Does not equal - supports a single value, excludes records that match exactly.
- Greater than - Supports numbers, dates, and text, including values greater than when ordered alphanumerically or by date.
- Greater than or equal to - Supports numbers, dates, and text, including values greater than or equal when ordered alphabetically or by date.
- Less than - Supports numbers, dates, and text, including values less than when ordered alphanumerically or by date.
- Less than or equal to - Supports numbers, dates, and text, including values less than or equal to when ordered alphanumerically or by date.
- Starts with - supports a single value, includes records where the CRM field value begins with the specified string of characters.
- Ends with - supports a single value, includes records where the CRM field value ends with the specified string of characters.
- Contains - supports a single value, includes records where the string is contained in the CRM field value.
- Is included in - supports a list of text or picklist values, includes records where the CRM field value is one of the values in the list.
- Must enter list as
‘value1’,’value2’,’value3’
- Must enter list as
Notes:
- Blank values are supported and will look to match on null/blank values in the CRM. To query against a blank, simply leave the final value box empty.
- When copying and pasting a list of values, use a plain text editor to avoid special quotes from being copied from programs like Word.
- In Group Assignments, you must always use the API Value in Conditions (instead of the Label value if they are different). For example, if you had a Campus setup with Value = Main Campus and API Name = Main, you must use the API Value in your Condition.
Note: When entering a single value as criteria, do NOT use' around the value.
- Multiple values should be entered as ‘value1’,’value2’,’value3’
- A single value should be entered as value1
Adding Logic for Checkbox Fields
When adding conditions for Checkbox fields, you can use true [for checked] or false [for unchecked] values.
Adding Logic for Lookup Fields
When adding conditions for Lookup fields, must use Salesforce Record IDs for the values and not the name of the record or any other field on the record. If you want to use the name of the related record or the value from another field on the related record, you first need to create a formula field that references the field from the lookup object.
For example, if your Group Assignment criteria are on the Contact object and you want to use the Name of the Account associated with the Contact, you would need to create a formula field on the Contact object with a formula of Account.Name. For similar criteria using the Account's CEEB Code, the formula would be Account.TargetX_SRMb__ceeb_code__c.
Adding Multiple Criteria Lines
When adding conditions, you can include multiple criteria lines by clicking the to add and the
to remove.
Using Advanced Expression Logic
You can use the Advanced Expression editor to support additional filter logic. Each criteria line in the Condition Set is given a numerical value using advanced expressions. The Advanced Expression editor then uses that number in a boolean expression.
For example, if your query had the following criteria and you wanted to look for EITHER Pennsylvania or New York students who had the listed majors and were interested in Main Campus, you could use advanced logic.
Criteria:
- Mailing State/Province Equals PA
- Anticipated Major IS INCLUDED IN 'English',' History',' Philosophy'
- Mailing State/Province Equals NY
- Campus Does not Equal Main
Advanced Expression Logic:
( {1} OR {3} ) AND {2} AND {4}
Advanced Expression Formatting
When adding advanced logic, you must surround all criteria numbers with curly brackets { } and use parentheses to group. The following are examples of how to write advanced logic:
- OR logic: {1} OR {2} OR {3} OR {4}
- Parenthetical groups: ({1} AND {2}) OR {3} OR {4}
- Nested parenthetical groups: ({1} AND ({2} OR {3})) OR {4}
- Multiple parenthetical groups: ({1} AND {2}) OR ({3} AND {4})
- NOT logic: {1} AND NOT({2}) AND ({3} OR {4})
Note: The NOT functionality requires adding parentheses around the criteria number, such as:
NOT({2})