Setting up Google Analytics for Appointment Scheduler
Notes:
- You MUST complete these steps in a sandbox environment before pushing to production via an Outbound Change Set.
- These instructions cover how to set up Basic Page Tracking with Google Analytics. For more advanced tracking, consult Google Analytics Support.
Before you begin
Obtain a Google Analytics Tracking Code
-
You will first need to create an account for the following or login if you have an existing account:
Note: if you’ve previously set up a Google Analytics Account, you should configure a new Property for your Online Application site.
-
- Google Analytics is a free web analytics tool offered by Google to help you analyze your website traffic.
-
Google Tag Manager allows you to easily update tags and code snippets on your website. Once the Tag Manager snippet has been added to your website or mobile app, you can configure tags via Google Tag Manager without having to alter and deploy additional code.
- Note: Google Tag Manager is ONLY needed for the Online Application setup. For all other setups you will use the Google Analytics Tracking code.
- Locate your Tracking code in Google Analytics:
- Select

- Click Tracking Info
- Click Tracking Code
-
Copy the code and store it for later use.
Step 1: Update your Community Template
- Ensure that your sandbox has been refreshed before continuing.
- Login to your sandbox.
- Navigate to your Community Theme tab.
- Click the Theme Name for the Community you wish to track.
- Make note of the Template Name and store it for later use.
- Navigate to Setup and search for Visualforce Pages.
- Locate the page that was listed as your Template Name.
- Select Edit.
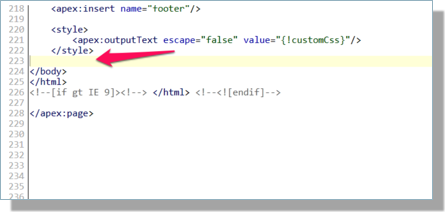
- Scroll to the end of the code and paste your Google Analytics tracking code BEFORE the last </body>:
Note: You must change the beginning of the following line in your Global Site tag from:
<script async src=...
To this:
<script async='async' src=...
-
Save your changes.
Step 2: Test the changes in your Sandbox
- Login to your Community using an existing test user.
- Verify they can create an Appointment, Interview, etc.
- Test any additional processes that are important to your institution.
- Verify that data is displaying in Google Analytics 'Real-Time.'
Step 3: Create and Deploy a Change Set