Configuring Payment Connectors
Configuring a payment connector with supported Payment Gateways should take a few minutes. The Payment Connector package was developed to handle all transactions with the payment gateway. Only client-specific information is needed to configure a payment connector in your CRM.
Note: Only one Secure Key and Response Handler link is needed when configuring multiple payment connectors.
Step 1: Create the Payment Connector Tab
- Click on the Apps icon and search for Payment Connectors.
- If you do not see the Payment Connector tab, proceed to step 3.
- Navigate to Setup and search for Tabs.
- In the “Custom Object Tabs” section, click the New button.
- Enter the following information:
- Tab Object: Payment Connector
- Style: Treasure Chest
- Description: Payment Connector object tab
- Click Next.
- Apply visibility to the appropriate profiles.
- Payment connectors should be accessible to CRM Admins.
- Click Next.
- Add the tab to the Recruitment Manager application.
- Uncheck the “Include Tab” checkbox.
- Scroll down to the Recruitment Manager application.
- Check the checkbox to the right of the Recruitment Manager application listing.
- Click Save.
- You should now see the Payment Connector tab in the Recruitment Manager application.
Step 2: Configure SecureKey
You will need to configure SecureKeys for the following gateways:
- Transact Payments (CASHNet)
- Campus Solutions (Higher One)
- Nelnet
- Converge
- RTS
To set up SecureKey:
- Navigate to the Payment Connector tab.
- Click on the payment connector record.
- Enter your Secure Key into the Custom Key field.
Note: The Secure Key is a value you or your Payment Vendor determine. It should be a unique, alphanumeric key no more than 75 characters. It is recommended that keys be at least 12 characters and should include a combination of letters (both upper and lowercase) and digits.
- Save your changes.
Note: Nelnet has a stand-alone key that needs to be configured in the Payment Connector itself in the Nelnet Shared Secret field. This key is provided by Nelnet.
Step 3: Configure a Payment Site
A Site is needed for payment gateways that send Asynchronous confirmation/rejection details to TargetX after the purchaser finishes the process on their site. These details are sent to the responseHandler visualforce page, which needs to be hosted on a site.
Note: Anytime a site is created, the Time Zone must be updated.
You will need to configure the responseHandler site if you are configuring any of the following gateways:
- Transact Payments (Cashnet)
- Campus Solutions (Higher One)
- CyberSource
- PayPal
- Nelnet
- Touchnet
- Converge
- WPM
Follow these steps to configure a NEW site:
- Navigate to Setup and search for Sites.
- If sites has never been setup, specify a custom subdomain.
- Otherwise, click New to create a new site.
- For each field, fill in these values:

- Site Label: any name, such as ResponseSite.
- Site Contact: System Admin of your Org
- Active: checked / true
- Active Site Home Page: choose any visualforce page. If you don’t have another use for this site, use responseHandler.
- Require Secure Connections (HTTPS): checked/true
- Referrer URL Protection: unchecked
5. Save your changes.
6. In the site’s Public Access settings, under Enabled Visualforce Page Access add the following Visualforce pages:
- targetx_payment.responseHandler
- targetx_payment.Confirm
Note: Grant access to any other Profiles your institution uses.
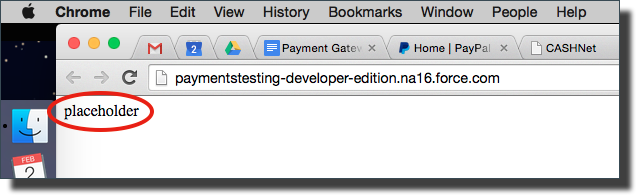
7. To make sure the site is working, navigate to Setup and search for Sites, locate your newly-configured responseHandler site, and copy the link under the column titled ‘Site URL’, then append /targetx_payment__responseHandler. The website should open in a new tab / window with with the word placeholder in the contents. Anything else is wrong.
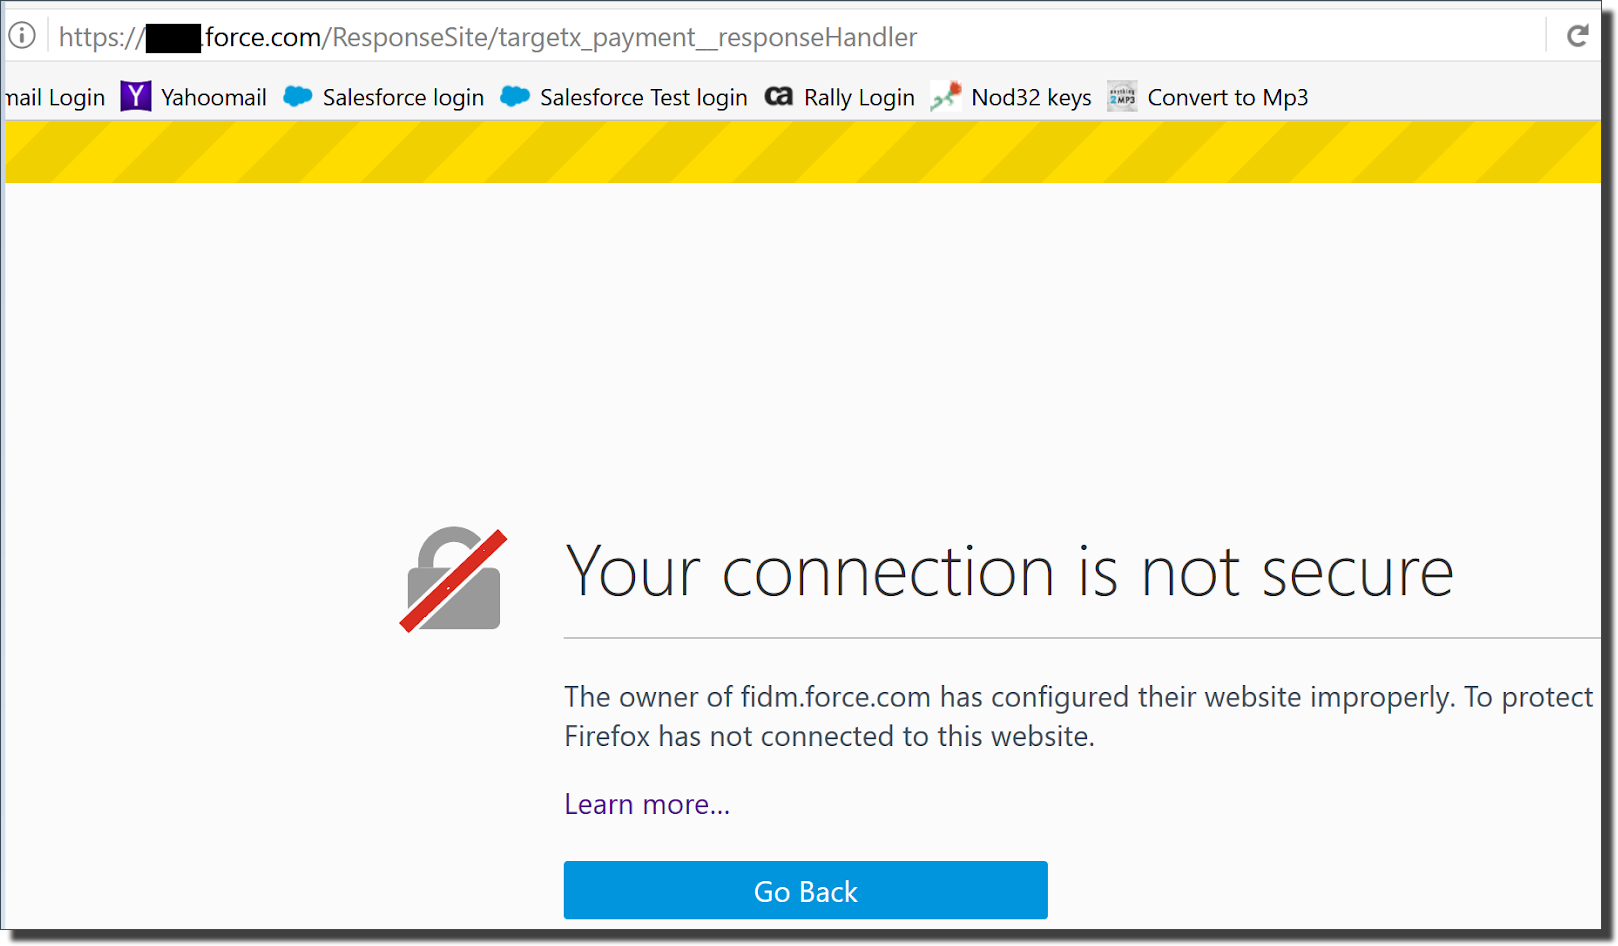
Note: In PRODUCTION Orgs, if you use a Custom domain you MUST use ‘secure’ in your url. In Sandbox Orgs, do NOT include 'secure'.
Production Org example:
- https://MyUniqueCustomName.force.com/responseHandler/targetx_payment__responseHandler (Incorrect)
- https://MyUniqueCustomName.secure.force.com/responseHandler/targetx_payment__responseHandler (Correct)
Note: This site MUST HAVE ACCESS to Read/Create/Edit/Delete on the TargetX Logs object BEFORE you test for the PLACEHOLDER message.
A Postback URL must be defined to receive a payment confirmation from your vendor. Constructing this URL will vary across vendors, but it will always start with your Base URL
BASEURL refers to the full url of the site itself (often times this will include /something at the end). For example: https://myclientsite.secure.force.com/responseHandler.
KEYVALUE refers to the Secure Key.
Sites that need the Asynchronous URL should use:
BASEURL/targetx_payment__responseHandler
Sites that need Keys should append:
?secureKey=KEYVALUE
You will need to provide this URL to your vendor or enter it into the configuration for your account.
Disable Lightning Features for Guest Users
The Salesforce setting, Lightning Features for Guest Users, is enabled by Default. TargetX products do not require Lightning features, so we recommend you turn this setting OFF to limit access to your Sites:
- Navigate to Setup and search for Sites.
- Click the Site Label.
- Click Edit.
- Uncheck the Field for Lightning Features for Guest Users.
- Save your changes.

Step 4: Set Field Level Security for Site Users
Update Public Access Settings
- Navigate to Setup and search for Sites.
- Click on the Site Label of the Site which uses Payments.
- Select the Public Access Settings button.
- Select Edit.
- Refer to TargetX Permission Scanner for details on which permissions to add.
Create Sharing Rules
Using the table below, create Sharing Rules for each object. Replace the items in < > below with the information listed in the table:
- Go to Setup and search for Sharing Settings.
- In Manage sharing settings for, select <object>.
- Under Sharing Rules > <object> Sharing Rules, select New.
- In the Step 1: Rule Name, enter Label = <Label>. Rule Name will automatically populate with this value.
- In Step 2: Select your rule type, select the radio button option <Rule Type>.
- In Step 3: Select which records to be shared enter the <Records to be Shared>.
- In Step 4: Select the users to share with, select <Users to Share With>.
- In Step 5: Select the level of access for the users, select <Level of Access>.
| <Object> | Step 1: Rule Name <Label> |
Step 2: <Rule Type> |
Step 3: <Records to be Shared> | Step 4: <Users to Share With> | Step 5: <Level of Access> |
|---|---|---|---|---|---|
| Pending Cart | Payment ResponseSite Users | Guest User Access, Based on Criteria | Created by ID starts with 005 | Payment ResponseSite Users | Read Only |
Step 5: Create a Payment Connector record
The required information for each supported payment connector is listed in Configuring Payment Connector Vendors - Transact Payments (CASHNet), Converge, CyberSource, Nelnet, OPC, Paypal, RTS, TouchNet, WPM, and Nelnet Campus Commerce.
Follow the steps below to create your payment connector:
- Click on the Payment Connectors tab.
- Click the New button.
- Choose your payment gateway in the Record Type list and select Continue.
- Using the documentation provided by your payment gateway vendor, enter the information needed to create the connector.
- ALL payment connectors require a Gateway Account Name. This name will be used when setting up your default Payment Gateway and when applying it to the online application or events products.
- Click Save.
Note: Institutions using Nelnet can also configure a confirmation message or the 'redirect time.'
Step 6: Set a Default Payment Gateway
If you are using Events, you must update the Payment Gateway Custom Setting to specify which connector should be used by Events.
- Navigate to Setup and search for Custom Settings.
- Click the Manage link to the left of “Payment Gateway Settings”.
- Click the Edit link to the left of the “default” setting.
- Enter the “Gateway Account Name” value, created in the Create a Payment Connector record section, in the “Default Payment Gateway” field. Note: The name must exactly match the name that was entered in the Payment Connector record.
- Click Save.
Note: All other fields in the default custom setting have no functionality in the payment connector package. These fields were used to set up payment connectors prior to version 1.22. All payment connectors are now created and configured in the “Payment Connectors” tab.
Step 7: Configure Remote Site Settings
Many gateways require remote site settings to be configured to allow the connection to the gateway to be established. Follow the steps below to add the payment gateway’s URLs to your CRM’s Remote Site Settings:
Remote Site Settings only need to be configured for the following:
- Converge
- Touchnet
- Nelnet HPP
- Paypal
- RTS
- Nelnet Campus Commerce
- Navigate to Setup and search for Remote Site Settings.
- Click the New Remote Site button.
- Enter the following information:
- Remote Site Name: This is used as a descriptor to help you identify your different Remote Site Settings.
Example: Touchnet
- Remote Site URL: this should be provided by your payment gateway.
Example: https://test.secure.touchnet.net
- Description: This is a descriptor to help you identify your different Remote Site Settings.
- Active: should be checked.
4. Click Save.
| Payment Vendor | Remote Site Name | Remote Site URL |
|---|---|---|
| Converge | Converge sandbox | https://api.demo.convergepay.com https://demo.convergepay.com |
| Converge | Converge production | https://api.convergepay.com https://www.convergepay.com |
| Touchnet | Varies by client... you will need to add one for sandbox and a different one for production. This will be the same as the server url saved in the payment gateway. | |
|
Note: TargetX uses TLink to connect to uPay payment pages and is TLink compatible. |
||
| Paypal | Paypal Sandbox | https://www.sandbox.paypal.com |
| Paypal | https://www.paypal.com | |
| Nelnet HPP | NelnetHPPUAT | https://portal.uat.cryptpay3.com/ |
| NelnetHPP | https://portal.cryptpay3.com/ | |
| RTS | RTS | <provided by RTS> |
| Nelnet Campus Commerce |
Nelnet CampusCommerceCheckout |
|
|
NelnetCampusCommerceCheckout2 |
||
Notes: You can obtain ‘fake’ Payment Cards/Accounts to test your payment gateways from each vendor.
Notes about Remote Site Settings:
- In Sandboxes, Remote Site settings must be recreated after a sandbox refresh.
- If Remote Site Settings are incorrect or missing, users will receive an error about an Unauthorized endpoint.
Step 8: Configure Session Settings
Notes:
- If you are using TargetX Email DO NOT check the setting Lock Sessions to the IP address from which they originated.
- DO NOT edit anything in Manage App Policies, or click on the Block or Uninstall buttons.
- Navigate to Setup and search for Session Settings.
- In the Require secure connections section:
- Set Require HttpOnly attribute to “true”
Note: If you are using Decision/App Reader DO NOT set Require HttpOnly attribute to “true.”
For additional information, see Salesforce Help & Training article Modify Session Security Settings.
-
In the Clickjack Protection section:
- Set Enable clickjack protection for customer Visualforce pages with standard headers to “true”
- Enable clickjack protection for customer Visualforce pages with headers disabled set to “true”
For additional information, see Salesforce Help & Training article Enable Clickjack Protection in Site.com.
-
In the HSTS for Sites and Communities section:
-
Set Enable HSTS for all Sites and Communities with the default force.com subdomain that require a secure connection (HTTPS) to “true”
For additional information, see Salesforce Help & Training article Enable Browser Security Settings.
-
In the Identity Verification section:
-
Set Require identity verification for change of email address to “true”
For additional information, see Salesforce Help & Training article Configure When Users are Prompted to Verify Identity.
-
Save your changes.
Step 9: Create Payment Connector Sharing Rules
- Using the table below, create Sharing Rules for each object. Replace the items in < > below with the information listed in the table:
- Go to Setup and search for Sharing Settings.
- In Manage sharing settings for, select <object>.
- Under Sharing Rules > <object> Sharing Rules, select New.
- In the Step 1: Rule Name, enter Label = <Label>. Rule Name will automatically populate with this value.
- In Step 2: Select your rule type, select the radio button option <Rule Type>.
- In Step 3: Select which records to be shared enter the <Records to be Shared>.
- In Step 4: Select the users to share with, select <Users to Share With>.
- In Step 5: Select the level of access for the users, select <Level of Access>.
| <Object> | Step 1: Rule Name <Label> |
Step 2: <Rule Type> |
Step 3: <Records to be Shared> | Step 4: <Users to Share With> | Step 5: <Level of Access> |
|---|---|---|---|---|---|
| Payment Connector | Payment ResponseSite Users | Guest User Access, Based on Criteria | Created by ID starts with 005 | Payment ResponseSite Users | Read Only |
| Pending Cart | Payment ResponseSite Users | Guest User Access, Based on Criteria | Created by ID starts with 005 | Payment ResponseSite Users | Read Only |
Step 10: Payment Connector Configurations
Step 11: Create a form in Cryptpay (Required for Nelnet Hosted Payment Pages)
- Navigate to the URL: https://portal.uat.cryptpay3.com/Account/LogOn
- Enter your Username and Password.
- Click Manage Payment Forms.
- Click Create New Form.
- Fill out the details for Form Name, Min Amount Allowed, Max Amount Allowed, Company Name and Description.
- Receipt Redirect Url should be your payment Confirm page.
- Enter your Base URL PLUS apex/targetx_payment__confirm
Example: https://targetxuniversity.force.com/apply/apex/targetx_payment__confirm
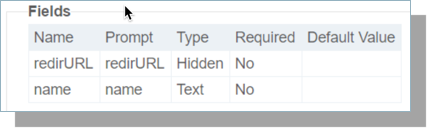
- Click ‘Add field’ and for the ‘Name’ and ‘Prompt’ enter value = ‘redirURL’, Type = ‘hidden’, Required checkbox should be unchecked:
- Fill in the rest of the information and select Create.
- You should see a Form id if the form is saved without any errors.