Implementing Prospect Scoring
Step 1: Install Required Packages
The following minimum versions of TargetX packages are required to support installing the Prospect Scoring package:
- Base 1.15 or higher
- Events 5.11 or higher
- Email 3.16 or higher
- Recruitment Manager 2.53 or higher
- Payments 1.18 or higher
Step 2: Install Prospect Scoring Package
To obtain the latest package, please see the package links document available in the the TargetX Recruitment Suite: Admin Group.
Step 3: Determine criteria and point values
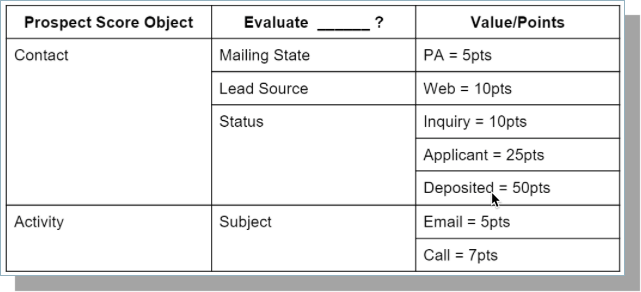
Your first step is to determine the criteria and point values within the limits of the components. Examples include points assigned to specific Lead Sources, Email Interactions, Legacy Relationships, etc. Review these Sample Formulas.
Step 4: Add Prospect Scorecard to Contact layout
- Navigate to Setup and click Object Manager.
- Search for the Contact object.
- Note: Contact may have been renamed to Student (API Name - Contact).
- Navigate to Page Layouts.
- Select Edit next to the Contact Layout.
- Add a new blank Section to contact layout (1 column width).
- Drag the ‘Prospect Scorecard’ Visualforce Page to the newly created section.
- Select the Properties icon for the Visualforce page.
- Set the Height (in pixels) to 325.
- Add the ‘Prospect Qualitative Score’ custom field to the layout.
- Save the changes.
Step 5: Configure each formula field
- Based on the criteria you outlined in Step 1 adjust each formula field to return a numeric value.
- For example, if you want to score any Prospects that live in the state of Pennsylvania 5 points, follow these steps:
- Navigate to Setup and click Object Manager.
- Locate the Contact object
- Select Fields & Relationships and locate the Prospect Contact Score field and select Edit.
- On the Advanced Formula tab, enter the following:
IF(MailingState = 'PA', 5, 0)
- Add additional criteria as needed.
- Save your changes.
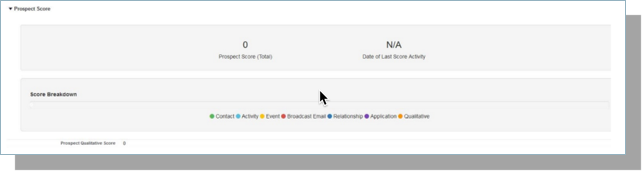
- Add data to a Prospect record to generate a score based on your criteria. For the above example, when you add a Mailing State = PA, the Prospect should display a Score = 5 for the Contact section of the Scorecard.
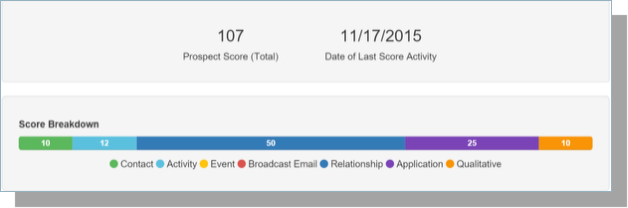
- Validate that the Prospect Scorecard is correctly displaying your scores.
- To configure additional formula fields, repeat the above steps for any of the available Custom Fields:
- Contact Object Custom Fields
- Activity Object Custom Fields
- Email Broadcast Member Object Custom Fields
- Contact Schedule Item Object Custom Fields
- Relationship Object Custom Fields
See Salesforce's Help & Training article Formulas in Salesforce.