Managing Action Plans
Overview
Studies indicate that engaged students are more likely to enjoy their college experience, perform well academically, earn their degree, and take on leadership or mentoring roles. The TargetX Action Plan is a set of tasks and to-do items assigned to students, along with designated university resources and communication touchpoints. Specific Action Plans can be assigned to an individual or group of students.
Administrators establish Rule Actions and Action Items. Whenever there is an update in the student's data, the associated Action Items are automatically assigned, triggered by the update.
Action Plans consist of a collection of Action Plan Items assigned to students via Rule Actions. These assignments can be made automatically or manually.
Using Rule Actions
When defining Rule Actions, the following fields are available:
- Rule Action Name: This field represents the name of the rule.
- Related Field API: This field specifies the API name of the field that will be evaluated to trigger the Action assignment. For example, if a specific action should be created when a Department is entered, the Related Field API name would be ‘Main_Department__c’.
- Matching Text: This field indicates the value in the Related Field API that will trigger the Action assignment.
- Available for Use: This field enables or activates the Rule.
- Available for Email: This field does not apply to Rule Actions, as it is used by TargetX Email to save conditional content and send emails. When building Rule Actions, you can ignore this field. However, do not remove access to this field, even if you remove it from your page layout.
- Available for Action Plans: This field shows that the Rule can be used with Action Plans.
Note: The Related field API can only reference fields from the Contact object. If you use a formula field, the fields in the formula must also be Contact fields and not fields from objects related to the Contact via lookup fields.
You must first create a formula field to create a rule to evaluate multiple criteria. For example, to set a rule for all Freshman from Pennsylvania, create a formula field that evaluates Level and Mailing State and sets a value. The Rule Action can then reference that formula field and the appropriate value to trigger the associated Action Items. For more information, see Rule Action Example.
The Clone button allows you to duplicate the Rule Action Detail or Action Item Detail.
Note: Cloning Rule Action Detail will NOT copy the associated Action Items.
Rule Action Example
Scenario: Assign a set of Actions to all incoming Freshman.
| Rule Actions | Action Plan Items |
|---|---|
| Rule Action Name = Freshman | Freshman Orientation |
| Related Field API = TgtX_Retention__Class_Level__c | Complete Health Services Screening |
| Matching Text = Freshman | Submit Housing Form to Student Services |
Implementing Action Plans
Step 1: Install Base Package
Action Plans are part of the Base Package, v 1.52 and higher.
Step 2: Configure Custom Settings
Action Plan Automation
If the criteria of a Rule Action are met, Action Items will be generated automatically once you enable the Action Plan Automation setting.
- Navigate to Setup and search for Custom Settings.
- Next to TargetX CRM Base Settings, select Manage.
- Select the Default record.
- Select the Edit button.
- Check the Action Plan Automation checkbox if you want Action Items to be created automatically when Rule Action criteria are met.
- Save your changes.
Step 3: Create the Rule Action Tab
- Navigate to Setup and search for Tabs.
- Under Custom Object Tabs, select New.
- Select the Rule Action object from the list of Objects.
- Enter a Tab Label and Tab Name.
- Select a Tab Style.
- Select Next.
- Under Add to Profiles, select which Profiles should display the new tab.
- Select Next.
- Under Add to Custom Apps, indicate which Apps should be included in the new tab.
- Select Save.
Assigning Action Plans automatically
If you want Action Items to be created automatically, you must ensure Action Plan Automation is enabled:
- Navigate to Setup and search for Custom Settings.
- Next to TargetX CRM Base Settings, select Manage.
- Select the Default record.
- Select the Edit button.
- Check the Action Plan Automation checkbox if you want Action Items to be created automatically when Rule Action criteria is met.
- Save your changes.
Action Plan Items
Configuring Action Item Status
- Navigate to Setup and select Object Manager.
- Locate and select the Action Item Template object.
- Under Custom Fields & Relationships, select the Status field.
- Find Picklist Values and either Replace, Reorder or add New values.
- Save your changes.
Configuring Action Item Type
- Navigate to Setup and select Object Manager.
- Locate and select the Action Item Template object.
- Under Custom Fields & Relationships, select the Type field.
- Find Picklist Values and either Replace, Reorder or add New values.
- Save your changes.
Configuring Action Item Priority
- Navigate to Setup and select Object Manager.
- Locate and select the Action Item Template object
- Under Custom Fields & Relationships, select the Priority field.
- Find Picklist Values and either Replace, Reorder or add New values.
- Save your changes.
Creating Action Plan Items
Action Plan Items are the assignments, or tasks, that are assigned to a Contact, either manually or via Rule Actions.
Manually adding an Action Item allows an Advisor or Faculty member to customize a plan to accommodate a student’s specific needs.
Action Plan Items include the following information:
- Label is a text field that should describe the Action Item. [REQUIRED]
- Assigned To is the student that is responsible for completing this Action Item.
- Details should include a description of the Action and any relevant information.
- Type indicates the type or category of the Action Item. [REQUIRED]
- Point Of Contact allows the user to indicate the user that assigned the Action Item. All points of contact must have a role on the Contact record to appear in the list. A Point of Contact is a Contact record with the Related User field populated. [REQUIRED]
Note: When Action Plans are assigned to a Student record, the Point of Contact defaults to the Primary Success Team Member. If no Primary Success Team Member is found, it defaults to the User adding the Action Plan.
- Due Date the date the Action Item must be completed. [REQUIRED]
- Priority indicates whether the Action Item is a high, medium, or low priority item.
- Status indicates the current status of the Action Item, such as Not Started or In Progress.
- System Generated is checked when an Action Item is generated via a Rule Action. See also: Action Plan Automation.
- Action Plan indicates the Action Plan this Item is related to, if applicable. [REQUIRED]
Adding an Action Item to a Contact
- Navigate to Contacts and select the student you want to add an Action Item.
- Scroll to the Action Items related list.
- Select New Action Item.
- Enter the following information:
- Label is a text field that should describe the Action Item.
- Assigned To is the student who is responsible for completing this Action Item.
- Details should include a description of the Action and any relevant information.
- Type indicates the type or category of the Action Item.
- Point Of Contact allows the user to indicate the user that assigned the Action Item. All points of contact must have a role on the Contact record to appear in the list.
Note: The Point of Contact in the Action Item will display the Contact Name but the Student Success Center will display the user's First Name and Last Name after saving.
- Due Date the date the Action Item must be completed.
- Priority indicates whether the Action Item is a high, medium or low priority item.
- Status indicates the current status of the Action Item, such as Not Started or In Progress.
- System Generated is checked when an Action Item is generated via a Rule Action. See also: Action Plan Automation.
- Action Plan indicates the Action Plan this Item is related to, if applicable.
Creating a Rule Action
- If you want Action Items to be created automatically, you must ensure Action Plan Automation is enabled.
- Determine what field on the Contact object you want to evaluate to trigger the creation of Action Items.
- Navigate to the Rule Action tab.
- Select New.
- Enter a Rule Action Name.
- Enter the Related Field API; this is the API name of the field that will be evaluated to trigger the Action assignment.
- Enter the Matching Text; this is the Value in the Related Field API that will trigger the Action assignment.
- Select the Available for Use and Available for Action Plans checkboxes.
Note: Available for Email does not apply to Rule Actions. This field is used by TargetX Email to save conditional content and send emails. This field can be ignored when building your Rule Actions. You can remove Available for Email from your page layout, but do NOT remove access.
- In the Action Plan Item related list, select New Action Plan Item.
- Enter the Type, Label and Details of the Action Plan Item.
- Indicate if the Action Plan Item should be Visible.
- Specify a Priority for the Action Plan Item.
- Specify either a Fixed Due Date or a Due Date Offset (in days).
Note: Due Date Offset (in days) is the number of days that will be added to the creation date to set the Due Date of the Action Plan Item. For example, if the Rule Action is ‘triggered’ on March 1 and the Due Date Offset is set to 5; then the Due Date of the Action Plan Item will be set to March 6.
- Save.
- Repeat steps 10-15 for additional Action Plan Items.
Note: If you setup a Rule Action based on a field which is then deleted, ALL users will receive an error when updating Contact records. Check your Rule Actions before deleting any fields on the Contact object.
Ensuring Action Plans and Action Items work with the TargetX Student Success Center
- Navigate to Setup and select Object Manager.
- Select the Action Item object.
- Click Details, then Edit.
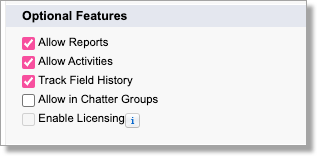
- Under Optional Features, ensure the checkboxes for Allow Reports, Allow Activities, and Track Field History are checked.
- Navigate back to the Object Manager.
- Select the Action Plan Item object.
- Click Details, then Edit.
- Under Optional Features, ensure the checkboxes for Allow Reports, Allow Activities, and Track Field History are checked.