Local Statuses Best Practices
Why use Local Statuses?
Local Statuses allow you to track applicants through each stage of your admissions review cycle. You can create a granular workflow customized to your process that only you can see in WebAdMIT; applicants cannot see any Local Status created for your workflow. Local Statuses help you better understand where your applicants are in your admissions review process.
You also have the option to match Local Statuses to Decision Codes. Decision Codes are standard CAS-wide codes used for categorization and reporting of applicants. If you link a Local Status to a Decision Code, when you change an applicant's Local Status, WebAdMIT automatically updates the Decision Code. Note that for programs that participate in ADEA AADSAS and match Local Statuses to Decision Codes, applicants can view final Decision Codes under the My Programs section of their application.
General Best Practices
Consider these best practices when building your Local Statuses:
- Use colors to group tasks within a workflow.
- For example, you can color-code your accepted Local Statuses as green or your denied Local Statuses as red.
- Additionally, you can use lighter and darker shades to show progression through a workflow. For example, a "Committee Review Needed" Local Status can be a lighter shade of blue, and a "Committee Review Completed" Local Status can be a darker shade of blue.
- Add a numbering system to order statuses within a workflow.
- For example, you can add 1.1, 1.2, 1.3, etc., to keep your statuses organized.

Example of Local Statuses by Application Status
The Local Statuses below are segmented by Application Status: In Progress, Received/Complete, and Verified. These Local Statuses are strictly examples and are meant to be adapted to fit your own application review workflow.
In Progress Applicants
In Progress applicants are those interested in your program but have neither submitted the CAS application nor paid the application fee. This number helps you gauge interest in your program.
Best Practice Example: Track how you communicate with In Progress applicants through Local Statuses.
In this example, create a Local Status for each email you want to track for In Progress applicants. This allows you to easily identify which applicants need a specific communication and track their progress in the process. Once your Local Statuses are set up, use the List Manager to build a list of applicants who meet your communication criteria. From there, use List Actions to perform batch actions, such as sending an email to all applicants on the list and updating their Local Status to reflect that the communication has been sent. This approach helps streamline communication, maintain accurate applicant records, and reduce the need to update each applicant individually.
Example Local Statuses:
- In Progress Email 1 Sent
- In Progress Email 2 Sent
- In Progress Email 3 Sent
- In Progress Email 4 Sent

Received/Complete Applicants
Received or Complete applicants have submitted their CAS application to your program and paid your application fee; at this point, you can begin reviewing their application. Examples of reviews you might run include:
- Committee Review: if you use an admissions committee to review applications, you can pre-track your applicants for review using a Local Status.
- Single Person Review: if you use a single person to pre-screen applicants, you can use a Local Status to move them to the next phase.
- Faculty Review: if faculty members review applications as part of your admissions process, Local Statuses can help you organize your faculty review process.
Best Practice Example: If you use a Committee Review, pre-track your applicants using your admissions criteria as your Local Status.
Use Local Statuses to segment your applicant pool and prioritize applicants for review based on specific criteria, such as GPA and test scores. Including these criteria in the Local Status name helps reviewers quickly identify applicants who fall within certain academic ranges, making it easier to organize the review process, manage workloads, and track review progress. For example, you can create separate Local Statuses for applicants who need committee review and those whose reviews are complete within each academic range. This approach helps ensure applicants are routed to the appropriate review process and provides a clear view of outstanding reviews.
Example Local Statuses:
- Committee Review Needed (GPA 3.0-3.49, GRE 130-159)
- Committee Review Complete (GPA 3.0-3.49, GRE 130-159)
- Committee Review Needed (GPA 2.7-2.99, GRE 100-129)
- Committee Review Complete (GPA 2.7-2.99, GRE 100-129)

Best Practice Example: If you use a Single Person Review, use a Local Status for each step of your review phases.
If your applicant workflow includes an interview component, you can use Local Statuses to track applicants through each phase of the interview process. Think of each Local Status as a way to organize applicants, similar to using separate tabs in an Excel spreadsheet. This allows you to quickly identify where each applicant stands, determine which applicants need follow-up, and monitor progress from the initial invitation through the completion of the interview. Using distinct statuses for each stage also helps keep your process organized and ensures applicants don't get overlooked as they move through the workflow.
Example Local Statuses:
- Invite to Interview (for reviewers to indicate the applicant should be interviewed)
- Interview Offered (for the admissions team to indicate the applicant has been sent the interview invite)
- No Response to Interview
- Interview Declined
- Interview Scheduled
- Interviewed (Needs Decision)

Best Practice Example: If you use a Faculty Review, create Local Statuses for each faculty member.
If you use a Faculty Review process, create a Local Status for each faculty member to organize applications by reviewer and quickly identify which applications are assigned to each person. This makes it easier to manage reviewer workloads, monitor review progress, and ensure applications are routed to the appropriate faculty member. As faculty members complete their reviews, use the Clipboard to group the applications reviewed by a specific faculty member. Then use Clipboard Actions to move those applications to a new Local Status in batch, saving time and keeping applicant records organized without updating each application individually.
Example Local Statuses:
- Sent to Faculty Review - Dr. Baker
- Sent to Faculty Review - Prof. DiMarco
- Sent to Faculty Review - Dean Swan

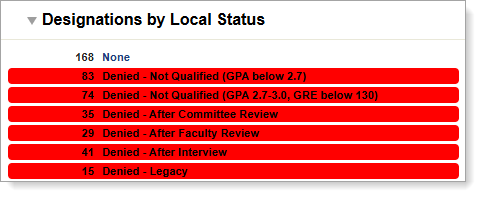
Best Practice Example: Once a final decision is rendered on an application, add the reason why in the Local Status name.
Once a final decision has been made on an application, such as Accepted, Denied, or Withdrawn, use Local Statuses to capture the reason behind the decision. Adding a reason to the Local Status helps you identify trends across your applicant pool and better understand the factors influencing application outcomes. Start by determining the most common reasons for each decision type, then incorporate those reasons into your Local Status names. For example, a withdrawn application might be categorized as "Withdrawn - Financial" or "Withdrawn - Short prerequisites prior to start term."
Example Local Statuses:
- Denied - Not Qualified (GPA below 2.7)
- Denied - Not Qualified (GPA 2.7-3.0, GRE below 130)
- Denied - After Committee Review
- Denied - After Faculty Review
- Denied - After Interview
- Denied - Legacy
Because Local Statuses can be queried and exported, you can use the Export Manager and Report Manager to extract decision data from WebAdMIT and generate detailed reports about your applicant pool. This allows you to analyze decision trends, identify common reasons for denials or withdrawals, and use those insights to inform future recruitment strategies and process improvements.
Verified Applicants
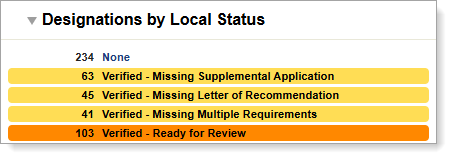
For some CASs, an applicant's final status is Complete. If your CAS uses verification, where an applicant's coursework is checked against their official transcripts, then the applicant's final status is Verified. While Verified applicants have completed the CAS application requirements, they may be missing requirements for your program.
Best Practice Example: Use Local Statuses to segment Verified applicants as complete or incomplete, according to your program-specific requirements.
Creating separate Local Statuses for Verified applicants helps you quickly distinguish applicants who still need to submit required materials from those who are ready to move forward in the review process. This allows you to easily identify applicants who may need follow-up, prioritize applications that are ready for review, and ensure incomplete applications don't get overlooked. You can also use these statuses to build targeted lists for communication and track applicant progress more efficiently.
Example Local Statuses:
- Verified - Missing Supplemental Application
- Verified - Missing Letter of Recommendation
- Verified - Missing Multiple Requirements
- Verified - Ready for Review