Sending Emails
Getting Started with Emails
Video Overview
Overview
You can correspond with applicants through WebAdMIT. Emails sent from WebAdMIT come from donotreply@webadmit.org, and the name of your organization appears as the Sender Name (e.g., Liaison University <donotreply@webadmit.com>). If the applicant replies to the email, their response is routed to your selected reply-to address.
When applicants receive emails from WebAdMIT, their email address is listed in the To field and anyone you chose to copy into the email is listed in the Cc field. However, if you send an email preview to yourself or you are cc'ed in an email, your email address is listed in the To field. The email body still contains all applicant-specific content, including from merge fields.
Gaining Access to This Feature
The Emails feature is available on the Applicant Details page and in bulk actions through List Manager, Search, and Clipboard. Access to this tool is controlled through Work Groups. You must have the Email Applicants permission to send emails.
Sending Emails from the Applicant Details Page
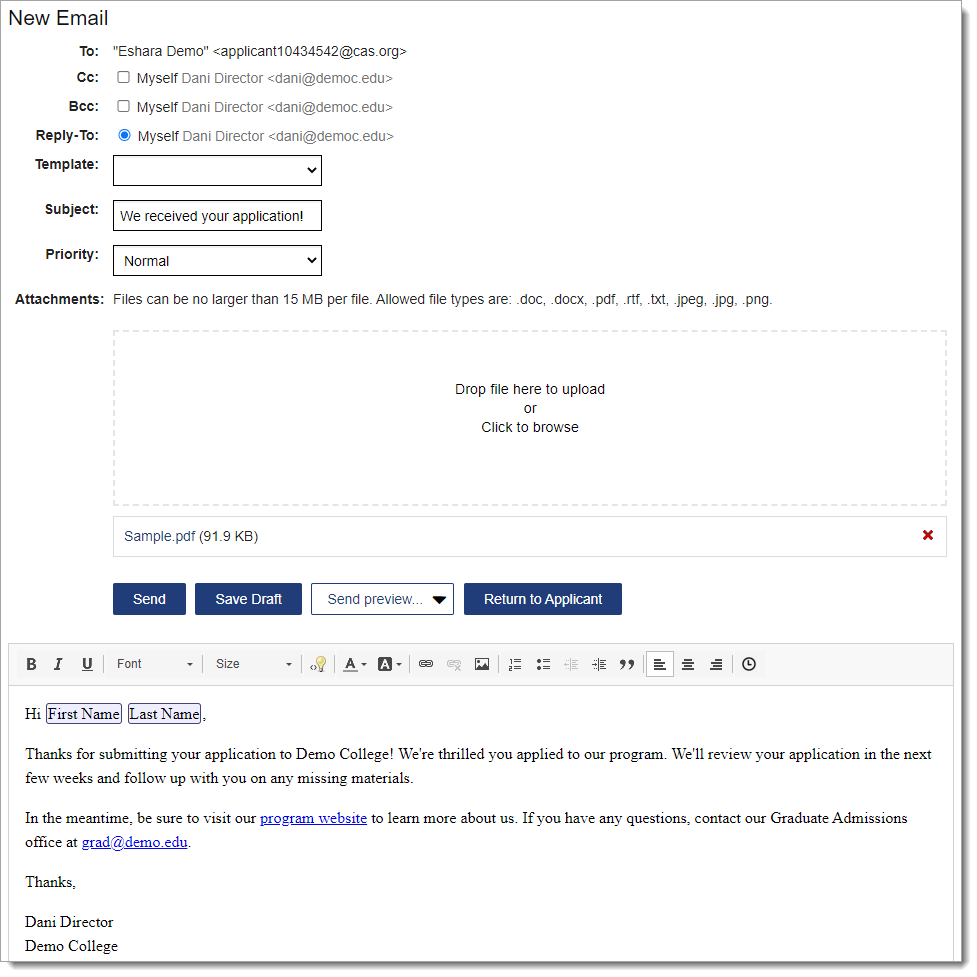
- From the Applicant Details page, click the email button under the Contact Information panel or New Email under the Emails panel.
- Select the CC, BCC, and reply-to options. When an applicant responds to an email you sent in WebAdMIT, their reply is not sent back to WebAdMIT; instead, it is sent to the email address you designate under Reply-To. By default, the email address you use to log in to WebAdMIT with is provided. You can create alternate CC, BCC, and reply-to options in Email Addresses.
- Select a template, if applicable. If you use a template and make changes to it, the changes only apply to that instance. To make permanent changes to a template, edit it in Email Templates.
- Enter a subject. Using certain buzzwords in the subject line or image-only emails can trigger spam filters. As a best practice, keep your subject lines as clear and concise as possible and avoid excessive use of capitalization and punctuation. For example, the subject line “Congratulations” may be marked as spam while “Congratulations on your acceptance to Demo University!” will clear spam filters.
- Add email attachments, if applicable. Click Add Attachment and then click to browse or drag and drop your attachments. To remove an attachment, click the delete icon. Note that:
- You can add the following file types (.jpeg, .jpg, .png, .txt, .rtf, .doc, .docx, and .pdf), up to 15 MB per file.
- There is no limit to the number of attachments for emails.
- When applicants receive the email, all attachments are located at the bottom of the email and either open in a new browser tab or download, depending on the applicant's browser configuration.
- Compose your email and format it, if applicable. Review the Email Formatting Options section below.
- When you are finished composing your email, you can click:
- Send to send the email.
- Save Draft to save the email as a draft, but not send it. Drafts are stored in the applicant's Emails panel.
- Send preview… to send a preview of the email. The available email addresses here include your own and any other email address that has been added in the Email Addresses section. When you send a preview of an email, a draft is saved in the applicant's Emails panel with a delivery status of Unknown. The Send Preview option only sends an email to the email address you indicate, not to applicants.
- Return to Applicant to cancel the email.
Email Formatting Options
|
Email Formatting Option |
Additional Notes |
|---|---|
| Add general formatting options |
|
| Use mail merge fields with the lightbulb icon |
To personalize the message using mail merge fields, click the lightbulb icon, then select the information you want to merge into the message. If you use date merge fields (e.g., Interview dates, Custom Fields built as date fields, etc.), the date merge field format is MMMM d, yyyy (e.g., July 9, 2022). If you use a merge field with more than one possible value (e.g., an applicant with more than one interview of the same type), WebAdMIT will include all possible values and add commas and "and" between the multiple values. For example, if an applicant has two interviews of the same type, the Interviewer merge field will populate as Last Name, First Name and Last Name, First Name (e.g., Stark, Tony and Rogers, Steve). If an applicant has three interviews of the same type, each at different times, the Time merge field will populate as Time, Time, and Time (e.g., 1:00 PM, 3:00 PM, and 4:00 PM). Finally, the merge field values will populate as they were created in WebAdMIT in chronological order. For example, if you assigned an interview to Tony Stark first, then Steve Rogers, then the Interviewer merge field will list Tony Stark first, then Steve Rogers. When using Interview Locations in a mail merge, the Interview Type is included with the Interview Location. For example, if your Interview type is First Interview and your location is Conference Room 243, the resulting email will display First Interview: Conference Room 243 for the Interview Location merge field. See Managing Interviews for a video overview of using Interview merge fields. |
| Create a hyperlink with the link icon |
To add a hyperlink, highlight the text you want to become the link, then click the hyperlink icon. Enter the link details, then click OK. If you want to hyperlink email addresses and phone numbers, you must enter the HTML attributes:
The default URL protocol is http://; if you want a different URL protocol, you must now manually enter it before the URL (e.g., https://demo.edu). To edit or remove a hyperlink, click the link and then click the appropriate button. |
| Insert an image |
Some common examples of images in email templates include an email header (e.g., your institution's logo) or a signature at the end of the email. If you want to add an image to the email header, review these suggested image sizes:
To insert an image:
|
| Insert the current date using the clock icon | This field will enter the date the email template is sent to the applicant. It is formatted as MMMM d, yyyy (e.g., July 9, 2025). |
Sending Emails in Batch
You can send batch emails through the:
- Search features using the Search Actions button.
- Clipboard feature using the Clipboard Actions button.
- List Manager using the List Actions button.
You can exclude applicants from your email by unchecking them before initiating a batch update. Applicants cannot view who else you send an email to in batch.
Follow the steps below to send batch emails through the List Manager; you can follow similar steps for the Search and Clipboard features.
- Using the Menu Bar, open the Applicant Lists panel, then click List Manager.
- Click on a list name to run it.
- Click List Actions.
- Click Email Checked Applicants.
- Follow the steps under the Sending Emails from the Applicant Details Page section above.
Email Statuses
Once you send emails in WebAdMIT, you can track email statuses. These statuses include:
- Bounced: the message was rejected by the recipient’s email server; you should verify the recipient’s email address. Contact the Client Support Specialist team at webadmitsupport@liaisonedu.com for further assistance.
- Clicked: the recipient received the message, opened it, and clicked a link or image.
- Deferred: the message was not sent and is in queue for redelivery.
- Delivered: the recipient’s email server received the message; however, this does not indicate that the applicant opened or viewed the message. The recipient may have recently changed their email address, or they may have rules or junk mail settings enabled that prevent the email from reaching the inbox. Applicants are encouraged to maintain updated contact information and disable junk mail filters.
- Dropped: the email provider is preventing delivery of the message. Messages are typically dropped when they contain an invalid or non-existent email address, or when the recipient marks a previous WebAdMIT message as spam. Contact the Client Support Specialist team at webadmitsupport@liaisonedu.com. Additionally, you may want to confirm with the recipient that you have the correct address and that they added donotreply@webadmit.org to their "safe senders" list.
- Failed: the message was not sent. Contact the Client Support Specialist team at webadmitsupport@liaisonedu.com for further assistance.
- Opened: the recipient received the message and opened it.
- Sent: the message is being processed for delivery to the recipient.
- Spam Report: the recipient reported the email as spam.
- Unknown: the status of the email can’t be determined. This status typically appears for recently sent emails and is replaced by another status within 24 hours.
Some emails will remain indefinitely in a status of Sent or Delivered if the recipient’s email server fails to process read receipts.
Email Troubleshooting
In some cases, emails sent through WebAdMIT may not reach their intended recipient. This can occur even if the email status is listed as Delivered, as the Delivered status simply indicates these emails have been successfully delivered to the recipient's email server.
After being delivered, emails may still be restricted or quarantined by the recipient's email server. IT teams can help resolve this issue by completing the following actions:
- Safe-list our sender IP address (167.89.98.50) and our sender email address (donotreply@webadmit.org), and
- Check SPAM traps and quarantines.
Use these links to obtain your email provider's safe-listing instructions:
If issues persist, contact our Client Support Specialist Team for more assistance.