Supplemental Applications
You can create a Supplemental Application to include program-specific questions for the applicant, such as additional essays, questions on work experience, etc. You can also opt to collect a fee for the Supplemental Application after the applicant completes the questions. If you require a fee, applicants will enter their credit card and address information.
To create a Supplemental Application, click the Supplemental App link on the Applicant Gateway Editor page.
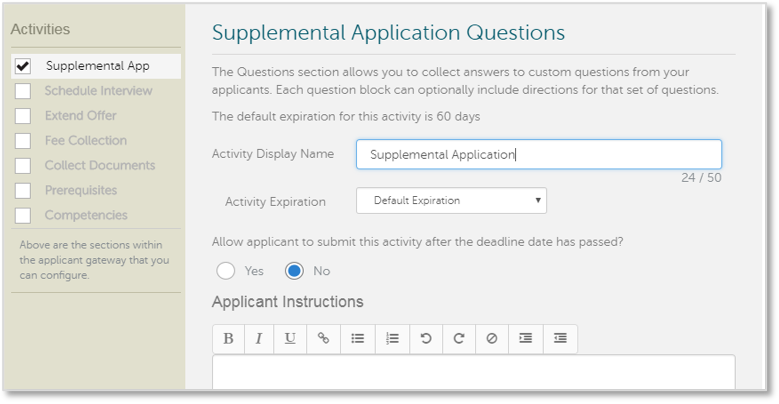
Example of Supplemental Application Activity:

Create Introductory and Finishing Text
The text you include in the Activity Introduction displays to the applicant before they begin the Supplemental Application. You can use this space to describe how your program uses the information provided by the applicant, any applicable fees, and how to contact your admissions department.
The text you include in the Finishing Statement displays when the applicant completes the Supplemental Application. You can use this space to explain the timeframes in which the admissions team reviews the applications or any additional steps the applicant needs to complete.
- Enter a header/title for the Activity Introduction.
- In the next field, enter your introduction text.
- Enter a header/title for the Finishing Statement.
- In the next field, enter text that acknowledges the applicant successfully completed the activity.
- Click Save.
- Click Continue to move to the next section.
Configure Questions
In this section, you can add program-specific questions for the applicant. These questions can be required or optional and there is no limit to the number of questions you can ask.
The Activity Display Name defaults to Supplemental Application and the activity expiration defaults to 60 days, but you can adjust this in the Activity Expiration drop-down. The following options are available:
- Default Expiration: use the default of 60 days from activation.
- Number of Days from Activation: specify the number of days from activation the activity will expire.
- Calendar Date: enter a date on which the activity will expire.
- Rolling: activity will not expire and applicants can submit it on a rolling basis.
Note that expired activities are not visible to applicants. You can also opt to allow applicants to submit their answers after the program’s deadline date.
Use the Applicant Instructions field to include text that explains the questions.
Add Question Sets
Questions Sets can be used to group questions together in a specific category, such as additional essays, work experience, etc. You must create at least one Question Set.
- Click + Add Question Set.
- Add header text. This appears above your question(s) and can be used to summarize the questions or provide other relevant details.
- Add an optional description.
- Click + Add.
Add Questions
Once you create a Question Set, you can add questions to it. There are several question types you can choose from, depending on the format in which you expect applicants to answer each question:
- Multiple Choice: questions can be single or multiple answer.
- Single answer questions can appear with radio buttons or drop-downs for applicants to select. Applicants can choose only one response.
- Multiple answer questions appear with checkboxes for applicants to select. Applicants can choose one or more responses.
- Essay: questions appear with a text box where applicants can type their response. You can set the maximum number of characters that applicants can enter (up to 9,999 characters). If you want the question to appear as a short, one-line answer, set the character limit to 50 characters. If you want applicants to enter a longer answer, set the character limit to 250 characters or more.
- Either/Or: questions appear with radio buttons where applicants can choose from two responses.
- Click + Add Question.
- Select whether the question is required or not.
- Enter a Question Description.
- Select a Question Type from the drop-down.
- Configure additional options, depending on the Question Type selected.
- Click Add.
- Add more questions and question sets as needed and click Save.
- Click Continue to move to the next section.
Note that if you use Multiple Choice or Either/Or Question Types, the answer options will not be visible in the Applicant Gateway once the activity is activated. We recommend keeping a separate record of Supplemental Application questions and answer options.
Configure Payment
You can elect to require applicants to submit a fee as part of their supplemental application. Payment options are configurable via the Applicant Gateway and can be used in conjunction with PayPal, TouchNet, and CashNet. See Configuring Payments for more information.
If you do not want to configure this option, select No and click Save. Otherwise, follow the steps below.
- Select Yes to indicate you want to add a payment.
- Enter a Payment Name (e.g., Supplemental Application Fee). This name will display for the applicant.
- Enter the fee amount as a whole number with no decimal points (e.g., $20 not $20.00).
- Click the Waive fee if applicant is approved for financial assistance checkbox if appropriate.
- Click Save.
Submit for Activation
Once you complete all required fields and save your Supplemental Application, click Submit for Review to submit it to the Client Support Specialist team for activation. A success message displays.
The Client Support Specialist team will then activate the Applicant Gateway activity within two business days. If you need your activity activated as soon as possible, contact the Client Support Specialist team.
Once activated, the activity is available the next morning and can be assigned to applicants in WebAdMIT for AMCAS.
Important: once you submit the Supplemental Application activity for activation, you can no longer edit it. Submit only when you are sure that the activity is complete and you have reviewed for accuracy. If you need to make edits after submission, contact the Client Support Specialist team. Requests for edits will be reviewed on a case-by-case basis. Please note that in most cases changes cannot be made.
To contact the Client Support Specialist team, call 617-612-2049 or email aamcwebadmitsupport@liaisonedu.com.
Activity Statuses
Applicant Gateway activities can be in the following statuses:
- Draft means that this is a new, fully-editable Applicant Gateway. It has not been sent to the Client Support Specialist team for activation. It is not yet available to assign to applicants.
- Ready for Review means that the Applicant Gateway was submitted for activation by the Client Support Specialist team. It is currently locked and only the Client Support Specialist team can make changes.
- Active means that the Applicant Gateway was activated. Active Applicant Gateways can be assigned to applicants via WebAdMIT for AMCAS.