Configuring Campaigns
In Outcomes, Campaigns are communication plans for interacting with a specific audience or purpose. Through Campaigns, you can:
- Create and foster relationships with prospective contacts.
- Generate interest and build attendance for specific events.
- Send reminders regarding deadlines.
For example, you can create a Campaign to encourage applicants to apply, or one to guide them in completing their application.

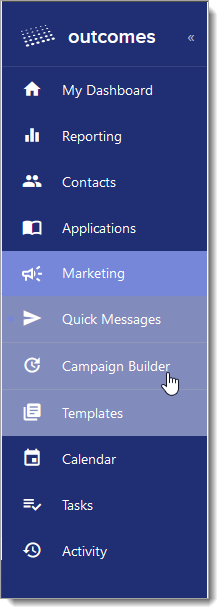
- Marketing Menu: select between Quick Messages, Campaign Builder, and Templates.
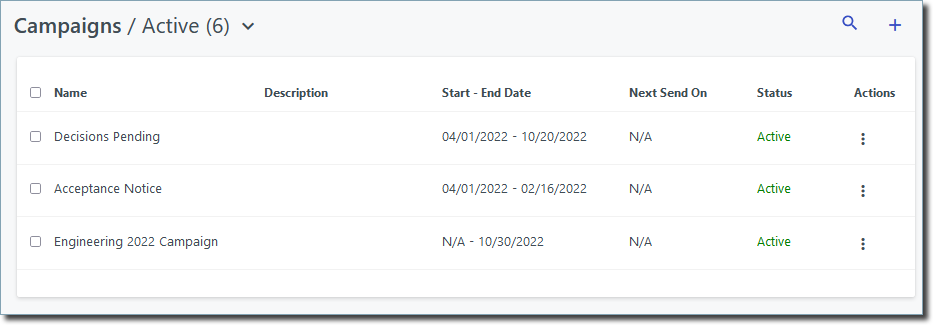
- Campaigns Dropdown: use this dropdown to select between active and inactive campaigns.
- Search Button: use the search to find existing campaigns.
- New Campaign: click the plus sign to begin building a new campaign.
- Campaign List: review your existing campaigns using this grid.
- More Options: use this button to access the Copy, Delete, and Deactivate actions.
To perform bulk actions on your campaigns, use the appropriate checkboxes to select them individually, or use the top checkbox to select them all.
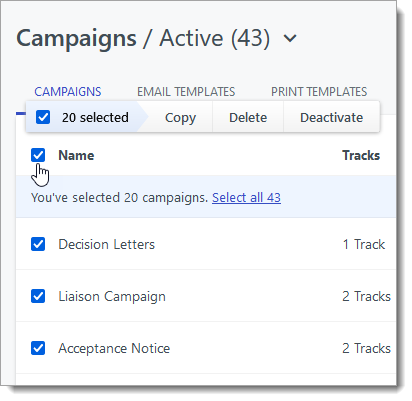
Bulk actions include:
- Copy: create a new campaign using the settings of your existing campaign(s).
- Deactivate: deactivate the existing campaign(s).
- Delete: remove the existing campaign(s).
Creating Campaigns
To create a new campaign:
- Navigate to the Campaign Builder section under Marketing on the Navigation Menu.
- From here, you can review your existing campaigns or click the plus sign to design a new campaign.
- Enter a name and description for your campaign.
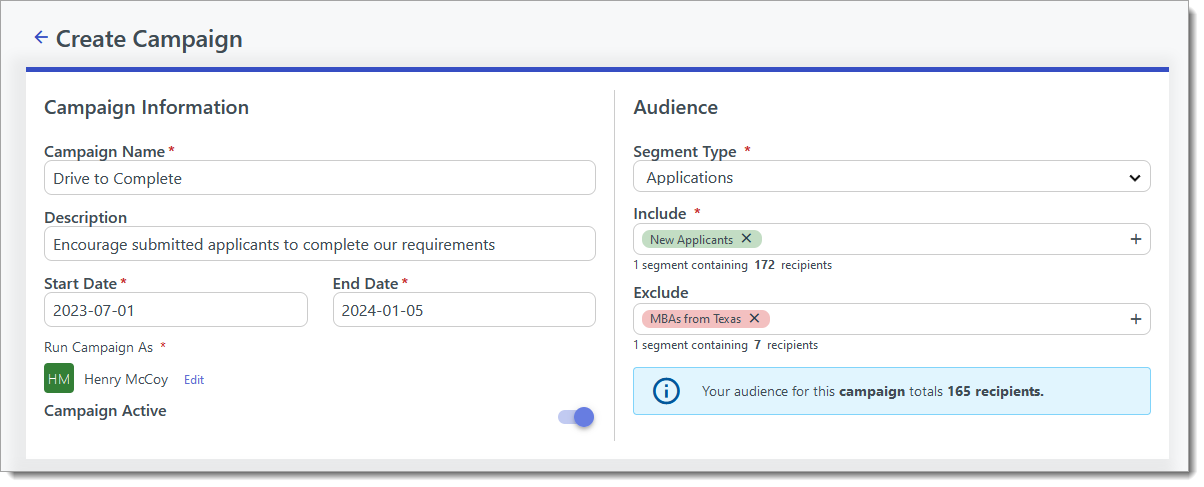
- Indicate the dates you'd like the Campaign to begin and end. The Campaign won't send any messages outside of this date range.
- Use the Run Campaign As feature to indicate which user's permissions you'd like the Campaign to operate under. This defaults to the account you're signed in with, but you can adjust it by clicking Edit. The Campaign won't send messages to applicants that are not visible to the user you select here. In addition to this, if the Run Campaign As user doesn't have access to view certain fields, the Campaign won't send messages to Segments that are based on filters using these fields. For example, if a user doesn't have access to ethnicity data on applications, any Campaign with them in the Run Campaign As field will not send messages to an Application Segment that uses an ethnicity filter.
- Next, choose the audience for this Campaign. Only the applicants that are included in the filters you add here will receive these messages. Start by indicating if this Campaign will send messages to applicants, advisors, or another Segment Type. Then, add the Segments you'd like be included in the Campaign using the Include field. If there are any exceptions, use the Exclude field to select Segments that you'd like to be left out of this Campaign. For example, you may choose to add a Segment that includes all MBA program applications to the Include field, but limit it to only domestic applicants by adding an international applicants Segment to the Exclude field.
- Review the numbers recipient numbers to confirm your Campaign will apply to your desired audience.
- Click SAVE CAMPAIGN to save your work. Then you can begin adding items to the Campaign Tracks area, where you'll configure the specific messages that will go to your audience.
Creating Tracks
Campaign Tracks are individual communication plans within a Campaign. Using tracks you can establish a flow and cadence for all of the messages you intend to send to the applicable applicants. For example, within a Drive to Apply Campaign, you can have one track for foreign applicants, and another for domestic.
Within each track there are tiers. Tiers are the steps included in a track. For example, within a track for international applicants, your first tier might be a welcome message, while your second tier could be a message to remind applicants of missing materials. Each tier can also have multiple messages. For example, you may wish to create an email, text message, and voice message to go out to all applicants at the same time. Or, you may have alternate initial messages for different Segments of applicants.
To create a track:
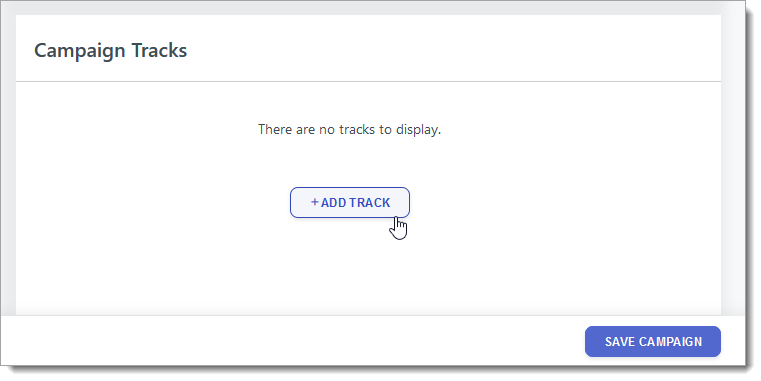
- From the Campaign Tracks page, click Add Track.
- Name the track and add a description.
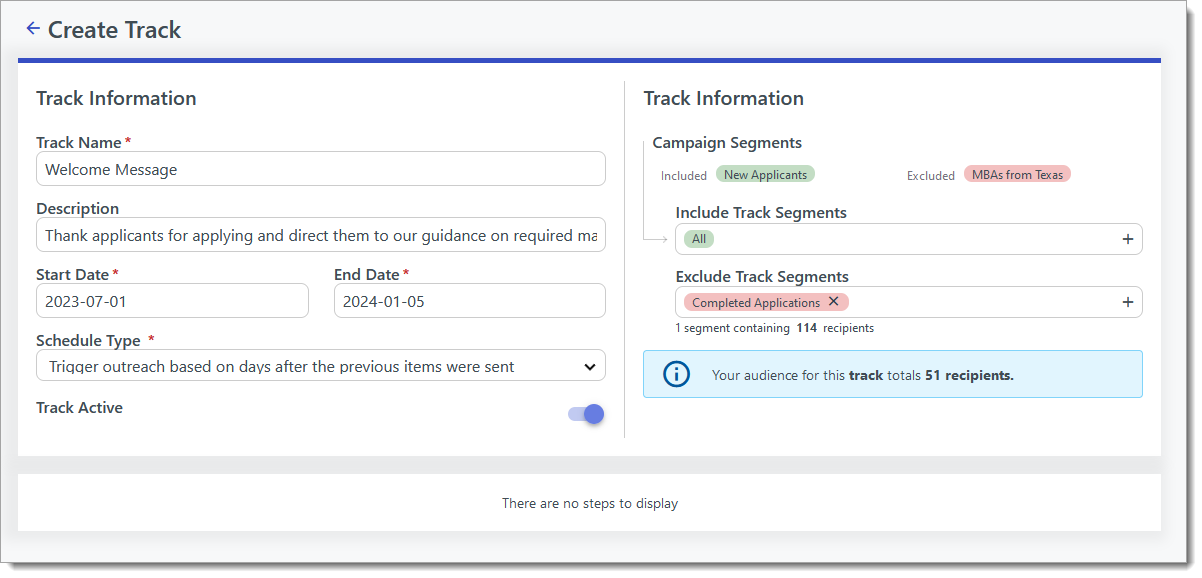
- Select dates for this track to be active. The track will not send messages outside of these dates.
- Make a selection in the Schedule Type field. Choose Send outreach on specific dates and times to have each message sent at a predetermined date and time. Choose Trigger outreach based on days after the previous items were sent to start sending your Step 1 message at a specified date and time, and send your following Step's messages a specified number of days after the previous Step's message was received.

- By default, the track is enabled to begin sending once your Start Date arrives. To disable this track, preventing it from sending any messages turn the Track Active slider off.
- If you'd like to filter the audience for this message more than the Campaign has already been filtered, make your selections in the Include Track Segments and Exclude Track Segments fields.
- Review your audience numbers to ensure your messages will be sent to the correct group.
- Your track is now listed on the Campaign Setup page.
Working with Steps and Blasts in Your Track
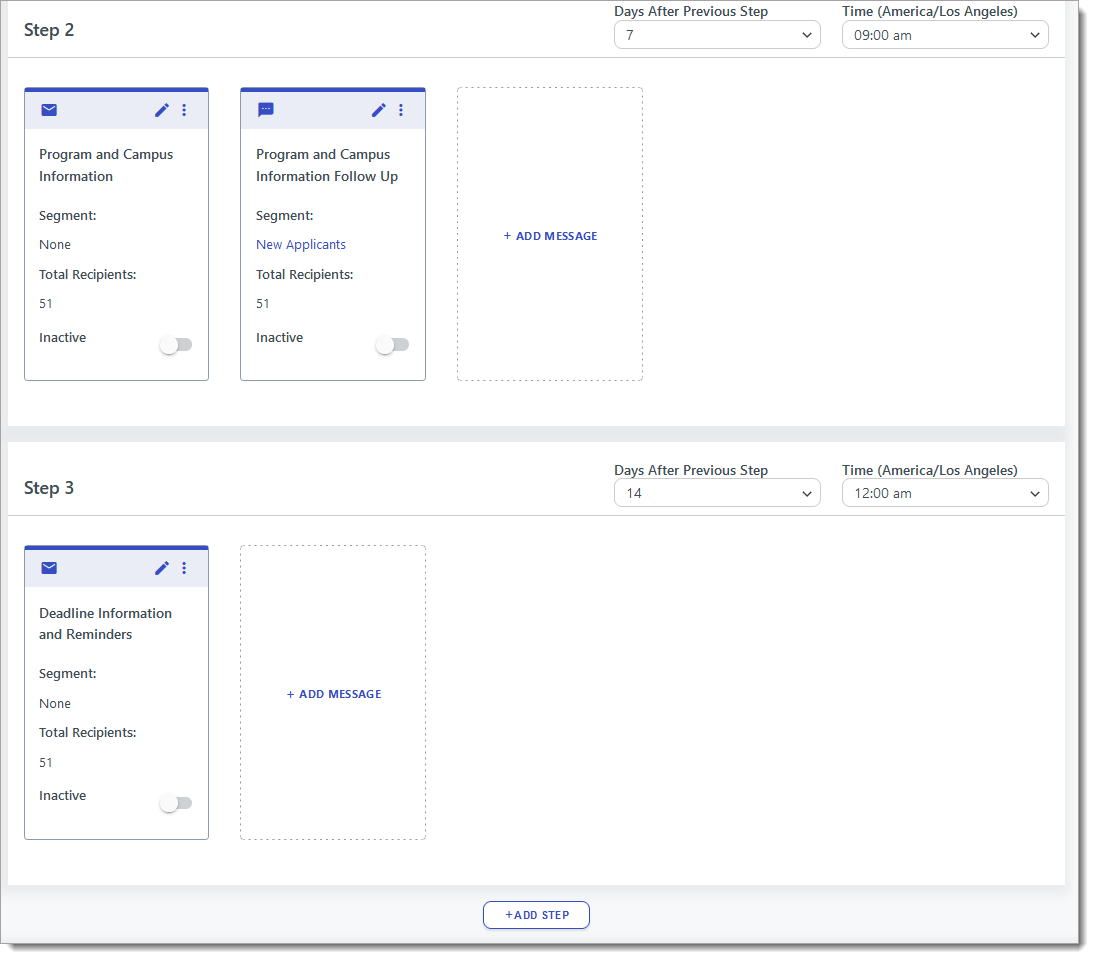
A Step is a progression of messages associated with each Track. A Step can include groups of related messages that are scheduled to go to your audience. Each Step can contain several messages. For example, you might create a Step 1 to send messages to your newest applicants. Within the Step, you may decide to schedule an Email, a Text, and a Phone message to all go out around the same time. Then, you may schedule a Step 2 to send out follow-up messages to the same audience a number of days or weeks later. If you have configured your campaign to send messages on a schedule of specific dates and times, Steps are referred to as Blasts.
- Your first Step appears after your Track is created. You can edit this Step, or begin creating new Steps by clicking ADD STEP.
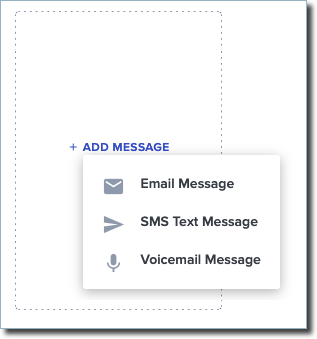
- Then, click ADD MESSAGE to choose which media type you want to send. Your options may include:
- Email Message: This option allows you to select which of your Email Templates you'd like to send.
- SMS Text Message: This option allows you to select the text messages of your choice to your recipients.
- Voicemail Message: This option allows you to send a prerecorded message to each recipient's phone. You can use a recorded voice message, or use text-to-speech. Messages arrive as phone calls, and upon answering the call the recipient hears your message.
Configuring an Email Message
If you choose Email Message, the next step is to configure the email that will be sent for this step. To do so:
- Select which Email Template you'd like to use. This opens the Email Configuration page.
- Create a name for the message.
- If applicable, select a Segment to determine who will get the email. If you select a Segment here, this acts as another filter in addition to audience selections on the Campaign and Track levels. You might select a Segment here if you have a different email you'd like to send to different groups of applicants. For example, one for in-state applicants, and another for everyone else. Adding a Segment here may also be useful if you want to send a different type of message based on your applicant's contact preferences (e.g., Email vs. Text).
- If applicable, make edits to the From Name, From Email, Reply-to Name, Reply-to Email, and Subject Line.
- Select which Delivery Address (e.g., Email Address, Alternate Email Address, Parent 1 Email Address, etc.) should be used. If one of your recipients does not have a value for the delivery address you select, the message will not be sent to them.
- If applicable, add Engagement Criteria. This acts as another filter, so that your message will only be sent to the recipients who have completed the engagement actions you select here. First, select which engagement action you'd like to use. Next, select the email that the action relates to. For example, you can add Didn't Open Email: Apply Today! as your Engagement Criteria. This makes it so that only recipients who didn't open your "Apply Today!" email will receive the email in this step. Or, you can add Didn't Open Email: Any Email in Campaign as your Engagement Criteria. This makes it so that only recipients who have not opened any of this Campaign's previous emails will receive this email. Options include:
- Clicked Email: this refers to the audience who has clicked one or more links within the email you select next.
- Didn't Click Email: this refers to anyone who has not clicked any links within the email you select next.
- Opened Email: this refers to anyone who has opened the campaign email you select next.
- Didn't Open Email: this refers to anyone who has not opened the campaign email you select next.
- Sent Email: this refers to anyone to whom you've sent an email in this campaign.
- Not Sent Email: this refers to anyone to whom you've not yet sent an email in this campaign.
Note that the Engagement Criteria filters act in combination with the other filters associated with your campaign. This includes the Segments you've configured to be included or excluded on the Campaign or Track levels. Applicants excluded from any filters will not be sent this email. Furthermore, engagement filters are dependent on the information Outcomes receives from each recipient's email client. Your audience's privacy or tracking settings may prevent information about emails that were opened or links that were clicked from being shared.
- To add an attachment to your email, click Attach File. If you add an attachment, the bottom of the email includes a link to the attachment for recipients to download.
- Make any desired edits to the body of the message.
- To select a different template, click CHANGE TEMPLATE at the top of the page. To save your changes as a new template for future use, click SAVE NEW TEMPLATE.
- You can also send a preview of the messages by entering email addresses in the Test Email Address(es) field and clicking SEND TEST.

Configuring a SMS Text Message
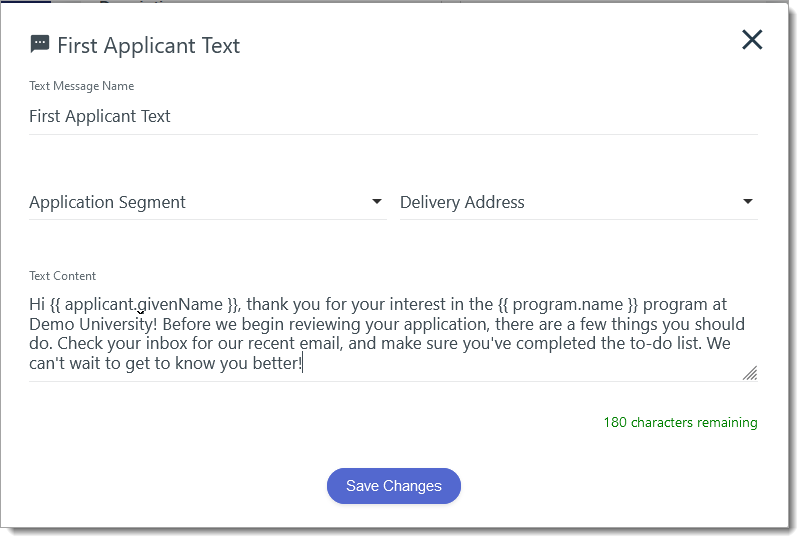
If you select SMS Text Message, you'll next need to configure your message on the Build Text page. To do so:
- Select which Segment should receive this message. Your selection here acts as another filter in addition to audience selections on the Campaign and Track levels.
- Select a Delivery Address (e.g., Mobile Phone, Other Phone, etc.) should be used. If one of your recipients does not have a value for the delivery address you select, the message will not be sent to them.
- Type the content of your text message.
Configuring a Voice Message
If you select Voice Message, you'll next need to configure your voicemail on the Build Voice page. To do so:
- Select your Segment. Your selection here acts as another filter in addition to audience selections on the Campaign and Track levels.
- Select your Delivery Address. If one of your recipients does not have a value for the delivery address you select, the message will not be sent to them.
- Select a Message Type. You can type a message and have it converted to audio, or record your voice. If you're using speech-to-text, select which language your voice should be converted to, and select the voice you'd like to use. Use the audio controls to review your message.
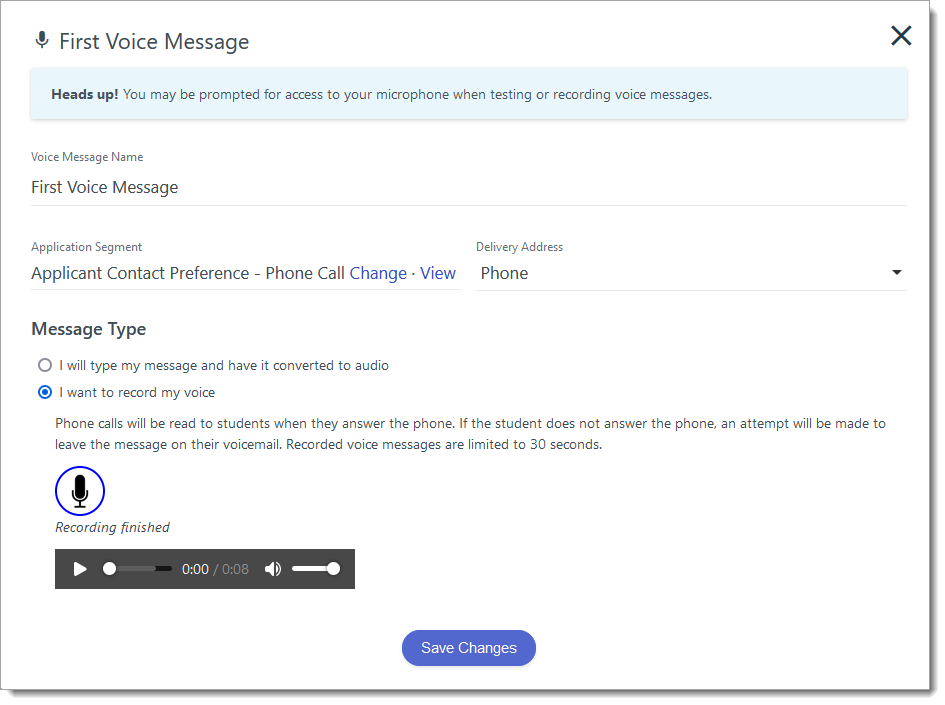
- Click Save Changes.
Configuring Your Steps
After adding an initial step and message, continue adding messages as desired. For example, you can send different texts or emails to different Segments. You can disable any individual messages by turning the Inactive slider on. Your Campaign won't send inactive messages, even if they are scheduled to go out.
Adding Additional Steps
After you've added a step, you can configure what happens next.
- To establish what should be sent after your Step 1 messages, click ADD STEP to begin configuring your Step 2 messages.

- Step 2 messages are only sent after your Step 1 message has been received.
- If you're working with a scheduled track, set the date and time the second blast, or Step 2, messages should be sent. Also, select how often this blast should repeat. A repeated message is sent to the qualifying recipients in your audience who have not yet received the message in question. For example, when your Blast 2 messages are sent, applicants who do not yet meet the criteria for your selected Segment will not receive your messages. If any of these applicants later meet the criteria, the messages are sent to them at the time you set the step to repeat.

- If you're working with a triggered track, use the drop-down to establish how many days after your Step 1 messages the software should wait before sending your Step 2 messages. Also select what time on that day the messages should be sent.

- If you're working with a scheduled track, set the date and time the second blast, or Step 2, messages should be sent. Also, select how often this blast should repeat. A repeated message is sent to the qualifying recipients in your audience who have not yet received the message in question. For example, when your Blast 2 messages are sent, applicants who do not yet meet the criteria for your selected Segment will not receive your messages. If any of these applicants later meet the criteria, the messages are sent to them at the time you set the step to repeat.
- Configure Step 2 as desired, and continue adding more steps and messages.
- Click Save Track at the bottom right to save your work.
- From the Edit Campaign page, click ADD TRACK to continue adding tracks as desired.
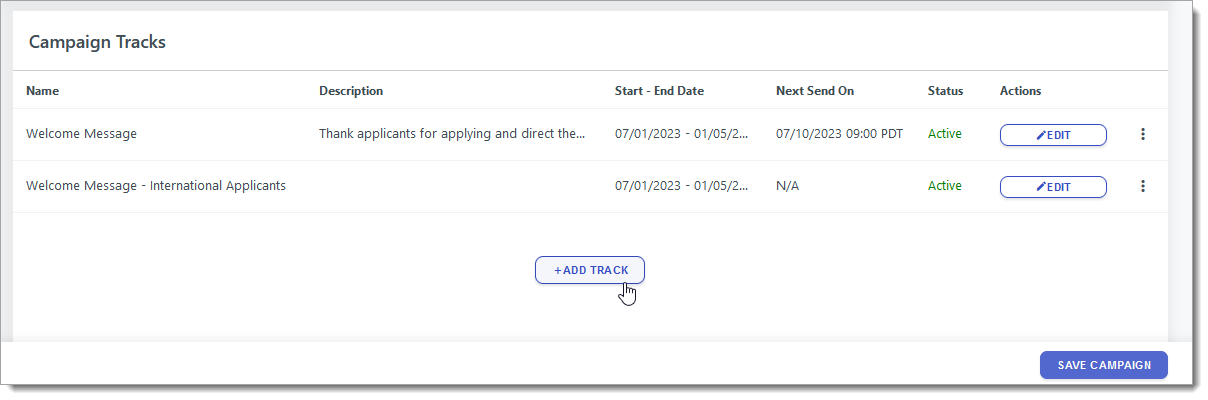
- When ready, click Save Changes at the top right to save your Campaign.
Managing Your Tracks
From the Edit Campaign page, you can manage your tracks:

- Click Analytics to view the analytics of this track, including a summary, message totals, and email performance information.
- Click Copy track to start a new track by copying this track.
- Click Remove track to delete this track completely.