Working With Application Segments
Segments are groups of applications or contacts that meet a specific set of criteria you’ve established through filters. Through the use of Segments, you can work with different subsets of applications or contacts without creating a new filter each time. For example, you can create a segment of International applicants, of In-state Applicants, or of Applicants who performed well on specific tests. The information below focuses on creating Application Segments, but you can also create Contact Segments.
Creating Application Segments
You can create Segments from the Applications Grid or from the Settings Menu.
To create a Segment from the Applications Grid:
- Add your desired filters.
- Click Create Segment.

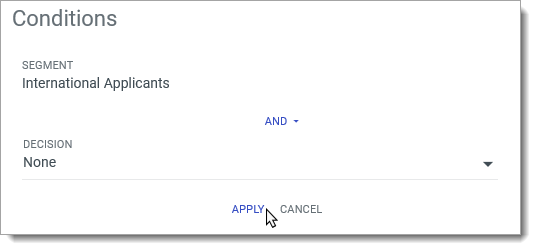
- A window appears with the filters you created listed under Conditions. Enter a name for the Segment, and (if desired) add more conditions by selecting the data points. Click APPLY to add the condition.
-
You can continue adding as many conditions as desired by clicking the plus sign.
-
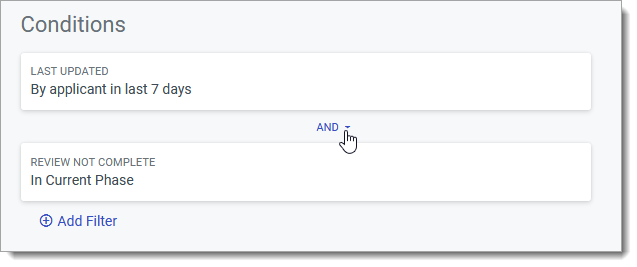
If you’re using more than one condition, click the AND button to toggle between AND and OR. This determines whether the resulting applicants meet any of your listed conditions or all of your listed conditions to appear in the Segment. Note that if you’ve added more than two conditions, the AND/OR operator can only be set once for all conditions.
-
When finished adding conditions, click Create Segment.
Segments can also be added from the Settings Menu. To do this:
-
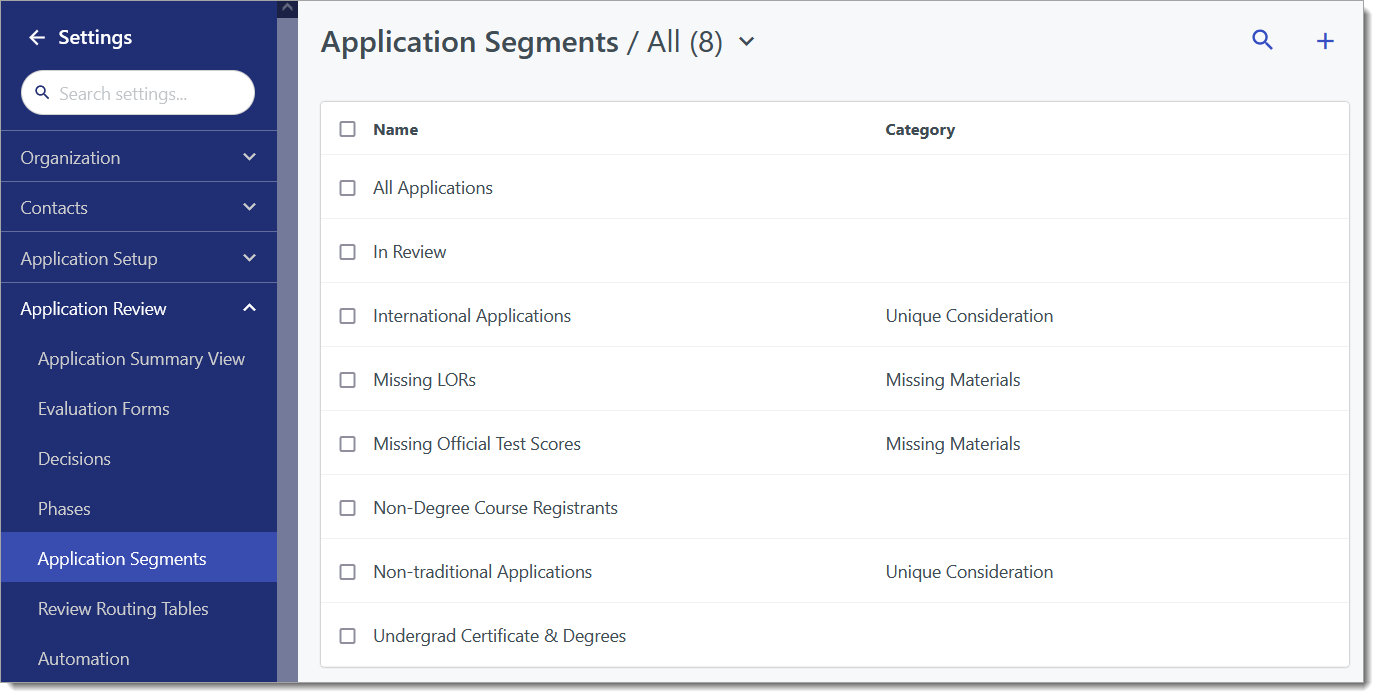
Go to Application Segments under Application Review in the Settings menu.
-
From here, you can review your existing Segments, and click the plus sign to create a new Segment.
-
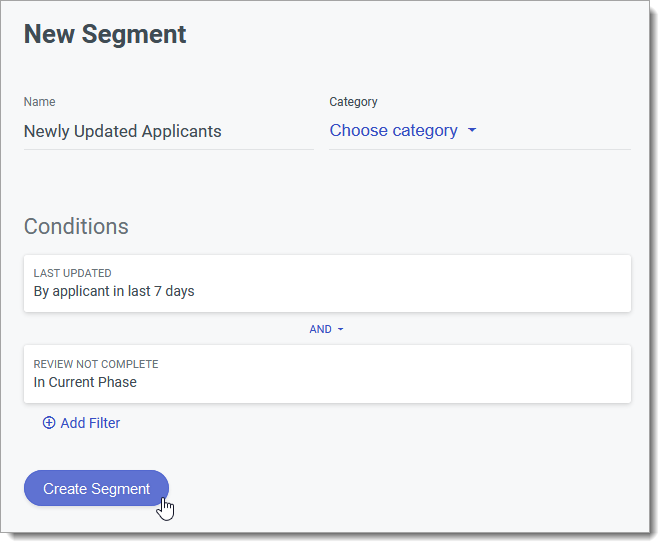
Name the Segment, and decide if you’d like to categorize it. Segment categories allow you to group Segments together to work with them more efficiently.
-
Next, you’ll use the Conditions area to establish what criteria must be met for applicants to appear in this Segment. Add conditions by clicking the plus sign.
-
A drop-down appears, presenting you with fields and data points you can use to add a criterion. Select the desired data point, and establish the condition. (For example, choose Last Updated as your data point, and select Applicant and In last 7 days as your condition. This selection isolates all applicants that have an applicant-made update within the last week.) Click APPLY to add the condition.

-
Click the plus sign again to add another condition. You can continue adding as many conditions as desired.
-
If you’re using more than one condition, click the AND button to toggle between AND and OR. This determines whether the resulting applicants meet any of your listed conditions or all of your listed conditions to appear in the Segment. Note that if you’ve added more than two conditions, the AND/OR operator can only be set once for all conditions.
-
When finished adding conditions, click Create Segment.
Viewing Segments
-
After creating a Segment, it is now saved and becomes usable in other areas of the software. For example, you can complete batch actions on Segments in the Applications View, or schedule periodic Exports of the Segment’s applicants.
-
To view the applications currently in your Segment, navigate to the Applications View. Click the Segments dropdown and select your desired Segment.

-
After selecting a Segment, you can add additional Segments or other filters.
Combining Segments
Outcomes also allows you to create Segments that combine or cross-reference previously-existing Segments. This can be useful when you need to build more advanced Segments that employ a large number of conditions. This also allows you to combine AND/OR operators to create a more dynamic Segment. When creating these composite Segments, remember that the Segments used within a Segment can no longer be deleted.
To combine Segments:
-
From the New Segment page, click the plus sign to add a new condition.
-
One of the available data points is Segment. Select this, and choose which Segment you’d like to work with. If desired, you can narrow down the available Segments using the Category dropdown. Click APPLY to add the Segment as a condition.
-
Continue adding conditions as necessary. If desired, you can add additional Segments to isolate applicants that appear in all of them.

-
Click Create Segment when ready.
-
Your new Segment is now filtered by the previous Segment(s), along with any other conditions you’ve added.
Filtering by Segments
On the Applications Grid, you can filter applicants using Segments. This allows you to view the applicants who are currently included in your Segment.
To do this:
-
Navigate to the Applications View and click the Segments dropdown.
-
Choose which Segment you’d like to use as a filter.
-
Once you’ve selected a Segment, only applicants in that Segment appear among the visible applicants.
-
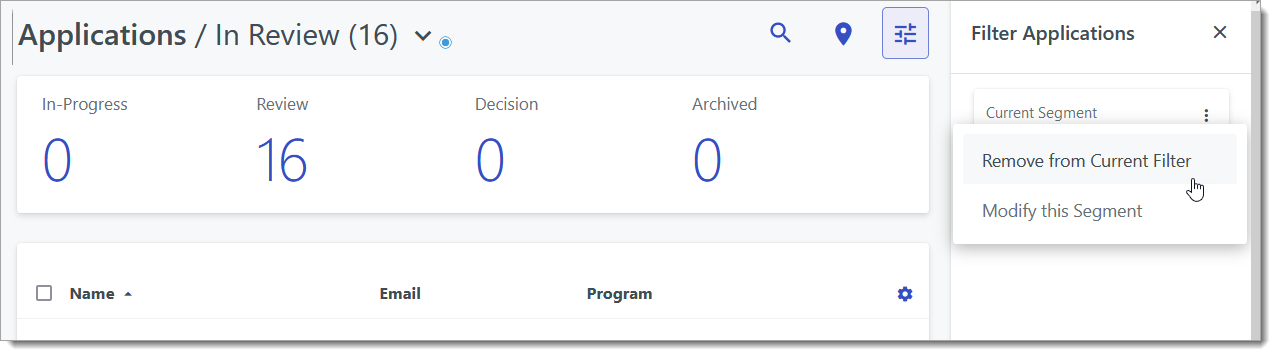
To clear a selected Segment, click the Filters icon, then click the More Options (three dots) icon near your Segment filter. Click Remove from Current Filter.
-
After selecting a Segment as a filter, you can edit the Segment by clicking its name. Then click Save Segment to keep your changes.
-
Use the plus sign on the left to add more filters to your Segment as desired. Note that additional Segments can also be added as filters using this method. To do this, select Segment as the data point you’re using as a filter, and choose from the available Segments. You can also use the Group Filter feature to create more complex filters.

Managing Segments
From the Segments page, you can manage your existing Segments.
You can access the Segments page under App Review in the Settings menu. Click on any Segment to view it or modify its filters.
When you click the checkbox to the left of the desired Segment, this reveals your management options toward the top of the page.

-
Delete: Use this option to remove an existing Segment.
-
Categorize: Use this option to select an existing Segment category to place the checked Segment into. Categorizing Segments helps keep your segments organized and quickly accessible. You can also create a new Segment category by clicking Create Category. To take a Segment out of an existing category, click Uncategorize.
-
Copy: Use this option to build a new Segment that copies the settings of your checked Segment. Clicking Copy takes you to the New Segment page, where the copied Segment’s conditions are added for you. From here, you can edit the existing conditions, add new conditions, or adjust the Segment’s category.
If you’ve created categories for your Segments, you can also filter the Segments using these categories. To do this, click Category at the top right of the page and select your desired category.