Adding Contacts
In Outcomes, contacts can be added manually or imported. Once Contact Types are established, you begin adding contact records as desired.
Creating Contacts Manually
In Outcomes, you can create contacts to keep track of your interaction with recruits, applicants, students, and others.
Once you have Contact Types created, you can begin creating contacts. To do so:
- Navigate to the Contacts View, and use Contact Type Selector at the top of the page to choose which type of contact you want to work with.
- Click the plus sign, and click Add Contact.

- Complete the fields and click Create to add the contact.

- From the Contact Information page, click on fields to complete them as desired.

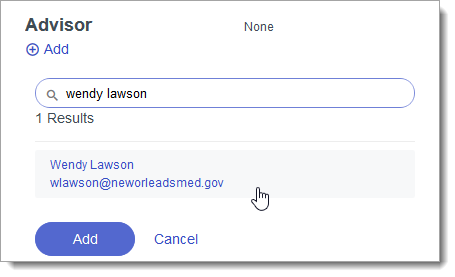
- You can use the Relationships tab to link the contact to other contacts. To do so, click Add near the desired Contact Type, search for the linked contact, then click Add to keep your change.
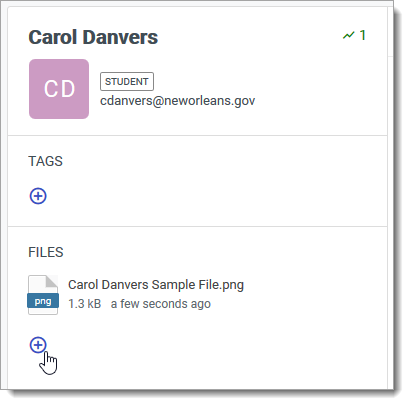
- If desired, use the side panel to add Tags or upload Files related to the contact.
Linking Applications to Contacts
If you add an application that already exists in Outcomes as a contact, the software links these together using their name and email address. The linked application is shown in the side panel of the Contact Information page.

Click on the application link to navigate to the contact's application.
Importing Contacts via File Upload
Contacts in Outcomes can also be imported in batch through a file upload. If you have contacts stored in a CSV, JSON, or XML file, you can pull these into Outcomes using the Upload option. When uploading contacts from a file, remember that contacts that already exist in Outcomes will not be imported again, even if these contacts exist under a separate Contact Type.
To begin importing contacts from a file:
- Navigate to the Contacts view, click the plus sign, and click Upload Contacts.
- Drag and drop your desired CSV, JSON, or XML file, or browse for it.
- After selecting the file, indicate if it is from a new data source or one that you've previously used. If it is from a previously imported data source, select which one. Then click Continue.

- Name the integration, select the Contact Type, then select your type of import:
- Contacts Only
- Activity Only
- Contacts and Activity
- Click Continue, then indicate if the file contains column headers. Click Continue again.

- Next, map the fields in your import file to existing contact fields in Outcomes. Drag the fields over from the left, then click Select a property to choose which existing field the new data should be imported into. Remember to select one of the imported data fields as a unique identifier. Review Indentifying a Contact via Mapping for more information. Click Done.

- A message indicates the file was successfully imported.
If, after following these steps, any contacts from your file did not upload into Outcomes, confirm that the contact information aligns correctly with the associated properties as described above. Also, confirm that the missing contacts do not already exist in Outcomes.
Identifying a Contact via Mapping
It's important to make sure you accurately set the identifier used when building your mapping. There are three items in the Mapped Property that you can use as identifiers:
- Email: this the default unique identifier. If you pass no information while mapping other than First Name, Last Name, and Email Address, Outcomes uses email to try to match to an existing record.
- [Property Name] (identifier): this is an identifier that you created as a property on this contact type that uniquely identifies a single person. Usually this is something like a CAS ID or an SIS ID. This is ideal for managing identification in your imports. First, {{helpcenter)) attempts to match on the selected identifier. If there's a match, this import will update this contact. If there's no match, {{helpcenter}} treats Email Address as a fallback match, and see if there's an existing record to update. If not, {{helpcenter}} creates a new record.
- Unique Identifier: this is the first option in the dropdown, and creates identifier behind the scenes. While you can use this for any truly unique, person-level identifier (e.g., CAS or SIS ID), the best practice is to create the explicit contact property above, which will make it easier to validate your imports. If you map a non-unique field to Unique Identifier, you will inadvertently merge together a large number of records, which cannot be undone.
Importing Contacts via Integration
You can also configure an integration with other software to handle your contact imports. To set up an integration:
- Click Contact Data Sources in the Import/Export section of the Settings menu.
- From the Current Integrations page, you can review your existing Integrations or adjust their priority. To begin configuring a new integration, click the plus sign.

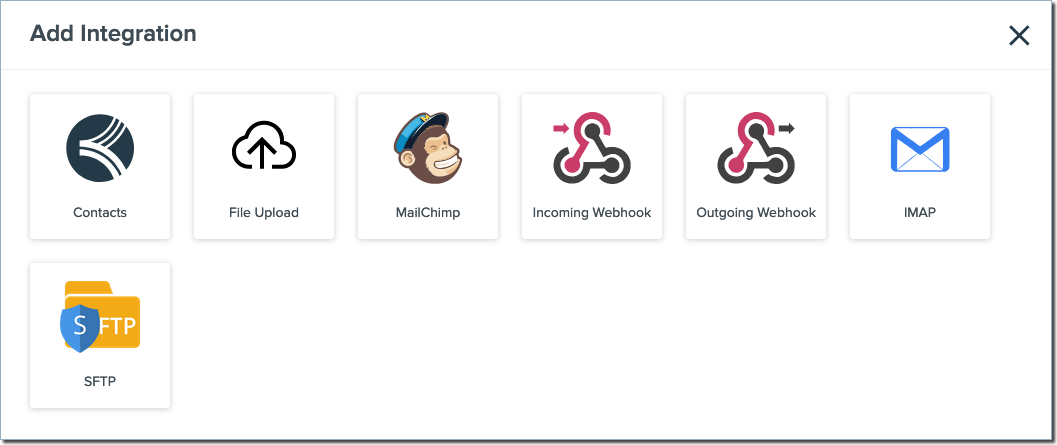
- Select from the available Integration types.
- Name the integration, select a Contact Type and Import Type to establish what this integration will bring in, and click Setup your Integration.
- In the window that appears, add the relevant credentials and keys and complete the setup to allow access.
- A confirmation message appears, and you can return to the Contacts view to see the results.
Once you've established multiple integration types, edit the priority of the integrations so that Outcomes knows which data should take precedence if conflicting information gets imported for any data point. If, after following these steps, any contacts from your file did not upload into Outcomes, confirm that the missing contacts do not already exist in Outcomes, even under another Contact Type.