Customizing the Application Summary and Sidebar
If there are fields in Outcomes that you'd like to find quickly, you can include them in the Application Summary or Sidebar of each application record.

- Application Summary: the section at the top center of each application record
- Application Sidebar: the section to the right of each application record
Both the Application Summary and Application Sidebar are customizable, allowing you to choose which data points you want to include there. This functionality allows you to take fields associated with each application and feature them prominently on each record. For example, you might want your colleagues to quickly locate the applicants' Citizenship Status, Primary Degree, or Experience Hours. You can include these data points in the Summary or the Sidebar so that you won't need to search for them on each record. You can also add Custom Properties to these sections.
Customizing the Application Summary and Application Sidebar
Once you've decided which fields you'd like to make more prominent, you can customize your Application Summary or Sidebar to move the fields in place. To do this:
- Navigate to the Settings menu and click Application Summary View in the Application Review section. From here you can review which fields are currently placed in the Summary or Sidebar.

- Click the edit pencil to make changes.
- From here, find the fields you'd like to include in either section by searching for them on the left under Available Fields. Click and drag to place them along with the Summary Fields or Sidebar Fields.

- You can also organize the fields you have added by creating groups. To do this for the Application Summary, go to the Add a column to your summary fields area and select Add a half width column to create a group that takes up half of the summary, or click Add a full-width column to add a group that spans the width of the entire summary section. Note that application records in Outcomes are responsive to the size of the screen you're viewing, so groups will automatically adjust to better fill the space.

- Once your new group is added, give the group a title and drag your desired fields in place.
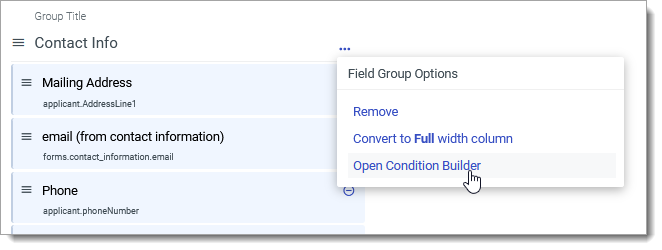
- You can also make the Field Group conditionally visible, so that it only appears for applicants that meet conditions you set. For example, you may have a field that indicates which department is reviewing the application. You can add the Engineering-related fields to the Application Summary only for applicants who are being reviewed by the Engineering department. Alternatively, you can make fields like Country of Residency visible in the Application Summary only for applicants whose Citizenship Country does not equal United States. To set visibility conditions for one of your groups, click the three-dots icon at the top of the Field Group. Then click Open Condition Builder.
- If you add conditions here, this Field Group only appears in the Application Summary or Sidebar of applications that meet these filters. Continue adding filters as needed. Click +condition to add more conditions to your filter. Click +(group) to create a group of conditions combined together. For advanced filters, you can also add groups of conditions nested within other groups.

- After setting these conditions, a Conditional Visibility indicator appears for the Field Group.

- You can also organize fields in the Application Sidebar by clicking Add a group in the Sidebar section.
- When you're done customizing, click Save Changes at the top right. Your new fields now appear in place on each application record.