Sending Quick Messages
Overview
The Marketing view in CSU Transfer Planner allows you to create and track your outreach methods. Using the Marketing tools, you can set up automated, personalized communications to any contact.
In CSU Transfer Planner, you can use Quick Messages to send a one-off message to applicants individually or in batch. In contrast with Templates, Quick Messages can be sent whenever you need to send them without working with a Campaign.
For example, perhaps there's an update to your procedure, deadlines, or requirements. Maybe you have new contact information or updated hours of operation. You may need to quickly send a message to your applicants to inform them of these adjustments. With Quick Messages, you can build the message as an email, text message, or voice message, and send it to whatever group of applicants you'd like - without developing a new campaign or editing your existing campaigns.
Creating Quick Messages
To create a new Quick Message:
- Navigate to the Quick Messages section under Marketing on the Navigation Menu.
- From here, you can review your existing messages or click the plus sign to create a new Quick Message.
- Select which type of Quick Message you'd like to create.

- Begin creating your message by giving the Quick Message an Internal Message Name. Then select the Audience Type, Delivery Address to be used, and the Contact Segment that you will send the message to.

- To move to the next step, click Message at the bottom of the page.
- If you're creating an email message, you're presented with your list of existing templates. The templates available here are those you've already built in the Email Templates area. Select a template and make any required edits to the message, including any changes to the Subject Line or body of the message. Click ATTACH FILE to add an attachment. Click CHANGE to go back and select a different email template. To test the message before sending it to your recipients, enter one or more email addresses in the Test Email Address(es) field and click SEND TEST. When you're satisfied with the message, review a summary of your message.

- If you're creating a text message, type your message into the Text Content field. When you're satisfied with the message, review a summary of your message.

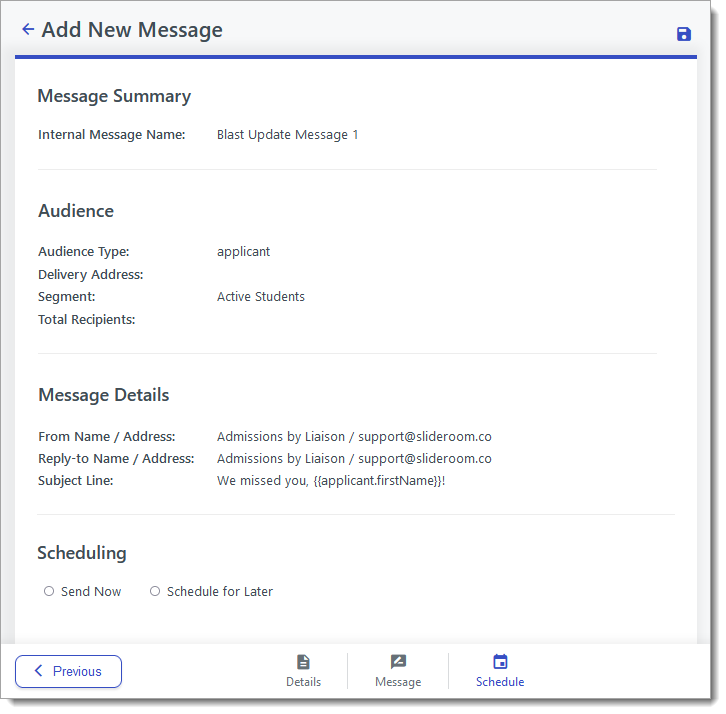
- When you're ready, click Next at the bottom of the page. Review the summary of your message and select Send Now or Schedule for Later. To finalize your message click the save icon at the top right of the page.
Sending Quick Messages from the Contacts Grid
Alternatively, you can send emails directly from the Contacts Grid. To do so:
- Go to the Contacts Grid and select your desired filters, or search for your desired applicant(s).
- Click the checkboxes to the left of the desired contacts’ names or click the checkbox at the top left to select all applicants on the page.
- If the list of contacts extends past the first page, you’re presented with an option to select the entire batch. Click Select all… to include all of the contacts.
- From the menu that appears on the bottom, click Email to send an email to these contacts.

- From the Send Email panel, enter your email under the Message section.

- Adjust your email settings as desired, including the following:
- From Email Address: the address that appears to recipients as the email sender.
- From Name: the name that appears to recipients as the email sender.
- Reply To: the email address that CSU Transfer Planner will use if the recipient replies to your email.
- Reply To Name: the name that will be associated with the Reply To address.
- If desired, click Attachment to include up to five attachments in your email. Each attachment can be up to 8 MB in size.
- Review the email using the Preview or Send Test Email options. If you preview your email, you can select a contact to test any merge fields you've included in the message.
- When ready, click Send.
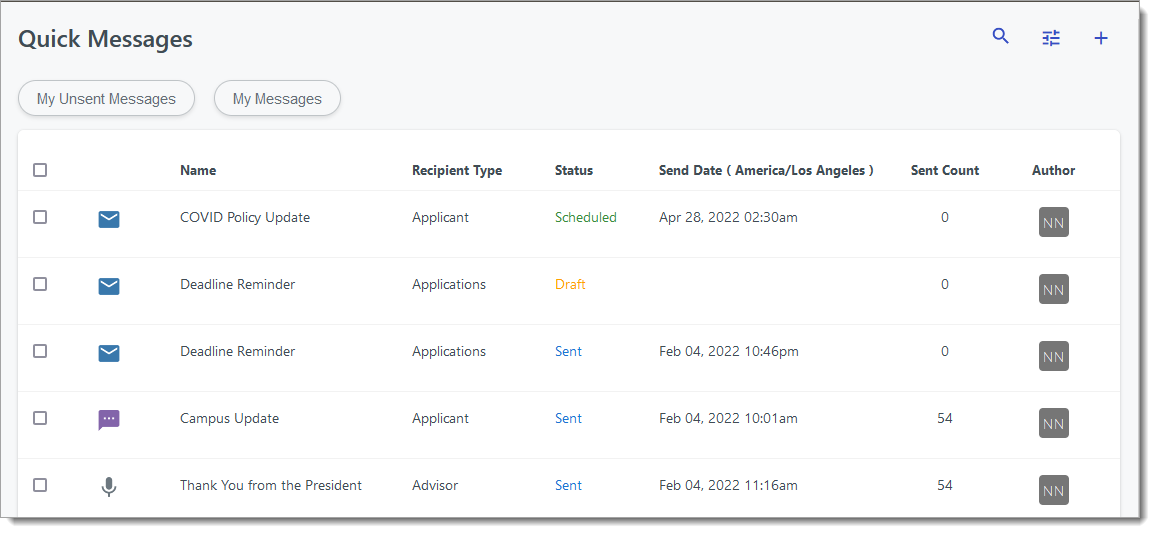
Managing Quick Messages
Once you send or schedule quick messages, you can review them in the Quick Messages Grid. To manage existing quick messages, click the checkbox next to the individual quick message name(s) or use the top checkbox to select them all.
Filtering Quick Messages
Use the My Unsent Messages and My Messages buttons to filter quick messages. Alternatively, use the filter icon to apply additional filters.
Searching for Quick Messages
Use the search icon to find a quick message.
Copying Quick Messages
Click Copy to copy a quick message.
Deleting Quick Messages
Click Delete to permanently delete a quick message.