Managing Roles
Overview
At your institution, you may have people who are responsible for completing different tasks in CSU Transfer Planner. To accommodate this, you can use the prefabricated Roles or create new Roles (University Portal users only) that correspond with different types of users. Each Role is customized with its own set of permissions and access. Note that a user can only belong to one Role.
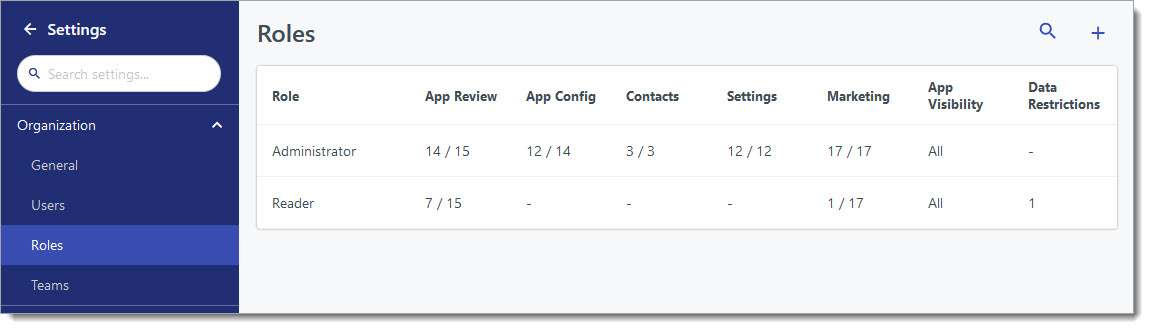
You can access Roles from the Navigation Menu: click Settings, then under the Organization section, click Roles.
The Roles grid provides an overview of the number of permissions enabled – out of the total number of permissions available – for each role in each module. For example, the Administrator role has 3 out of 7 permissions enabled for the Contacts module, 6 out of 11 permissions for the Marketing module, etc.

Prefabricated Roles
|
Role |
Key Permitted Actions |
|---|---|
| CCC Transfer Planner Primary User |
The Administrator Role gives full access to all features. Only two people per university should be assigned to this role.
|
| Counselor |
|
| Report Viewer |
|
| Viewer |
|
You can use the following prefabricated Roles in CSU Transfer Planner when creating or updating user accounts.
|
Role |
Key Permitted Actions |
|---|---|
|
Administrator |
The Administrator Role gives full access to all features. Only two people per university should be assigned to this role.
|
|
Communication |
|
|
Configuration/Reviewer |
|
|
Counselor/Reviewer |
|
|
Data Viewer |
|
|
Executive |
|
|
Viewer |
|
Creating a New Role
- Using the Navigation Menu, click Settings.
- Under the Organization section, click Roles.
- Click the plus sign to add a new Role.
- Enter a name for the Role.
- Select the dashboard for this Role. Users who are placed in this Role will have the selected dashboard as their default dashboard in CSU Transfer Planner.
- Select the Role's actions. Review the Role Actions and CSU Transfer Planner Functionality section below to determine which actions to activate for a Role. The selected actions appear under Permitted Actions. Any items left unchecked may still be visible to the reviewers. To hide items, use the Data Restrictions area.
- Under Application Visibility, select if users in this Role can view all applications or only a certain Segment. Keep in mind, users can also see applications that have been assigned to them, regardless of their Role restrictions.
- Under Application Data Restrictions, select the data you want to hide from this Role. By default, all fields listed are visible.
- Click Add restriction.
- Type and select the field you want to hide.
- Click Add Selections.
- Under Contact Access, select:
- If users in this Role can view all applications or only a certain Segment. Click All Records, then select the Segment. Keep in mind, users can also see applications that have been assigned to them, regardless of their Role restrictions.
- The data you want to hide from this Role. By default, all fields listed are visible. You can delete any selections by clicking the blue icon.
- Click Hide a property.
- Type and select the field you want to hide.
- Click Hide Selections.
- Click Create Role.
Role Actions and CSU Transfer Planner Functionality
When creating Roles in CSU Transfer Planner, you can select which actions are available to the users with each Role. See below for a description of the available actions.
Contacts
|
Role Action |
Definition |
Available in? |
|---|---|---|
|
Edit Contacts |
Allows users to add or remove any Contact, and edit any data on Contact records. Edit all Contact settings, such as Contact Types, Contact Properties, and Integrations. |
|
|
Manage Contact Segments |
Allows users to add, remove, or edit Contact Segments, their Categories, and contained filters. |
|
|
Resend Activation Emails |
Allows users to resend activation emails from the Pending Accounts page. |
|
|
Manage Assigned Conversations |
Allows users to send messages and work with the management functions (reassign, resolve, etc.) for the conversations assigned to them. |
|
|
View All Conversations |
Allows users to see all conversations. |
|
|
Manage All Conversations |
Allows users to see and manage all conversations. |
|
|
Send Contact Email |
Allows users to send emails to contacts. |
|
|
Activate Pending Contacts |
Allows users to activate contacts from the Pending Contacts page. |
|
General Settings
|
Role Action |
Definition |
Available in? |
|---|---|---|
|
Manage Global Data Restrictions |
Allows users to configure Global Data Restrictions. |
|
|
Manage Users |
Allows users to add, remove, or edit any user and their metadata, such as Role, Team, and Portal Access. |
|
|
Invite Users |
Allows users to send portal invitation emails to users for initiation of system access. |
|
|
Manage Roles |
Allows users to create and edit any Roles in the software. |
|
|
Impersonate Organization Users |
Allows users to temporarily access the CSU Transfer Planner Portal on behalf of a specific user to troubleshoot or configure their account. |
|
|
Manage Reports |
Allows users to add, remove, or edit any report, its content, and sharing link settings. |
|
|
Manage Goals |
Allows users to add, remove, or edit any Goal and its available metadata, such as Target, Segment, and Dates. |
|
| Manage Exports | Allows users to add, remove, or edit the set of Exports, their names, contents, filters, schedule, and delivery settings. |
|
| Generate Exports | Allows users to export files, including any applications or data they are permitted to view. |
|
|
Personalize Dashboard |
Allows users to customize the default Dashboard’s contents, filters and layout to match one’s own personal preferences. |
|
Marketing
|
Role Action |
Definition |
Available in? |
|---|---|---|
|
View Outreach |
Allows users to view the sent list and contents of emails, text, and voice messages in campaign tracks. |
|
|
Manage Outreach Campaigns & Tracks |
Allows users to turn off messages and to create, edit, and delete tracks. |
|
|
Manage Emails |
Allows users to create, edit, and delete emails on the campaign tracks pages. |
|
|
Send Emails |
Allows users to activate and deactivate emails to be sent. Set the schedules for email tiers. |
|
|
Manage Text Messages |
Allows users to create, edit, and delete text messages on the campaign tracks pages. |
|
|
Send Text Messages |
Allows users to activate, and deactivate text messages to be sent. Set the schedules for email tiers. |
|
|
View Marketing Email Templates |
Allows users to view the active and archived email templates on the Email Templates list page. |
|
|
Manage Marketing Email Templates |
Allows users to create, edit, and archive email templates. Note that changing templates doesn't impact existing emails. |
|
Other
|
Role Actions |
Definition |
Available in? |
|---|---|---|
|
Manage Transfer Planner Programs |
Update your program's Transfer Success Pathway (TSP) configurations and program branding in the Configuration Portal. |
|
Adding Users to Roles
Once you create Roles, you can assign them to existing users. Each user can only be in one Role.
- Using the Navigation Menu, click Settings.
- Under the Organization section, click Users.
- Click the applicable user's name.
- Select the applicable Role.
- Click Save Changes.
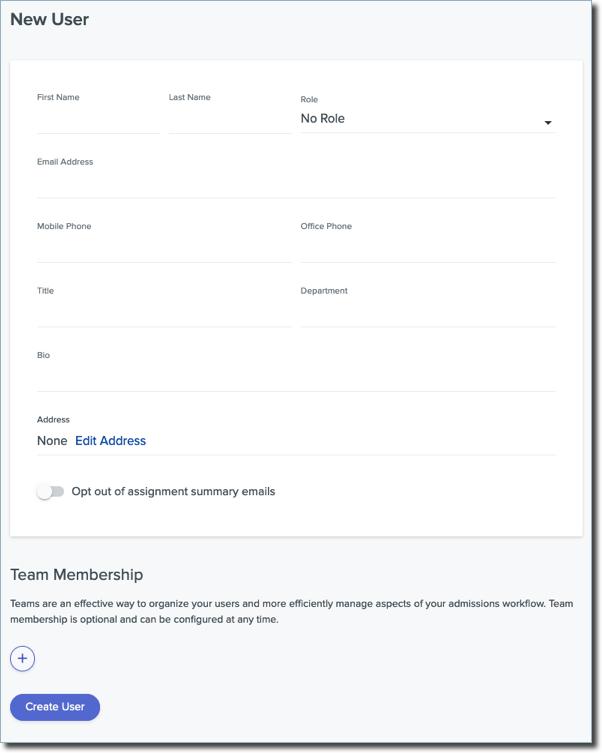
To create a new user, see the Managing Users topic.
Managing Roles
To manage existing Roles:
- Using the Navigation Menu, click Settings.
- Under the Organization section, click Roles.
- Click the search icon to search for Roles.
Each Role is listed, indicating how many of the available Role actions are enabled in each category.
Editing Roles
To edit an existing template, click the Role name, make any desired edits, then click Save Changes.
Deleting Roles
To delete a Role, click the Role name, then click Delete Role. Note that you cannot delete a Role that is currently assigned to a user.