How to Create Frequently Used Segments
Overview
Below are the steps to create frequently used segments. Note that some frequently used segments have already been created as Default Segments, which can be accessed through the Segment Selector.
Geographic Segments
Local Applicant Segment
- Click Add Criteria.
- Search for Current Address in the search bar.
- Select Form: CAS - Contact Information > Current Address from the drop-down menu.
- Enter the two-letter state code of the applicable state.
- Note: you only need to complete one prompt for the segment to generate (e.g., state); completing additional prompts (e.g., city and state) is optional unless you require that information for the segment.
- Click OK and Apply.

Geographic Region Segment
To create a geographic region segment, add the states in that region to the segment builder. For example, to build a West Coast regional segment, add CA, OR, and WA.
- Click Add Criteria.
- Type Permanent in the search bar.
- Select Form: CAS - Contact Information > Permanent Address.
- Type the two-letter state code of the applicable state, e.g., CA.
- Click OK.
- Repeat these steps to include additional states in the desired region.
- Note: as you add additional criteria, use the AND/OR operators to configure the segment.
- Click Apply.

Medical School Segments
Medical School Name
Find the name of a degree-granting medical school that the applicant attended.
- Click Add Criteria.
- Type Medical School in the search bar.
- Select Application Property > Medical School Name.
- Operation = Is exactly.
- Search for and select the desired school’s name from the drop-down menu, or input it manually.
- Click OK and Apply.

Medical Degree Type
- Click Add Criteria.
- Type Medical Degree in the search bar.
- Select Application Property > Medical Degree Type.
- Operation = Is exactly.
- Select the desired degree type from the drop-down menu.
- Click OK and Apply.

Current and Prior Training
Tip: the Current & Prior Training form gathers information on internship, residency, and fellowship experiences, and it is useful to familiarize yourself with the segmentable fields within it.
Residency Training Type
- Click Add Criteria.
- Type Prior in the search bar.
- Select Form: Current & Prior Training (CAS Custom) (700103) > Type Training.
- Operation = Is.
- Choose Residency from the drop-down menu.
- Click OK and Apply.

Training Institution Name
- Click Add Criteria.
- Type Prior in the search bar.
- Select Form: Current & Prior Training (CAS Custom) (700103) > Training Institution.
- Operation = Contains.
- Enter a keyword of a Training Institution.
- Click OK and Apply.

Training Institution Country
- Click Add Criteria.
- Type Prior in the search bar.
- Select Form: Current & Prior Training (CAS Custom) (700103) > Training Country.
- Operation = Is.
- Choose a country from the drop-down menu.
- Click OK and Apply.

Miscellaneous Segments
Complete/Incomplete Applications Segment
Depending on how your program defines a complete application, you may want to create a segment to identify applications that meet or do not meet all the required criteria. An applicant’s Application Status will remain in the Received status until at least 3 letters of recommendation have been received, at which point it will move to the Complete status. We can segment by applications in the Complete application status.
- Click Add Criteria.
- Type Status in the search bar.
- Select Application Property > CAS Application Status.
- Operation = Is exactly.
- Enter Complete.
- Click OK and Apply.

Completed Letters of Recommendation
- Click Add Criteria.
- Type Letter in the search bar.
- Select Reference Count > FellowshipsCAS Letter of Recommendation - Is Complete.
- Operation = At Least.
- Enter 3
- Choose Completed.
- Click OK and Apply.

Signaled Applicants
If your program uses signals, you can identify applicants who have shown interest.
- Click Add Criteria.
- Type Signal in the search bar.
- Select Application Property > Signal.
- Operation = Is.
- Choose Signaled from the value drop-down menu.
- Click OK and Apply.
Segments to Track Reviews
There are several methods to track an applicant's progress through the review process.
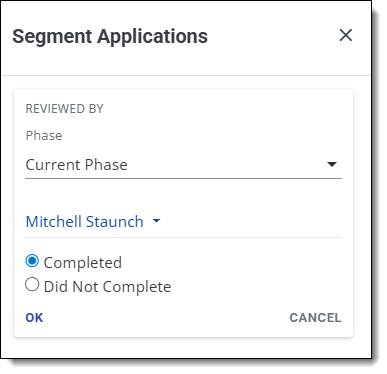
Review Completed by a Specific Reviewer
- Click Add Criteria.
- Type Review in the search bar.
- Select Reviewed By.
- Choose Current Phase from the phase drop-down menu.
- Select a user.
- Select Complete.
- Alternatively, you can select Did Not Complete to view this user’s incomplete reviews.
- Click OK and Apply.
Note: review forms are attached to specific phases within the review process. If you would like to view the reviews completed in a previous phase, choose that specific phase from the Phase drop-down menu.
Review Completed
In each review phase, you can specify the number of reviews required. Once that many reviews are completed for the applicant within that phase, their review will be considered complete, which we can segment by.
- Click Add Criteria.
- Type Review in the search bar.
- Choose Review Complete from the phase drop-down menu.
- Select Review Complete.
- Choose Current Phase from the phase drop-down menu.
- Click OK and Apply.

Tags
Tags are useful labels that can be added to applications to help organize and monitor applicants throughout the review process. By creating segments, you can identify applicants with specific tags.
- Click Add Criteria.
- Type Tags in the search bar.
- Choose any of the Following Tags from the drop-down menu.
- All of the Following Tags and None of the Following Tags can also be used for various applications.
- Click the + Icon and choose the desired tag.
- Click OK and Apply.
