Getting Started
SFTP Setup and Scheduling
Create an SFTP Site for WebAdMIT Scheduler
Before you can start a file transfer, you must decide where on your institution's SFTP server you want the files to be sent to. If your SFTP site requires you to identify IP addresses as safe before accepting a file, add the following IP addresses to your safe-list. Be sure to also review the Technical Requirements page for additional IP addresses to safe-list.
- WebAdMIT's production environment and prelaunch environment:
- WebAdMIT for AMCAS environment:
- 12.130.14.3
Note that anyone with the Manage Destinations permission can view and edit all destinations created.
- Using the Menu Bar, open the Reports & Exports panel, then click Destination Manager.
- Click New Destination.
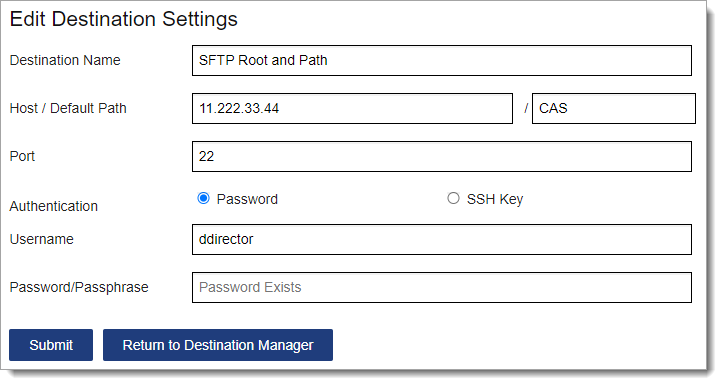
- Enter a name for your destination.
- Enter the host path (i.e., root folder) of your access. If needed, you can enter a subfolder in the default path. For example, you can enter 11.222.33.44 / CAS, where 11.222.33.44 is the root of your SFTP login and CAS is a subfolder underneath it. Note that this path will be checked and verified once you submit.
- Enter a port name. If you do not have a port name, you can use the default 22 value.
- Select how you want to authenticate your destination setup and your authentication credentials. Ensure that the host/default path is accurate. Also note the following:
- You may need to contact your IT team for the host name and other information.
- In some cases, this path is not an IP address.
- SSH keys need to be in PEM format.
- Click Submit.
Set Up the SFTP Scheduler for WebAdMIT
For WebAdMIT exports to run automatically and at a scheduled time, follow these steps to configure the SFTP scheduler:
Once your SFTP destination is set up, you can schedule file transfers for any existing export, report, or PDF Manager template you can view. Additionally, you can schedule the partial view report for In Progress applicants. All file transfers are saved on the Recent Files page in WebAdMIT and any destinations you select.
To ensure a successful file transfer, be sure that the file name for your export, report, or PDF Manager template does not include special characters (e.g., \ / : * ? " < > | ). Some SFTP sites cannot save files with special characters, which can prevent the file from being posted.
As a best practice, we encourage you to immediately test every file transfer schedule you make to ensure it works correctly; see Viewing Schedules and Running On-demand File Transfers via the Schedule Manager for more guidance.
Missing data in an export, report, or PDF Manager template? Remember:
- Exports, reports, or PDF Manager templates that are included in a schedule to an SFTP site will not contain data from programs that their owner does not have access to. So, for example, if you work with programs A and B, but the person who creates an export doesn't have access to program B, the export produced through a scheduled file transfer will only contain data related to program A.
- Exports, reports, or PDF Manager templates that are run on-demand or scheduled to UI only will not contain data from programs that the user running the export, report, or PDF Manager template does not have access to. So, for example, if your school has programs A and B, but you only have access to program A, data related to program B will not appear in a file transfer that you run on demand.
When your exports, reports, and PDF Manager templates are included in Transfer Settings, all your schedules will be carried forward but be disabled. Schedules for the partial view report for In Progress applicants are not included in Transfer Settings.
Scheduling File Transfers for Exports, Reports, and PDF Manager Templates
- Using the Menu Bar, open the Reports & Exports panel, then click the Export Manager, Report Manager, or PDF Manager.
- Click the calendar icon near the template you want to schedule a file transfer for.
- Click the green plus sign to add a new schedule.
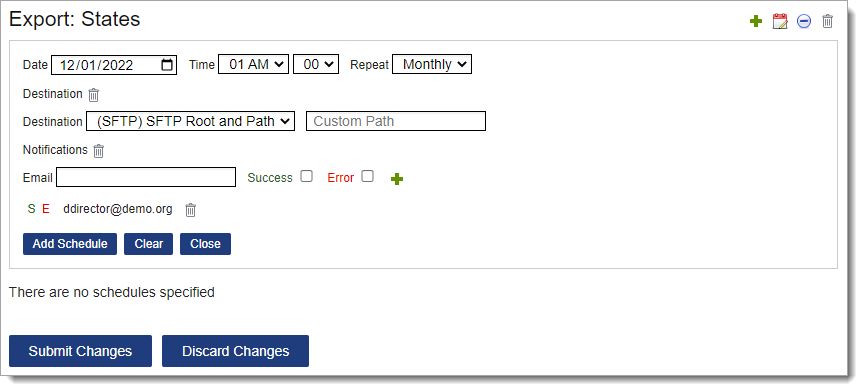
- Select the start day, time, and recurrence. Note that:
- The time you select is your local time zone.
- If you create multiple schedules for exports, reports, or PDF Manager templates, schedule the times at least two hours apart. For example, you can have a daily schedule run at 1 AM and a weekly schedule run at 3 AM.
- If you select a schedule to run on the 31st of the month, then the schedule will run on the last day of all months.
- Click the green plus sign to add a destination.
- If you have not created destinations, UI only is automatically selected, and all file transfers will only be sent to the Recent Files page in WebAdMIT.
- If you created destinations, you can select one, and if desired, add an additional default path. If you add a default path on this page, the destination path will not be validated before you save this schedule.
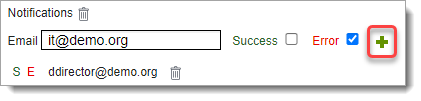
- Click the green plus sign if you want to be notified about your file transfer deliveries. Enter the email addresses you want to be contacted at, and select if you want to be emailed when your file transfer deliveries are successful or if there are errors. Be sure to click the green plus sign after entering these details to save your notification selections.
- Success emails are sent once an export, report, or PDF Manager template is produced and posted to your SFTP site or the Recent Files page (if you select UI only).
- Error emails are sent if the export, reports, or PDF Manager template fails to produce or post to your SFTP site or the Recent Files page. The emails will identify the reason for the failure.
- Click Add Schedule.
- Click Submit Changes.
Scheduling the Partial View Report for In Progress Applicants
- Using the Menu Bar, open the Applicants panel, then click In Progress Applicants.
- Under Search Actions, click Schedule Export.
- Follow the steps above for Scheduling File Transfers for Exports, Reports, and PDF Manager Templates.
SFTP and Informatica Server
Ideally, the SFTP should be located on the informatica server. If your SFTP server is not co-located with your Informatica server then the following applies:
- Client is responsible for transfer of files between the SFTP and the Informatica server (CAS\dropbox location) and the cleanup of files from the SFTP after every file transfer.
- If you lack the IT resources to help build the file transfer from the SFTP and the Informatica server and are a TargetX Premier Services client, then you can open a Premier Services case to have a premier services team member create informatica tasks for transferring files from the SFTP to the Informatica server and cleanup of files from the SFTP after file transfer.
- If you are not a TargetX Premier Services client, then the responsibility of file transfer resides with your IT resources.