Executing your integration
Review Mapping Worksheet
Liaison will provide you with a mapping sheet outlining the fields in both WebAdMIT and TargetX. Use this worksheet and your CAS's data dictionary to build your exports from WebAdMIT and the data integration into TargetX.
Build Exports in WebAdMIT
Use WebAdMIT's Export Manager to extract data:
- Using the Menu Bar, open the Reports & Exports panel, then click Export Manager.
- Click New Export.
- Select an existing list to run the export against, if applicable.
- Select an export type (.csv, .xls, .txt, or .zip). See Notes and Consideration below for additional guidance.
- Enter a name for your export.
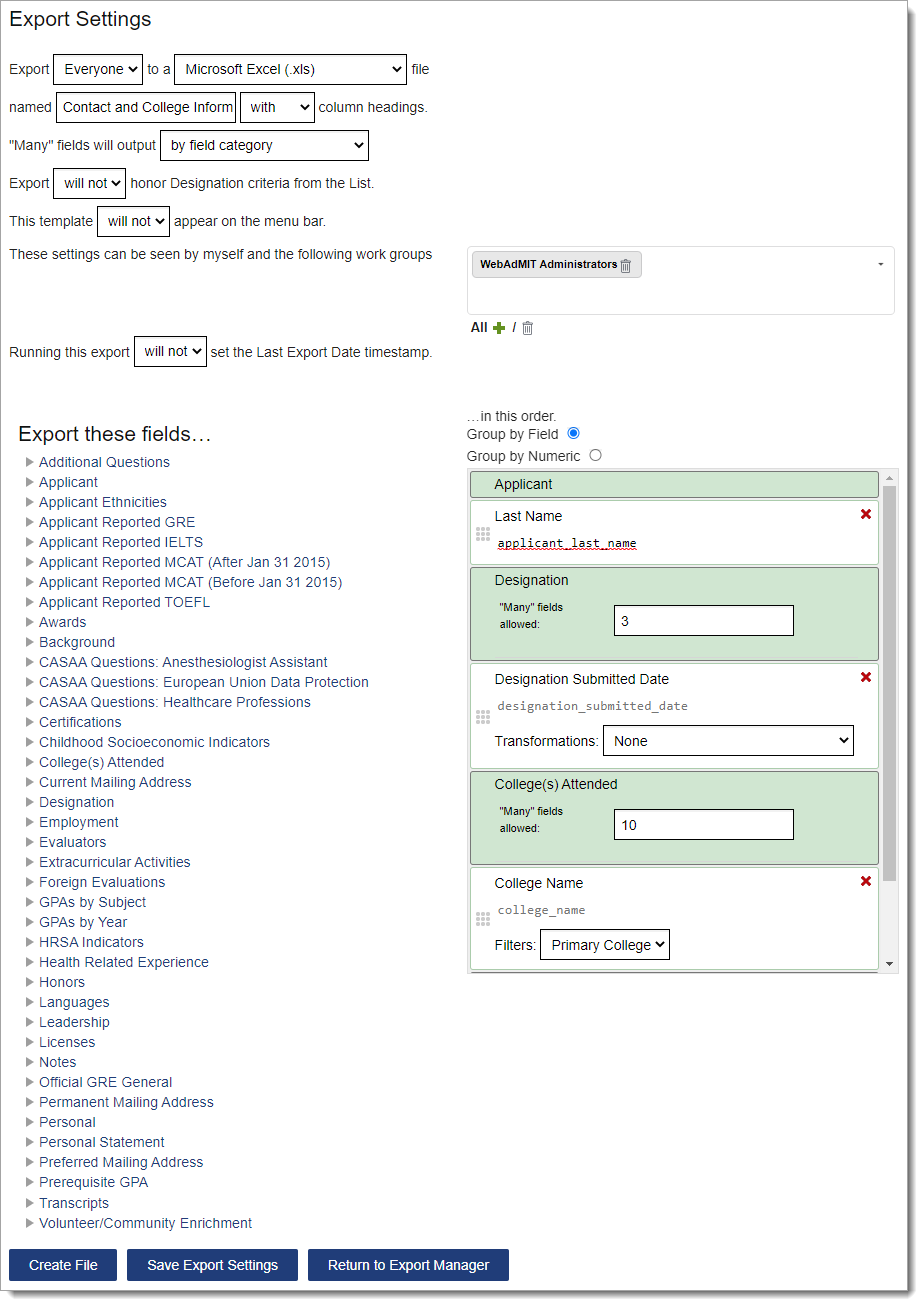
- Select whether to include column headings. The names of the fields you select in the export become the column headings in the file.
- Select how you want to export fields with more than one result. This includes fields like college names, test scores, evaluations, etc.
- Select as many columns as needed to expand the field to display as many results as needed, based on the applicant pool you have chosen (i.e., if an applicant attended 10 colleges, the college field and all fields in that grouping will expand to 10 columns for all applicants).
- Select exactly to set a fixed number of columns allotted for all one-to-many fields (i.e., if you set it to 2 columns, all colleges attended, test scores, and experiences will expand to 2 columns each). Warning: when selecting this option for an applicant who has more answers than the number of columns you selected, you can’t control which data points appear in the export. Entering a higher number of fixed columns may help ensure that you export all necessary data.
- Select by field category to specify the number of fixed columns for a category. Selecting this option does not allow you to intermingle fields from different categories. Only sections with one-to-many fields offer the “Many” fields allowed: option.
- If applicable, select if you want your export to honor the designation criteria from your list. If this is set to will, and your list filters applicants by any field in the Designations field grouping (e.g., Designation, Application Status, etc.), then the export will include only the data that matches that selected designation criteria. See Notes and Consideration below for additional guidance.
- Indicate if the export should appear in the Menu Bar under the My Exports and Reports subpanel in the Reports & Exports panel. This option provides you with quick access to run the export.
- Select who can view the template (e.g., just yourself, specific Work Groups, or all Work Groups). Institution Managers who are in the WebAdMIT Administrators Work Group can view and delete any exports created within their organization.
- If available, select if the Last Export Date timestamp will update for applicants. If this is set to will, the Last Exported column in the Designation panel of the Applicant Details page updates with the date this export was most recently run for all applicants included in the export. See Notes and Consideration below for additional guidance.
- Under the Export these fields… column, click the field groupings to view and select fields. See Notes and Consideration below for additional guidance. Be sure to review the Data Dictionaries and Master Code Lists page to learn all the available fields in the Export Manager for your CAS, as well as access lookup tables and master code lists.
- The fields you select appear in the …in this order. column. If you previously selected .txt for the export type, you can set a fixed width for each field. Depending on the field, you can also select a data transformation or filter option. These options are useful to IT staff when importing data into an SIS. See Notes and Consideration below for additional filter guidance.
- If available, enter custom column headings by clicking the default custom column heading in gray and typing in the new column heading. Note that:
- You can enter up to a maximum of 255 characters for your new column heading.
- You can’t use the same column heading for different fields in an export template.
- If you select a "many" field, Data Integration automatically appends "_0, _1, etc." to the end of your column heading.
- If you carry forward an export template that has custom column headings through the Transfer Settings feature, the custom column headings will also carry forward.
- Use the grip icon to drag and drop your fields into the preferred order; the top field will export first, and the bottom last. If you select a "many" field, you can also group data by field or numerically.
- Group by Field exports the data by field category (e.g., College Name 1, College Name 2, College Name 3, College State 1, College State 2, College State 3).
- Group by Numeric exports the data by value (e.g., College Name 1, College State 1, College Name 2, College State 2, College Name 3, College State 3).
- Click Create File to save and run the export, Save Export Settings to save the customized export for future use, or Return to Export Manager to discard the export.
Use WebAdMIT's PDF Manager to extract PDFs:
Once you save a PDF template, you must generate it from the PDF Manager page and retrieve it from the Recent Files page. You can also retrieve exports, reports, and PDF templates run within the past seven days from the Recent Files page.
To generate and download the .zip file of PDF documents:
- Using the Menu Bar, open the Reports & Exports panel, then click PDF Manager.
- Click the template name in the PDF Template column.
- You'll automatically be sent to the Recent Files page. Depending on document size, number of applicants, and other factors, it may take anywhere from a few minutes to a few hours for Data Integration to create the .zip file.
- Click the file link in the Download column.

Create Informatica Tasks and Mappings
Customize the Informatica mappings, tasks, and flow to meet your needs. Review the Informatica article Create Dynamic Mapping Task in Cloud Data Integration.
Create any Custom fields in both the sandbox and production versions of TargetX.