Working with SFTP Features
- Last updated
- Save as PDF
SFTP Overview
SFTP (Secure File Transfer Protocol) allows you to transfer export, report, and PDF Manager files from WebAdMIT to your institution's servers, such as a Student Information System (SIS), Slate, TargetX, or EMP. You can set up your file transfer (i.e., scheduled job) through two features in WebAdMIT: the Destination Manager and Schedule Manager.
You can include .csv, .xls, .txt., and .zip file types in the file transfer. In the Report Manager, while sometimes both a .csv and .pdf file is produced, only the .csv file will be included in the file transfer.
Be aware that these features can only be used in WebAdMIT's prelaunch and production environments. Additionally, you can only schedule jobs for your CAS's current and preceding cycle. For cycles before the preceding one, you can view disabled jobs and associated logs, but you cannot schedule or create new jobs.
Gaining Access to This Feature
The Destination Manager is available under the Reports & Exports panel and access to this tool is controlled through Work Groups. You must have the Manage Destinations permission to create and edit destinations. You can use destinations without this permission.
The Schedule Manager is available under the Management panel and access to this tool is controlled through Work Groups. You must have the Schedule Manager permission to create schedules for exports, reports, and PDF Manager templates.
Configuring an SFTP Destination via the Destination Manager
Create an SFTP Site for WebAdMIT Scheduler
Before you can start a file transfer, you must decide where on your institution's SFTP server you want the files to be sent to. If your SFTP site requires you to identify IP addresses as safe before accepting a file, add the following IP addresses to your safe-list. Be sure to also review the Technical Requirements page for additional IP addresses to safe-list.
- WebAdMIT's production environment and prelaunch environment:
- WebAdMIT for AMCAS environment:
- Ingress (Load Balancer)
- 100.26.75.48
- 52.73.75.53
- 50.19.222.83
- Egress (NAT Gateways)
- 44.217.202.101
- 52.22.118.251
- 52.0.101.234
- Ingress (Load Balancer)
Working with SFTP Destinations via the Destination Manager
Note that anyone with the Manage Destinations permission can view and edit all destinations created.
- Using the Menu Bar, open the Reports & Exports panel, then click Destination Manager.
- Click New Destination.
- Enter a name for your destination.
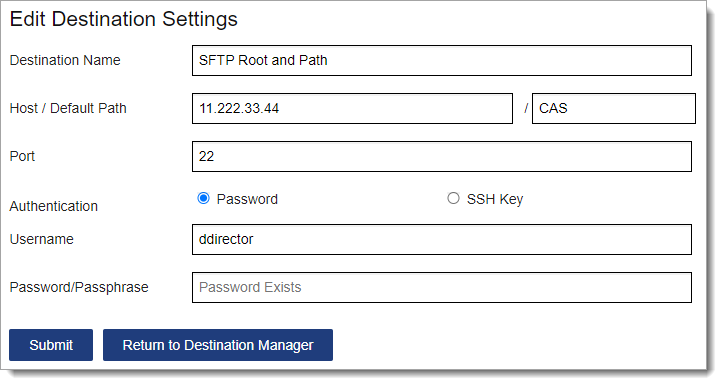
- Enter the host path (i.e., root folder) of your access. If needed, you can enter a subfolder in the default path. For example, you can enter 11.222.33.44 / CAS, where 11.222.33.44 is the root of your SFTP login and CAS is a subfolder underneath it. Note that this path will be checked and verified once you submit.
- Enter a port name. If you do not have a port name, you can use the default 22 value.
- Select how you want to authenticate your destination setup and your authentication credentials. Ensure that the host/default path is accurate. Also note the following:
- You may need to contact your IT team for the host name and other information.
- In some cases, this path is not an IP address.
- SSH keys need to be in PEM format.
- Liaison requires the private SSH key to be entered.
- Click Submit.

Scheduling a File Transfer
Once your SFTP destination is set up, you can schedule file transfers for any existing export, report, or PDF Manager template you can view. Additionally, you can schedule the partial view report for In Progress applicants. All file transfers are saved on the Recent Files page in WebAdMIT and any destinations you select.
Getting Started
To ensure a successful file transfer, be sure that the file name for your export, report, or PDF Manager template does not include special characters (e.g., \ / : * ? " < > | ). Some SFTP sites cannot save files with special characters, which can prevent the file from being posted.
As a best practice, we encourage you to immediately test every file transfer schedule you make to ensure it works correctly; see Viewing Schedules and Running On-demand File Transfers via the Schedule Manager for more guidance.
Missing data in an export, report, or PDF Manager template? Remember:
- Exports, reports, or PDF Manager templates that are included in a schedule to an SFTP site will not contain data from programs that their owner does not have access to. So, for example, if you work with programs A and B, but the person who creates an export doesn't have access to program B, the export produced through a scheduled file transfer will only contain data related to program A.
- Exports, reports, or PDF Manager templates that are run on-demand or scheduled to UI only will not contain data from programs that the user running the export, report, or PDF Manager template does not have access to. So, for example, if your school has programs A and B, but you only have access to program A, data related to program B will not appear in a file transfer that you run on demand.
When your exports, reports, and PDF Manager templates are included in Transfer Settings, all your schedules will be carried forward but be disabled. Schedules for the partial view report for In Progress applicants are not included in Transfer Settings.
Scheduling File Transfers for Exports, Reports, and PDF Manager Templates
- Using the Menu Bar, open the Reports & Exports panel, then click the Export Manager, Report Manager, or PDF Manager.
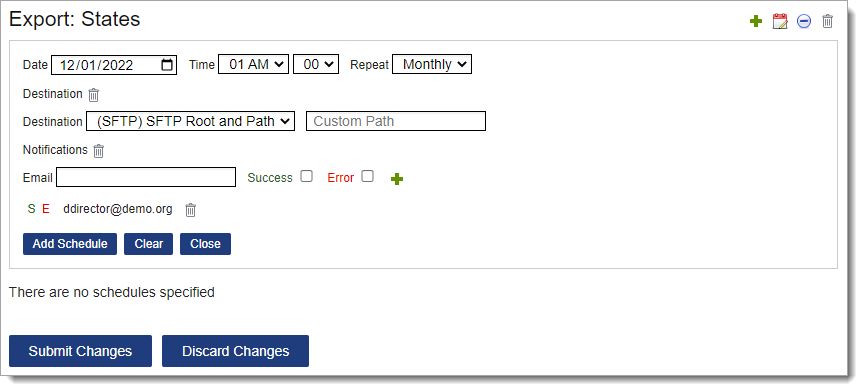
- Click the calendar icon near the template you want to schedule a file transfer for.
- Click the green plus sign to add a new schedule.
- Select the start day, time, and recurrence. Note that:
- The time you select is your local time zone.
- If you create multiple schedules for exports, reports, or PDF Manager templates, schedule the times at least two hours apart. For example, you can have a daily schedule run at 1 AM and a weekly schedule run at 3 AM.
- If you select a schedule to run on the 31st of the month, then the schedule will run on the last day of all months.
- Click the green plus sign to add a destination.
- If you have not created destinations, UI only is automatically selected, and all file transfers will only be sent to the Recent Files page in WebAdMIT.
- If you created destinations, you can select one, and if desired, add an additional default path. If you add a default path on this page, the destination path will not be validated before you save this schedule.
- Click the green plus sign if you want to be notified about your file transfer deliveries. Enter the email addresses you want to be contacted at, and select if you want to be emailed when your file transfer deliveries are successful or if there are errors. Be sure to click the green plus sign after entering these details to save your notification selections.
- Success emails are sent once an export, report, or PDF Manager template is produced and posted to your SFTP site or the Recent Files page (if you select UI only).
- Error emails are sent if the export, reports, or PDF Manager template fails to produce or post to your SFTP site or the Recent Files page. The emails will identify the reason for the failure.

- Click Add Schedule.
- Click Submit Changes.

Scheduling the Partial View Report for In Progress Applicants
- Using the Menu Bar, open the Applicants panel, then click In Progress Applicants.
- Under Search Actions, click Schedule Export.
- Follow the steps above for Scheduling File Transfers for Exports, Reports, and PDF Manager Templates.
Viewing Schedules and Running On-demand File Transfers via the Schedule Manager
You can view and test file transfer schedules in the Schedule Manager.
While all users can view active schedules of the partial view report for In Progress applicants, only users who created the schedule can edit and run it on-demand.
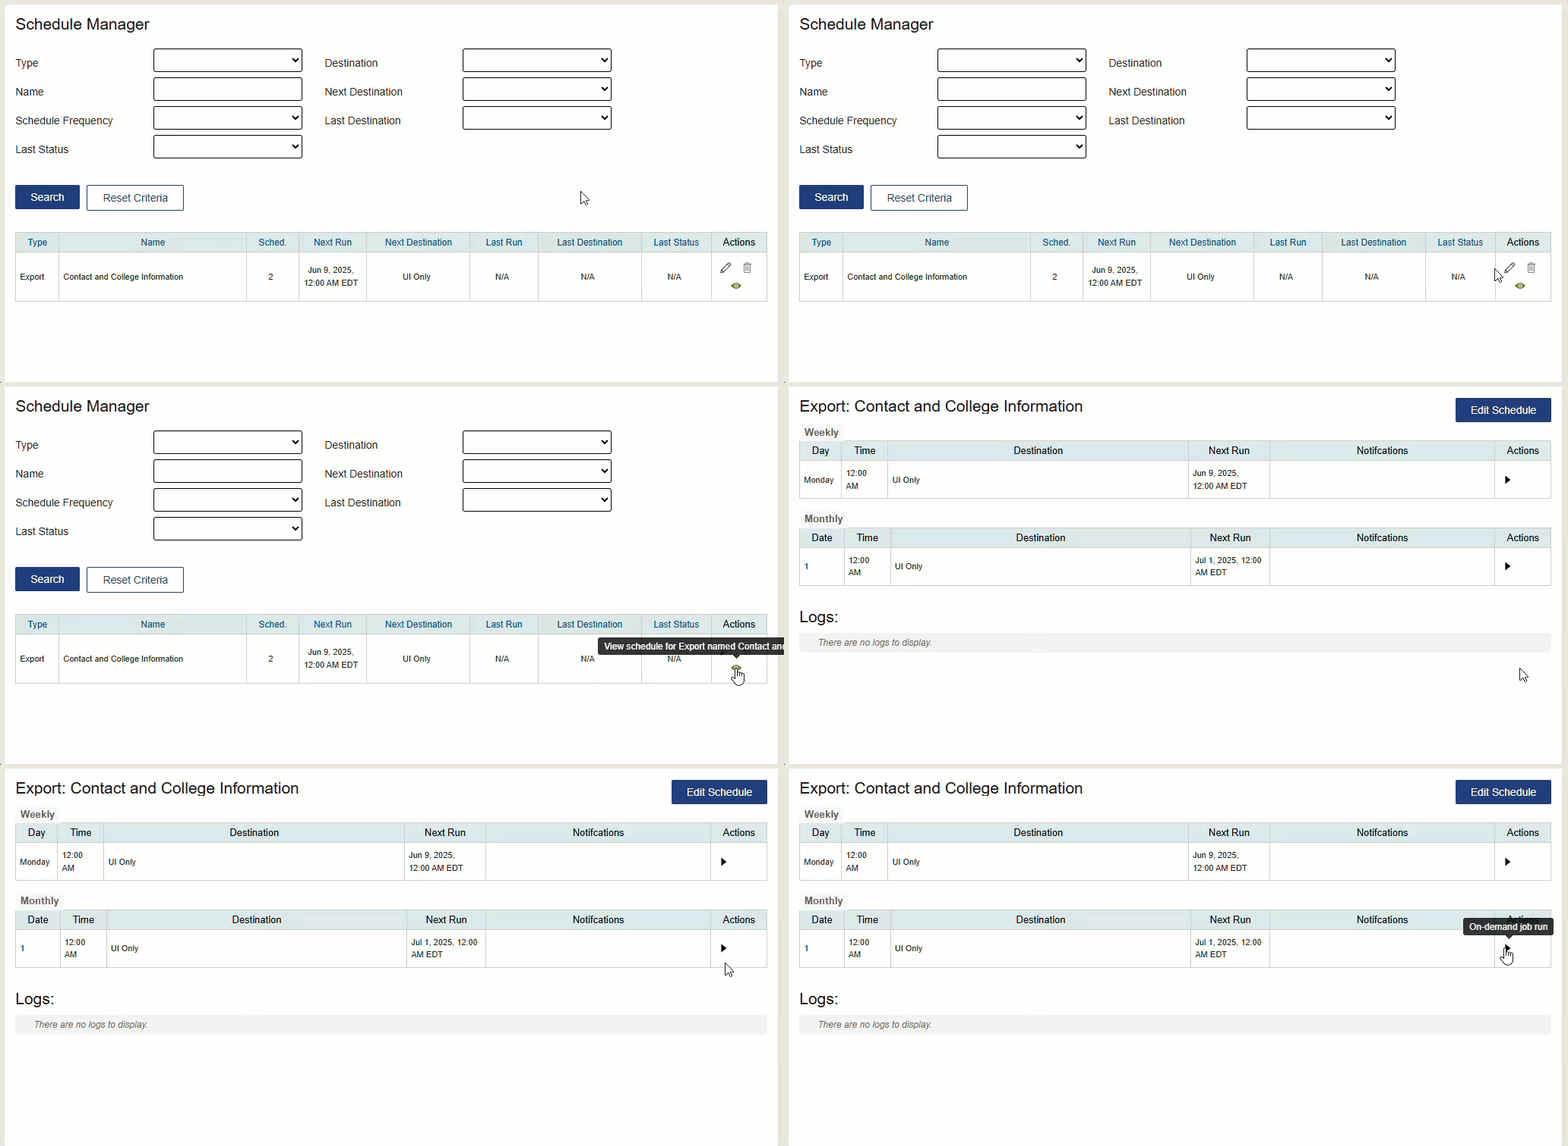
- Using the Menu Bar, open the Management panel, then click Schedule Manager.
- Use the filter options to search for file transfers.
- The number of schedules associated with the template is listed under the Schedules column.
- Click the eye icon to view the schedules.
- If desired, click the play icon to immediately run a file transfer. This is useful when testing a new file transfer setup. Note that only the most recent version of the file transfer is available on the Recent Files page.

Alternatively, you can view and test file transfer schedules in the Export Manager, Report Manager, or PDF Manager.
- Using the Menu Bar, open the Reports & Exports panel, then click the Export Manager, Report Manager, or PDF Manager.
- Click the eye icon under the Schedules column. The number of schedules associated with the template is listed next to the icon.
- If desired, click the play icon to immediately run a file transfer. This is useful when testing a new file transfer setup. Note that only the most recent version of the file transfer is available on the Recent Files page.
Managing File Transfer Schedules via the Schedule Manager
All schedules associated with exports, reports, and PDF Manager templates are listed in the Schedule Manager, Export Manager, Report Manager, and PDF Manager. Be aware that the schedule list page does not auto-refresh when you make an update. Additionally, when a scheduled Once file transfer completes, it is automatically removed from this page because it will not rerun.
You can manage file transfer schedules in the Schedule Manager.
- Using the Menu Bar, open the Management panel, then click Schedule Manager.
- Use the filter options to search for file transfers.
- Click the pencil icon to view the schedules.
Alternatively, you can manage file transfer schedules in the Export Manager, Report Manager, or PDF Manager.
- Using the Menu Bar, open the Reports & Exports panel, then click the Export Manager, Report Manager, or PDF Manager.
- Click the calendar icon.

Adding a File Transfer Schedule
Use the green plus sign to add a new file transfer schedule.
Editing File Transfer Schedules
Use the pencil icon to edit an existing file transfer schedule.
Pausing File Transfer Schedules
Use the calendar icon to pause file transfer schedules in batch until a later date. When you pause file transfer schedules, they will resume on the next date in the schedule. For example, if you have a file transfer schedule that starts on the first of every month (e.g., October 1), and you pause the schedule until October 5, then the file transfer schedule will resume on the first of the next month (e.g., November 1).
While you cannot undo a pause, you can disable and then re-enable one or all file transfer schedules. The transfer will then resume on the next date in the schedule (not including the current day). Note that Once schedules will run the next day; you may want to delete or reschedule Once schedules you no longer need.
Disabling and Enabling File Transfer Schedules
Use the minus icon to disable and enable file transfer schedules individually or in batch. Any disabled file transfer schedules will be highlighted in red. If you enable a file transfer schedule, it will start on the next date in the schedule (not including the current day).
Deleting File Transfer Schedules
Use the trash icon to delete file transfer schedules individually or in batch.
Reviewing File Transfer Logs
You can view file transfer logs for exports, reports, and PDF Manager templates in the Schedule Manager, Export Manager, Report Manager, and PDF Manager.
File transfer logs for the partial view report for In Progress applicants can only be viewed by the user who created the schedule. You can access them by going to the In Progress Applicants page under the Applicants panel, and under the Search Actions drop-down, click View Export Logs.
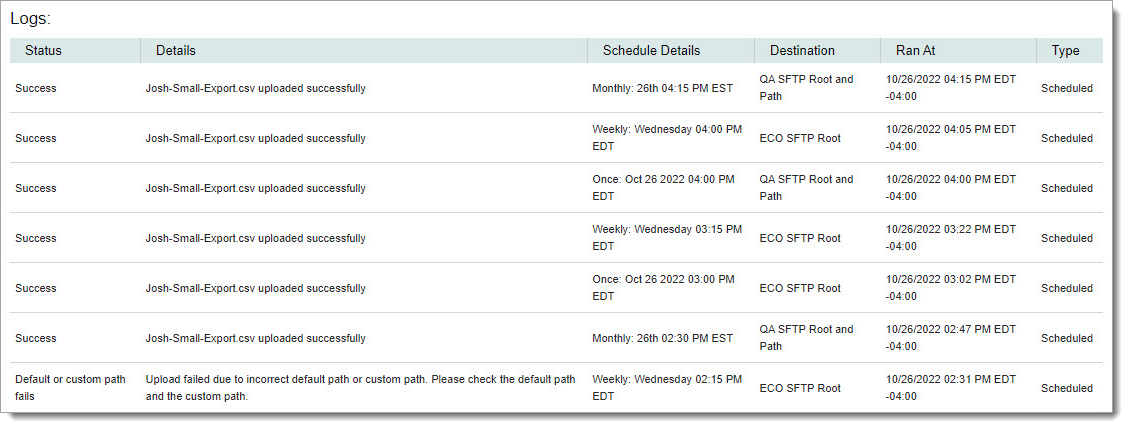
Note that the Ran At time in the Logs table is the time the export, report, or PDF Manager template was placed in the SFTP.
You can review the file transfer logs in the Schedule Manager.
- Using the Menu Bar, open the Management panel, then click Schedule Manager.
- Use the filter options to search for file transfers.
- Click the eye icon to view the schedules.
- Review the file transfer logs under the Logs section.
Alternatively, you can review the file transfer logs in the Export Manager, Report Manager, or PDF Manager.
- Using the Menu Bar, open the Reports & Exports panel, then click the Export Manager, Report Manager, or PDF Manager.
- Click the eye icon under the Schedules column.
- Review the file transfer logs under the Logs section.

Log Statuses
Log statuses include:
- Auto Disabled: the scheduled job has failed in 10 consecutive runs and has been disabled. Review your file transfer settings, correct any errors, and then reschedule your job.
- Could not connect: the file transfer did not upload to your SFTP site due to a connection error.
- Default or custom path fails: the file transfer did not upload to your SFTP site due to a destination path error. Review your SFTP destinations and, if desired, click the play icon to re-run the file transfer.
- Export did not complete: the export file did not complete in WebAdMIT. Try running the file again, and if the error continues, contact the Client Support Specialist team.
- PDF Template did not complete: the PDF Manager file did not complete in WebAdMIT. Try running the file again, and if the error continues, contact the Client Support Specialist team.
- Report did not complete: the report file did not complete in WebAdMIT. Try running the file again, and if the error continues, contact the Client Support Specialist team.
- Success: the file transfer was successfully uploaded to your SFTP site.
