Managing Work Groups
Getting Started with Managing User Accounts
Video Overview
What are Work Groups?
Work Groups allow you to manage permissions for a group of users instead of separately managing permissions for each individual user. Using WebAdMIT’s Work Groups feature, you can decide:
- What actions a user can perform. These functions are granted via permission sets. Each Permission Set determines the options that appear in the user’s Menu Bar, as well as the admissions data they can update.
- What applicant data a user can view. You can decide which sections of the application users can view. The data available for viewing is controlled by panels and subpanels that you enable or disable for users, as needed.
As you create Work Groups, you add users to them. You can create as many Work Groups as necessary (each with its own unique permission sets), move users among groups as desired, and change the permissions or viewing ability for all users in any given Work Group. Note that an individual can only belong to one Work Group at a time per CAS and cycle. So, for example, if Bob is both a screener and an interviewer and those roles have different permission sets, you can:
- Move Bob from the Screener Work Group to the Interviewer Work Group (and vice versa) as needed, or
- Create a hybrid Screener-Interviewer Work Group with a specific set of permissions for people who perform both of those tasks.
Review the Work Groups Guide for Work Group templates, such as:
- Faculty Reviewers/Interviewers
- Faculty Reviewers/Interviewers without Race/Ethnicity Data
- Faculty Reviewers Using a Blind Review Process
- IT Staff
The WebAdMIT Administrators Work Group
The WebAdMIT Administrators Work Group is available by default and provides users with full administrative access. If you are in this Work Group and are an Institution Manager, then you can also:
- View and delete all the following templates created by any user at your organization, even if the template was not shared with you:
- List Manager
- Export Manager
- Report Manager
- PDF Manager
- Email Templates (additionally, you can edit these templates)
- Initiate a transfer settings.
Be sure to review the View Primary Contacts List page in the CAS Configuration Portal Help Center to learn more about your organization's primary users, the key points of contact for your organization.
Gaining Access to This Feature
The Work Groups feature is available under the Management panel and access to this tool is controlled through Work Groups. You must have the Manage Users and Work Groups permission to create and edit Work Group templates and assign them to admissions users' accounts.
Creating Work Groups
As you create Work Groups, be aware that permissions sets and panels must be used together. For example, if you add the Add Notes permission set to the Work Group, you’ll also need to add the Notes panel.
Additionally, if you restrict a user from viewing a panel of data, they cannot see the restricted information on the Applicant Details Page or full application PDF. They may be able to view the restricted information in other places in WebAdMIT, depending on their Work Group configurations and access to features. Review the How Work Groups Impact Access to Features and Fields guide to learn more.
As a best practice, we recommend that you thoroughly test current and new Work Group templates to ensure the user has the correct access (e.g., sit side-by-side with a user to compare the Work Group template you built and their view and permissions in WebAdMIT).
To create a Work Group:
- Using the Menu Bar, open the Management panel, then click Work Groups.
- Click New Work Group.
- Enter a name for the Work Group.
- Select the group’s Permission Sets. Review the Permission Sets and WebAdMIT Functionality section below to determine which permissions to activate for a Work Group.
- Select the panels and subpanels that the group can view on the Applicant Details page. The selected panels and sub-panels appear under Panels and Sub-Panels Enabled for Viewing.
- Review How the CAS Application Sections Link to WebAdMIT for a more thorough understanding of where CAS application information appears in panels and subpanels.
- Review the How Work Groups Impact Access to Features and Fields guide to learn the implications of enabling or disabling fields, and how WebAdMIT's features adhere to those restrictions.
- For CAS Custom Questions specifically, you can select a checkbox to confirm if you want new question blocks added mid-cycle to automatically be added to this template. Using this will save you time by eliminating the need to manually update your templates when changes occur, such as mid-cycle or during the Transfer Settings process for a new cycle.
- Select the reports that the user can create, view/run, and share. The selected reports appear under Reports Enabled for Viewing.
- Click Submit to save your template or Return to Manage Work Groups to discard your template.

Permission Sets and WebAdMIT Functionality
To manage features in WebAdMIT, you must activate permission sets in your Work Group template. Review the following permissions to learn which specific features you can control.
Many of these permissions also give you the ability to delete or deactivate templates. If you can permanently delete a template, a warning module appears alerting you of this. If you can only deactivate a template, you can reactivate it at a later date if needed.
|
Permission Set |
Definition |
Which features can you create or edit? |
Additional notes |
|---|---|---|---|
|
API Access |
Allows you to query WebAdMIT using the API. |
N/A |
Access your API Key under Account |
|
Access to CAS Configuration Portal |
Allows you to gain entry into the CAS Configuration Portal to set up programs. |
Customize program settings in the Configuration Portal, including:
Once a program is live, you can only update program deadline dates and the WebAdMIT Name. |
|
|
Add Notes |
Allows you to enter notes on the Applicant Details page. Users without this permission can read, but not create notes. |
Enter information under the Notes panel on the Applicant Details page |
You can only delete notes that you have entered, not other users' notes. |
|
Change Local Statuses |
Allows you to change the Local Status of an applicant's designation, either individually on the Applicant Details page, or in batches via list or search actions. |
Place an applicant into a Local Status that's enabled for their program |
|
|
Configure Software |
Allows you to access management functions. |
Create and edit any templates from the Management panel, including:
|
If you also have the Email Applicants permission, you can access the Email Templates and Email Addresses features under the Management panel. |
|
Defer Individual Applicants to a Future Cycle |
Allows you to defer applicants to a future cycle on demand. |
Defer an applicant from one cycle to the next. |
|
|
Email Applicants |
Allows you to email applicants. |
Compose new emails and edit email templates for applicants |
If you also have the Configure Software permission, you can access the Email Templates and Email Addresses features under the Management panel. |
|
Enable Applicant Gateways |
Allows you to enable (individually or in batch), disable, and extend deadlines for Applicant Gateway activities. |
Customize program settings in the Applicant Gateway, including:
|
|
|
Exclude Full PDF Cover Sheet |
Where applicable, this allows you to remove the cover sheet (i.e., applicant summary) from the full application PDF. Note that this feature is only available for select application services. |
N/A |
The cover sheet does not follow the same data restrictions as the full application PDF. For example, if you choose not to include an applicant's race and ethnicity data in a Work Group, while the full application PDF will not include that data, the cover sheet may. |
|
Hide Applicant Names |
Allows you to hide applicant names within WebAdMIT so you can conduct blind reviews. |
Hide applicant names from the:
|
This permission does not hide the applicant's name in the full application PDF, transcripts, evaluations, reports, or the applicant's email address, where their full name may be listed. |
|
Manage Advanced Review |
Allows you to edit advanced (i.e., holistic) review model domain and subdomain weights. |
Edit holistic review models |
|
|
Manage Assignments and Interviews |
Allows you to assign and delete Assignments and Interviews on applicant pages. Users with this permission can also edit submitted Assignment and Interview results. |
Assign Assignment and Interview templates and edit completed Assignments and Interviews |
|
|
Manage Destinations |
Allows you to create SFTP destinations for file transfers. |
Create and edit SFTP destinations |
|
|
Manage Direct Applicants |
Where applicable, this allows you to manually add applicants to WebAdMIT. Note that this feature is only available for select application services. |
Manually add applicants in WebAdMIT |
|
|
Manage Lists, Reports, and Exports |
Allows you to create lists, reports, exports, and PDF templates and define their visibility. |
Create lists, reports, exports, and PDF templates and edit any templates that you created |
WebAdMIT Administrators who are also Institution Managers can view and delete all list, export, report, and PDF templates created within their organization. |
|
Manage Uploaded Documents |
Allows you to upload and delete documents on an applicant's record for an organization. |
Upload documents under Documents panel, Admissions Uploaded Documents subpanel |
|
|
Manage Users and Work Groups |
Allows you to create and administer other users and Work Groups. |
Create and edit admissions users' accounts and Work Group templates |
|
|
Modify Applicants' Custom Fields, Local GPAs, Prerequisites, and Requirements |
Allows you to update an applicant's Custom Fields and Requirements, either from the Applicant Details page or in batches. This permission set also allows you to update courses included in an applicant's Prerequisite or Local GPA via the Electronic Transcript. |
Update and edit an applicant's Custom Field, Local GPA, Prerequisite GPA, and Requirements that are enabled for their program |
|
|
Redirect a Single Applicant |
Allows you to move an applicant from one program to another. Note that this feature is only available for select application services. |
Select an alternate program for an applicant |
|
|
Request Background Check |
Where applicable, this allows you to submit a request for a background check for an applicant. Note that this feature is only available for select application services. |
N/A |
Request a background check under the Personal Information panel, Background Check subpanel |
|
Schedule Manager |
Allows you to view and manage file transfer schedules. |
Add, edit, pause, disable/enable, and delete file transfer schedules you can view |
|
|
Update Last Exported Date Timestamp When Exporting |
Where applicable, this enables applicants' Last Exported Date field to be updated when you run an export. Note that this feature is only available for select application services. |
Update an applicant's Last Exported Date field based on running exports |
|
|
Update Last Printed Date Timestamp via PDF Manager |
Where applicable, this enables applicants' Document Last Printed Date field to be updated when you run a PDF Manager job. Note that this feature is only available for select application services. |
Update an applicant's Last Printed Date field based on running a PDF Manager job |
|
|
View All Applicants |
Allows you to view information for all applicants. Users without this permission can only view their assigned applicants. |
N/A |
View all applicants for the programs you have access to |
|
View Background Check |
Where applicable, this allows you to view an applicant’s background check information. Note that this feature is only available for select application services. |
N/A |
View a completed background check under the Personal Information panel, Background Check subpanel |
|
View Other User's Assignment/Interview Results |
Allows you to view any applicant’s Assignments and Interviews, both on the Applicant Details page and on the Search Assignments and Search Interviews pages. Users without this permission can only view their assigned Assignments and Interviews. |
N/A |
View the Assignments and Interviews that have been assigned to the same applicants you can view. |
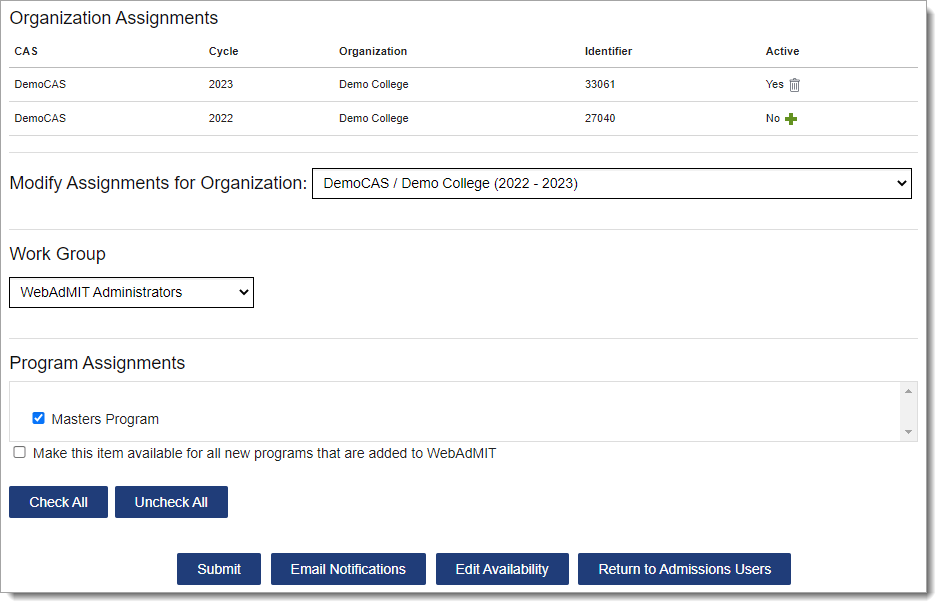
Adding Users to Work Groups
- Using the Menu Bar, open the Management panel, then click Admissions Users.
- Click the pencil icon for the applicable user. Note that you can only add existing users to Work Groups. To create a new user, see the Managing Users topic.
- Select the appropriate organization and cycle using the Modify Assignments for Organization drop-down.
- Select the applicable Work Group.
- Click Submit.
Managing Work Groups
To manage existing Work Groups, click Work Groups from the Menu Bar. Changes made to Work Groups take effect immediately.
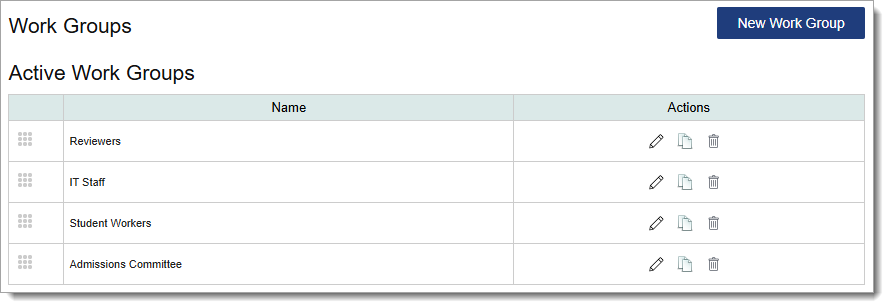
Reordering Work Groups
Use the grip icon to drag and drop the Work Group into the preferred order.
Editing Work Groups
Use the pencil icon to edit an existing Work Group template. Any changes take effect immediately for users in that Work Group.
Copying Work Groups
Use the duplicate icon to copy an existing Work Group template.
Deactivating Work Groups
Use the trash icon to deactivate Work Group templates. Note that you cannot deactivate a Work Group that is currently assigned to a user.