Managing Users
Overview
In Outcomes, you can create as many new users as you need to work with the software. When creating users, you choose their Role to establish what permissions they'll have in the software. Once you add a new user, Outcomes sends them an email invitation.
Adding a New User
- Go to the Organization section of the Settings menu and click Users.
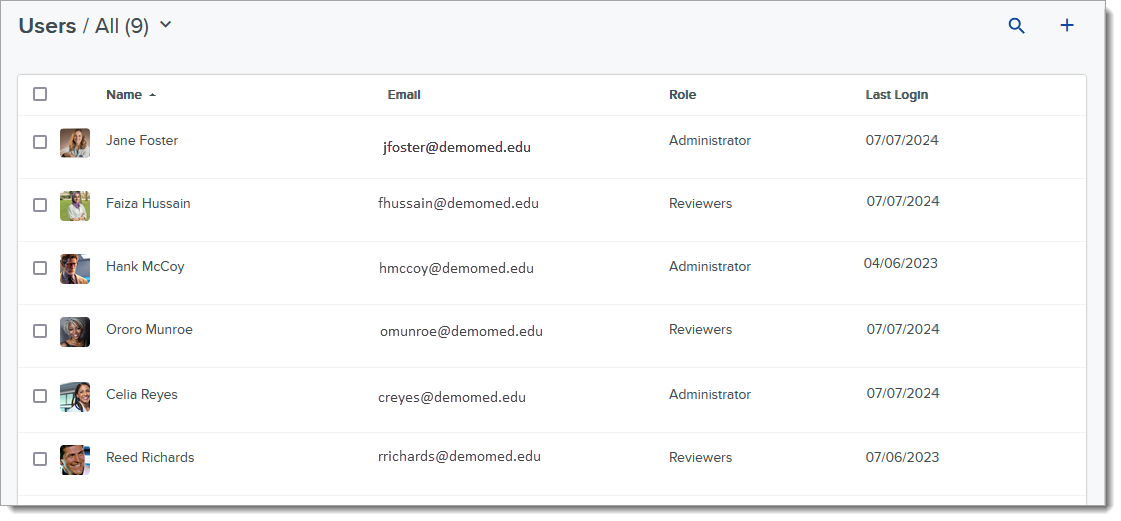
- On the Users page, you can review your existing users. Click the plus sign at the top right to add a new user.
- Enter the new user’s name and email address, and select the desired Role for your new user. By default, there is an Administrator role that gives full access to the software. All other Roles need to be created in the Roles area.
- If you don't want the user to receive notifications regarding review assignments that have been given to them, enable the Opt out of assignment summary emails option.
- If your program works with the Events feature in Outcomes, and you'd like the user to receive notifications about event registration changes, enable the Opt into event registration emails.
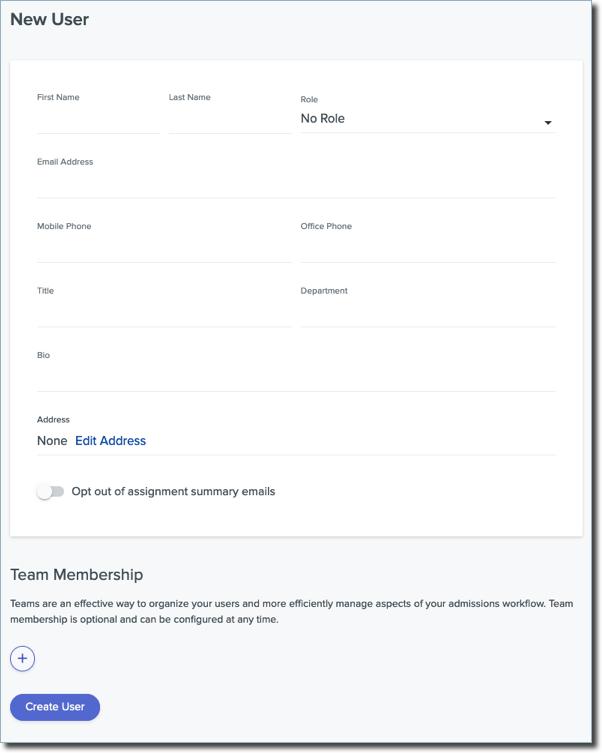
- If applicable, in the Team Membership area, click the plus sign to search for and select the teams you’d like to add the user to. You can select any previously created team. You can also create and manage teams separately by clicking Teams in the Organization section of the Settings Menu.

- Click Create User.
- If you selected a Role for the user, you’re now presented with a Portals area that allows you to indicate which portal the user will be invited to. This allows you to distinguish access to Outcomes, the Reviewer Portal, or other portals, where applicable. Use the toggle to enable access to a portal.

- When you enable access, the status changes to Not Invited. Use the envelope icon to send the user an email invitation. Once the invite is sent, the status changes to Invited. Users who have not yet been invited are pending.
- Once the user accepts the invite, the status changes to Activated.
- Invitations expire after 90 days. To resend an invitation, return to the user's page and click Resend Invite from the Invites section.
Managing Teams
As an administrator, you can establish teams that will work together to complete reviews or tasks. For example, if you conduct reviews or interviews and you have separate groups of colleagues who handle these, you can organize them together in a team. Teams can be used in assigning reviews, distributing tasks, or establishing Workspaces.
To create a team:
- Navigate to the Organization section of the Settings Menu and click Teams.
- From the Teams page, you can review and edit existing Teams. Click the plus sign at the top right to create a new team.
- On the New Team page, give the Team a name. If you have several teams, you can create and assign categories to group your teams (e.g., Interviewer Teams, or Reviewer Teams).

- Select which existing users should be managers or members of this team. Managers you establish here do not have additional permissions and are not included in any assignments that are distributed to the team. You may also save your team without adding any members, as they can be added later from the Teams page or directly from each person's Users page.
- Click Create Team.
You can edit existing teams from the Teams page by clicking the name of the team. You can delete or categorize teams by clicking the checkbox to the left of them, and selecting the desired option at the top of the grid.
Managing Users
To manage existing users' accounts:
- Using the Navigation Menu, click Settings.
- Under the Organization section, click Users.
Searching for Users
Click on a column header to sort users alphabetically in ascending or descending order. Use the search icon to search for specific users by their name or email address. Click the dropdown arrow to filter users based on their Role, Portal, or Review Team.
Editing Users
Permissions for each user are based on the role they are assigned. Administrators can modify a user’s access by changing their role.
To modify users:
- Click a user’s name to view their page.
- Adjust settings as described above. You can select a new role in the Role area, or adjust the user’s assignment settings in the Team Membership area.
- Click Save Changes to save your new settings.
Any user in the software can also make edits to their own account by clicking My Account at the bottom of the Navigation Menu. From the My Account Menu, you can edit your contact information, update your account image, change your login email, or reset your password.

Inviting Pending Users
If there are any users with pending access, click # invitations ready to send to see who those users are. Click Send All to send the email invitations in batch.
You can also select users to send them an invitation, allowing them to confirm their access and create a password. Invitations expire after 90 days.
To resend an invitation, click the user you'd like to re-invite, and click Resend Invite.
Deleting Users
To remove a user from your account, click the checkbox near their name, then click Delete.
Exporting Users
Click the checkbox next to the user's name, then click Export. Select the export view, then click Download.
Managing Global Data Restrictions
Global Data Restrictions are organization-wide rules that control the visibility of certain application fields. Similar to data restrictions within roles, these rules allow you to block specific fields from being seen by users unless their role permissions exempt them from the restriction. Since Global Data Restrictions are organization-wide, they can impact multiple roles at once.
For example, if, as an administrator, you want to restrict all non-admin users in your organization from seeing race and ethnicity data, you can add the race field (or the entire Race and Ethnicity form) as a data restriction, as seen below.

Only administrators and other users with the Manage Global Data Restrictions permission enabled in their roles can configure Global Data Restrictions. Therefore, setting a data restriction here (rather than in the Application Data Restrictions area of the role settings) limits who can remove your data restrictions.