Configuring Workflows and Automation
Overview
ResidencyCAS has two features that can help you become more efficient: workflows and automation.
Workflows are sequences of actions that occur automatically after a specific event happens. When configuring workflows, you decide what the trigger event is and what actions should follow. For example, you can design workflows to:
- Assign an application to a reviewer when a specific tag is added.
- Send an email to applicants placed in a "rejected" phase.
- Move an applicant to another phase once an evaluation form is completed.
Automation allows you to complete tasks automatically when specific conditions are met. For example, you can build a rule to automatically move applicants with gold signals to a specific phase.
Workflows differ from automation in that workflows are triggered whenever your set conditions are met, while automation occurs at specific times and with a set frequency.
Workflows
Building a Workflow
Once you've identified a series of actions you want to occur after a given event, you can build a workflow so that these actions happen automatically.
- From the Settings menu, open the Application Review section, then click Workflows.
- Click the + icon.
- Name the workflow.
- You can make the workflow active now or later – see Running Workflows below for more information.
- Click Add Trigger to select the type of event that should cause the workflow to begin, then configure the specific trigger event. For example, if you select Phase as the trigger type and Assigned & In Review as the phase that triggers this workflow, then any time an applicant is moved to the Assigned & In Review phase, the sequence of actions in the workflow begins.
- After configuring your trigger, click the + icon below it to add the first step in your workflow. You can also configure additional triggers that will start this workflow by clicking the + icon to the right of the existing trigger.
- Choose what type of step should take place at this point in the workflow:
- Choose Action to configure the next action, such as moving the application to a review phase, adding tags, etc.
- Choose Decision if your next step is dependent on some other conditions. This creates a Yes/No path, allowing you to insert your desired steps in either branch.
- Choose Wait to add a delay. This is useful if you want to provide yourself with a buffer or delay the next action from occurring.
- Choose Exit when the workflow should end.
- Next, add and configure any additional steps that should occur. To remove a step, hover over it and click the X.
- When you're done adding steps, click Save Changes.
Workflow Example
An example of a common workflow would be to add a tag to all applicants placed in the Assigned & In Review phase. To set this up:
- Select Phase > Assigned & In Review for your trigger.
- Select Action > Add Tag as your action type.
- Select the tag you want to add to applicants.
- Save your changes.

Running Workflows
After you enable a workflow, it runs automatically when your trigger occurs. Newly enabled workflows do not run retroactively, so they will not impact applications that previously met the trigger criteria. You can launch workflows manually on applications as needed:
- Navigate to the desired application.
- From the More Options menu, click Workflows.

- Click Add Workflow and select which workflow you'd like to run on this applicant.
- Click Enroll.
Reviewing Workflows
If you've started running workflows, you can review them to determine which actions have taken place on each application and ensure that they have run as expected. You can do this from any application:
- Navigate to the desired application.
- From the More Options menu, click Workflows.
- To see what actions have taken place, click a workflow.
- From here, you can review each step. Hover over a step to see when it was completed.
Automation
Building Automation Rules
Once you've determined what you want to automatically happen and when, you can build an automation rule.
- From the Settings menu, open the Application Review section, then click Automation.
- Click the + icon.
- Name the rule, then set up a schedule for it.
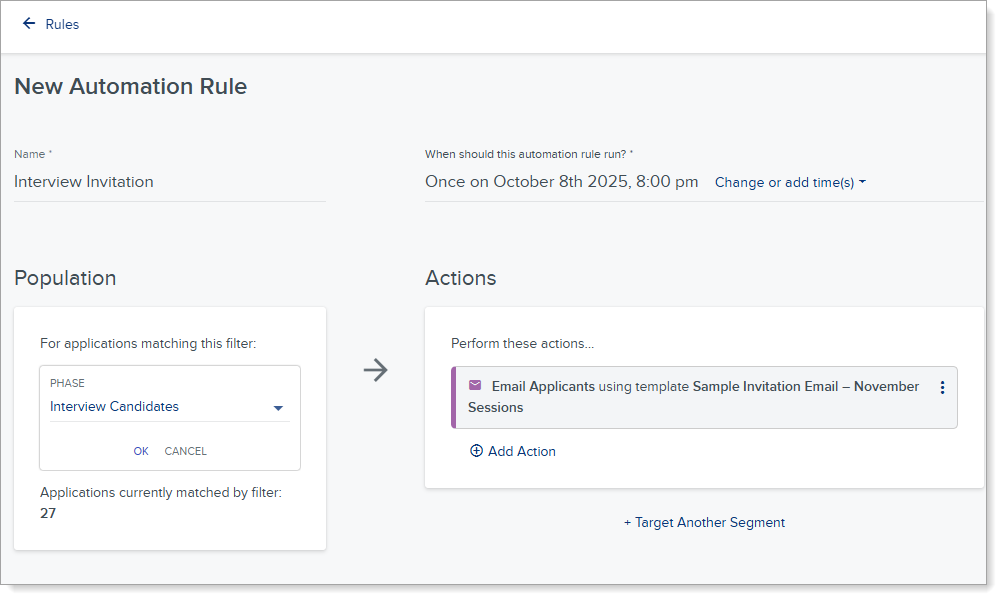
- In the Population area, add criteria to filter applications. Here, you're telling the system which applications you want the rule to apply to (for example, applications in the Interview Candidates phase). Note: the Population area updates to show you how many applications match your criteria.
- In the Actions area, indicate what you want to happen.
- Once you've configured everything, click Create Rule then Save Changes.
Automation Example
After you have decided which applicants you would like to interview, an example of a useful automation would be to send an interview invite email to these applicants all at the same date and time after being placed in the Interview Candidates phase. To set this up:
- Select Phase > Interview Candidates for your trigger.
- Select Add Action > Email as your action.
- Select the email template you want to send to the applicants.
- Save your changes.

