Managing Roles
Overview
At your program, different people are likely responsible for different application processing tasks. To support this, the Program Portal includes the Roles feature. Roles control what users can do in the system (permissions) and what data they can see. When you add a user, you assign them a role.
Video Overview
Default Roles
The Program Portal includes a set of default roles. You can access these roles from the Settings menu – open the Organization section, then select Roles. The grid displays the default roles and provides an overview of the number of permissions enabled – out of the total number of permissions available – for each role in each module. For instance, in the example below, the program director role has 12 out of 12 permissions enabled for the App Review module, 8 out of 8 permissions for the App Config module, etc.

You can click any role to open and adjust permissions settings (or use the + icon above the grid to create a new role).
Managing Access to Data
By default, the Reviewer/Interviewer role has limited system permissions but full access to application data. We recommend editing this role – or creating variations of it – and updating three key sections that control data access:
- Application Review
- Application Visibility
- Application Data Restrictions
As a best practice, after editing a role, assign it to a peer and then meet with them to review the access settings and confirm everything looks right.
Application Review
Key permissions you may want to enable for reviewers:
- Review Applications: lets users complete review forms.
- Edit Application Tags: lets users add or remove tags on applications.
- Comment on Applications: lets users add comments to applications.
- Change Application Phase: lets users move applications to different phases.
- View Reviews: lets users read review forms submitted by others.
- Assign Applications: lets users assign applications (i.e., redirect) to other users.
Be sure to save any changes.
Application Visibility
Use this feature to limit which applications a role can view and search. Depending on your specialty, the Reviewer/Interviewer role can view either all applications or only those assigned to them, but you can update this as needed. Be sure to save any changes.

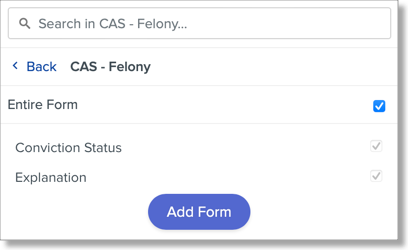
Application Data Restrictions (i.e., Data Masking)
You can use this feature to hide specific application information from a role. For example, if you use a blind review process and want to hide potentially bias-inducing characteristics, you can add those restrictions here.
- Click Add restriction.

- Fields are organized into categories. In this example, we'll open the Applicant Forms category, which contains data entered by applicants (and is where most of the information you'd likely want to hide is located).

- Next, we'll select the Felony form.

- You can choose to hide individual questions or the entire form (which includes all questions). Once you've made your selections, click Add.
- The restriction now appears in the list. After adding all restrictions, be sure to save your changes.
