DIO Quick Start Guide
Overview 
ResidencyCAS is a single, comprehensive platform that streamlines and improves the residency application process for everyone. This guide covers key functions DIOs will perform in the Program Portal, such as setting global data restrictions for program users. We recommend bookmarking this page for future reference. If you need assistance, you can contact us for live support.
Accessing the ResidencyCAS Program Portal
To gain access, ask your program director or manager to create your account at https://programs.residencycas.com and assign you the pre-built Designated Institution Official role.
Note: if any of the functionality below is unavailable to you after logging in, contact your program director or manager so they can adjust any necessary settings.
Customizing Your Dashboard and Building Reports
The Dashboard is the landing page where you arrive after logging in, offering a customizable view of key reports through interactive charts. You can click on these charts to explore specific groups of applicants.
To customize your dashboard, use the pencil icon in the top-right area to add new charts or rearrange the layout. You can also navigate to the Reporting section in the left menu to create and view reports outside of the dashboard.

Note: when creating a chart, you can apply criteria to narrow down who is included. For example, if you're adding a chart that shows states of residence, you can indicate the chart should only include individuals who have gold signals.
Setting Global Data Restrictions
You can use this feature to hide specific application information from all program users. For example, if you use a blind review process and want to hide potentially bias-inducing characteristics, you can add those restrictions here.
- Click Settings in the lower-left menu bar.
- Open the Organization section, then click Global Data Restrictions.
- Click + Add restriction. Fields are organized into categories. In this example, we'll open the Applicant Forms category, which contains data entered by applicants (and is where most of the information you'd likely want to hide is located).

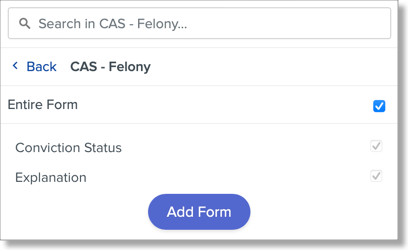
- Next, we'll select the Felony form.

- You can choose to hide individual questions or the entire form (which includes all questions). Once you've made your selections, click Add.
- The restriction now appears in the list. After adding all restrictions, be sure to save your changes.

Exporting Data
ResidencyCAS comes with a set of preconfigured file exports, including export templates for use with New Innovations and MedHub. However, you can also configure custom export templates. When you create an export template, you can then use it to generate exports for batches of applicants (including all applications) or individual applications.
-
Generating batches of exports:

-
Generating individual exports:
