
Creating Quick Messages
Quick Messages allow you to deliver content to a specific group of recipients as a one-time event. They can be created and scheduled quickly, offering a streamlined way to communicate without needing a full campaign setup. Quick messages are ideal for campus alerts, announcements, reminders, special event invitations, and more.
Quick Message Tab
The Quick Message tab is on the Communication Planner's left navigation panel. From here, you can view existing messages, create new messages, and toggle between email and SMS quick messages. For details on creating Quick Messages, see Creating Quick Messages.

Creating Email Quick Messages
- Navigate to the Quick Messages tab.
- Click the Email tab, then + to add a new message.
- Enter the Message Details:
- Name
- Description
- Tags (optional)
- Click Next to specify Recipients:
- Select who the message appears to come from (From Name and From Email) and who should receive the reply (Reply Name and Reply Email).
- You can select the assigned Contact or Lead record owner, if preferred, by checking the “Use Record Owner...” checkboxes.
- Select the folder location of your recipient report.
- Select the name of your recipient report.
- Select a test list if you would like to test the Quick Message.
- Select any email groups to be included in this message, if enabled (link to email groups).
- Click Next to select Content:
- Template Folder
- Template Name
- Subject Line

- Preview the content by selecting Preview Template.
- To Test your message, click the Test icon:
- Specify any Test Lists
- Click Next to Schedule:
- Choose Schedule to send the message immediately (default option) or
- Send in the future by selecting the Send this message in the future toggle and specify a Date, Run Time, and Time Zone.
Note: most emails scheduled for ‘now’ will begin sending within 15 minutes. Remember that the more recipients, the longer the message may take to deliver.
- You're done! Your message will be visible on the Quick Messages main page.
Creating SMS Quick Messages
- Navigate to the Quick Messages tab.
- Click the SMS tab, then + to add a new message.
- Enter the Message Details:
- Name
- Description
- Tags (optional)
- Message Service Name
- Phone Number
- Click Next to specify Recipients:
- Select the folder location of your recipient report.
- Select the name of your recipient report.
- Specify the Send SMS to
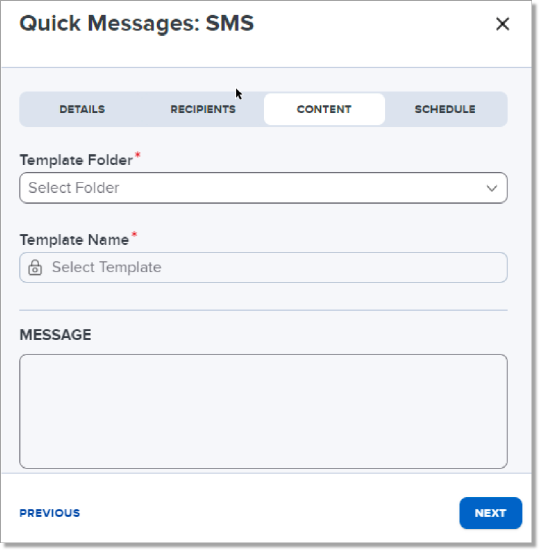
- Click Next to select Content:
- Template Folder
- Template Name
- Message
- To test your SMS, click the Test icon:
- Specify any Test Lists
- Notes:
- Test list members must have an SMS-enabled number associated with their test list membership to receive test messages.
- The Send Test SMS button sends a test SMS to the first 25 records selected in the test report and sends it to members of the selected test list.
- Test messages are delivered with “TEST SMS:“ before the template content.
- Notes:
- Specify any Test Lists

- Click Next to Schedule:
- Choose Schedule to send the message immediately (default option) or
- Send in the future by selecting the Send this message in the future toggle and specify a Date, Run Time, and Time Zone.
- You're done! Your message will be visible on the Quick Messages main page.
Managing Quick Messages
Cloning a quick message
- Click the three dots next to the quick message.
- Select Clone Message.
- Review the prompts in Creating an Email or SMS Quick Message.
- Once you have confirmed the information in the details, recipients, contents, and schedule tabs are correct, select Schedule.
Editing Quick Messages
Before a message has been sent, a user may want to edit the message for sending. From the list view screen:

- Click the three dots next to the quick message.
- Select Edit Message.
- You can edit any information to create your quick message.
Note: messages that have already been sent cannot be edited.
Canceling Quick Messages
Quick Messages scheduled but not yet sent can be canceled from the Quick Message list or from the message details. Quick messages scheduled to send immediately cannot be canceled.
To cancel a message, open the Action Menu, select Cancel Message, and confirm your choice.
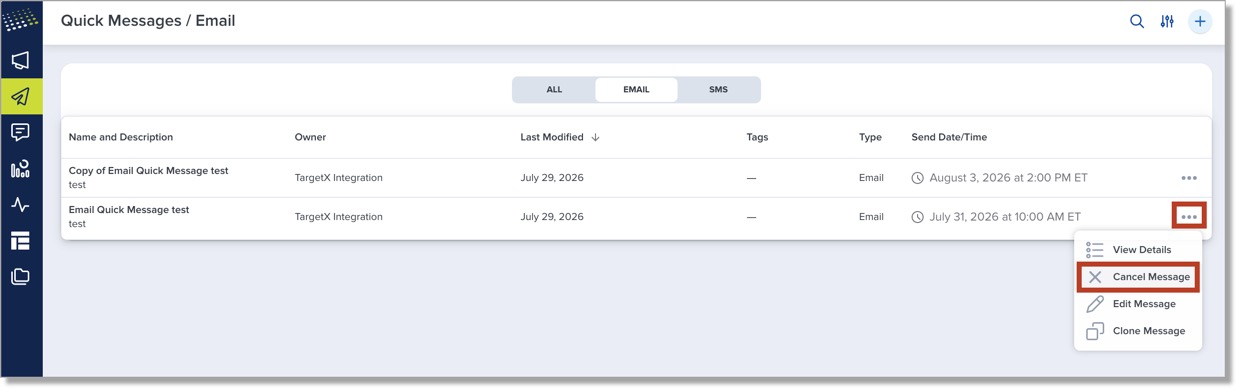
After cancellation, the message is removed from the list. You can also perform this action directly from the Quick Message details window.
Viewing Quick Message Data
In the TargetX Communication Planner, Quick Message activities can be viewed by selecting the Quick Message icon in the left pane. This list view is the primary list view for all quick messages. From here, you can search for a quick message, filter by type (email or SMS), and sort. You can also see how many recipients received the message.
Quick message data is also visible at the bottom of the Contact record in the Communication Planner Contact Activity widget:

Viewing Quick Message Details
Use the Action menu to view details for your Quick Messages. Select the ellipsis (…) to open the menu.

Use the View Details option to review a message’s configuration, recipients, content settings, and activity information without opening the edit experience.
A detailed side window opens with the quick message name in the header. The panel includes the message’s tags, description, delivery settings, recipient information, and creation and modification history.
Depending on the quick message type and configuration, the details panel can include:
- Tags
- Description
- Send Date
- Type, such as SMS or Email
- Send To
- Template Name
- Subject
- From Name and From Email
- Reply Name and Reply Email
- Recipient Report
- Recipient Count
- Email Groups
- Created date and user
- Last Modified date and user
Note: Created and Last Modified information appears in the right column in the format `<date> by <User>`.