Overview of the Salesforce Lightning Experience with TargetX
This reference guide includes a brief overview of what the Lightning Experience is, how to enable the Lightning Experience, what browsers are supported, considerations and limitations of the Lightning product, how the Lightning Experience impacts current TargetX products, and notes any limitations and known issues with TargetX products when using Lightning.
What is the Salesforce Lightning Experience?
"Salesforce Lightning is a collection of tools and technologies behind a significant upgrade to the Salesforce platform. Lightning includes:
- Experience: A set of modern user interfaces optimized for speed. This includes the Lightning Experience, Salesforce1 Mobile app and template-based communities.
- Lightning Component Framework: A JavaScript framework and set of standard components that allow you to build reusable components to customize the Lightning Experience, Salesforce1 Mobile app and template-based communities and build your own standalone apps.
- Visual Building Tools: Drag-and-drop technologies for fast and easy app building & customizations. Use the Lightning App Builder to customize the Lightning Experience and Salesforce1 Mobile app. Use the Community Builder to customize template-based communities.
- Lightning Exchange: A section of the AppExchange where you can find 70+ partner components to jumpstart your development.
- Lightning Design System: Style guides and modern enterprise UX best practices to build pixel perfect apps that match the look and feel of the Lightning Experience and Salesforce1 Mobile app." [1]
For more information on the Salesforce Lightning Experience, click here.
Salesforce Lightning Experience Considerations and Limitations
The latest release of Lightning Experience doesn't include everything available in Salesforce Classic. There may be functionality that is limited or unavailable to Lightning users. The information provided by clicking the links below can help prepare users about what to expect when switching to Lightning Experience. The following links will provide information on the considerations and limitations involved if migrating to Lightning:
Lightning Experience Considerations
What's Not Available in Lightning
What are the Gaps Between Lightning Experience and Salesforce Classic
Supported Browsers for Salesforce Lightning Experience
"Lightning Experience is supported with Apple® Safari® version 9.x and 10.x on Mac OS X, and Microsoft® Edge for Windows® 10. The most recent stable versions of Mozilla® Firefox® and Google Chrome™ are also supported. Microsoft® Internet Explorer® version 11 is retiring beginning in Summer '16. If you're using Microsoft® Internet Explorer® versions 9–10, you will be redirected to Salesforce Classic. There are some limitations." [2]
For up-to-date information on supported browsers, please refer to the Salesforce Website here.
Enabling the Lightning Experience
Please refer to Salesforce's Enabling the Lightning Experience and Setting Up Users for the Lightning Experience.
The following Salesforce site on Lightning for Admins also provides various resources for administrators, including Webinars, Trailhead training, blog posts, and podcasts.
Known Issues/Limitations with TargetX Products Using Salesforce Lightning
TargetX products are Salesforce Lightning-ready. Please test any customizations to your Salesforce org beyond the standard TargetX CRM implementation to ensure Lightning readiness.
Considerations for Lightning
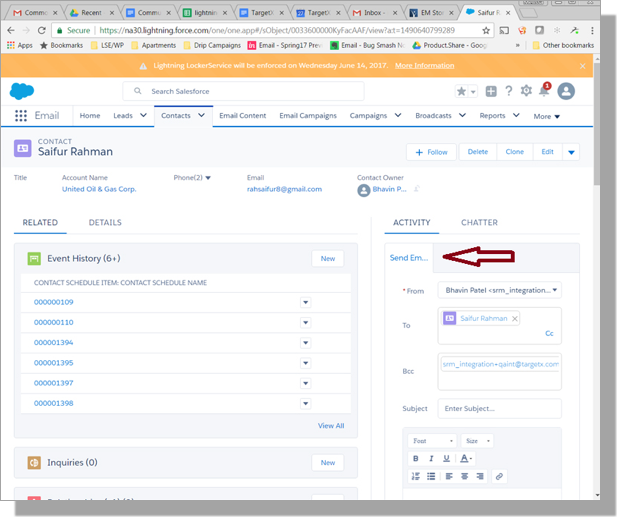
- When Lightning mode is on, Send Email from Activity panel on the Contact screen is not fully functional. The feature is a native SalesForce feature and doesn't use TargetX email components, such as email templates. Users can send an email, but cannot select an existing template designed with the TargetX Email Template builder. The image below displays the Contact screen and how the Send Email from Activity panel on the right side of the screen uses native SalesForce functionality and will not allow for sending email templates designed with TargetX email content. Note that the page layout can be modified so that the Activity Panel does not display at all, which is the recommended configuration to avoid confusion for users.
- Institutions should replace S-Controls for Lightning compatibility.
Events
Considerations for Lightning
- You can view attachments natively in Lightning on the event record page using the appropriate component. However, if you want to modify them, it will open a new single-use tab in Classic to allow the modifications.
Retention (Student Success Center)
Considerations for Lightning
- Lightning includes a new notes interface which utilizes a full rich-text editor. Notes saved in Salesforce directly that have html (e.g. break tags, formatting) - when viewed in SSC, the notes display with the HTML tags. This can be resolved either by treating the note display to accept/render HTML tags or auto-escaping HTML tags.
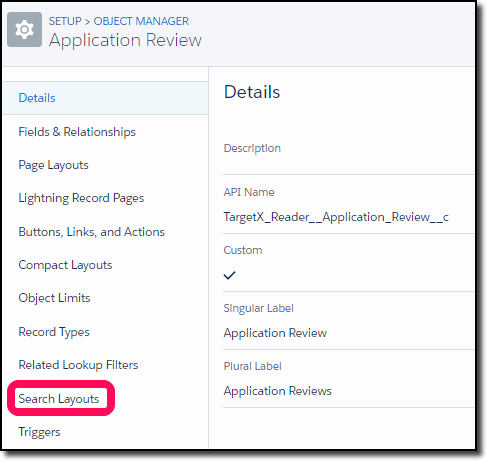
Application Review Tool and Salesforce Lightning
Read Application button
When Lightning is enabled, you must complete the following steps to properly view the Read Application button.
- Navigate to Setup and click Object Manager.
- Select the Application Review object.
- Click Search Layouts.
- Select to Edit the Default layout. You will need to click the link to open the page in Salesforce Classic:

- In the Custom Buttons section, under Available Buttons, Add the Update Owner and Read Applications buttons:

- Remove the Read Applications button already listed (it will be at the top of the list under Selected Buttons).
- Save your changes.
Notes:
- The App Reader will include Notes and Attachments classified as Content Document type. Content Document is an attachment type that is generated in Lightning Experience. These notes display with HTML code.
Using Salesforce files in the Application Review Tool
Step 1: Enable the Files tab in the User profile
Note: Ensure that the user who’s running the cache scheduled job or the user who’s viewing the App Reader page has access to Files.
- Navigate to Setup and search for Profiles.
- Click the Profile that you wish to enable Files.
- Click Object Settings.
- Click the Files object.
- Verify that the Tab Settings are set to Default On.
- Save any changes.
Step 2: Assign API Access
- Navigate to Setup and search for Profiles.
- Click the Profile that you wish to update permissions.
- Click System Permissions.
- Click Edit.
- Check the field for API Enabled.
- Save your changes.
Step 3: Assign Decision permissions
You can either assign Decision permissions manually or via a Permission Set.
Assign via a Permission Set
- Navigate to the Permission Scanner tab.
- In the Product/Feature field, select Decision.
- Select the appropriate Version, such as 2106.1.
- Click Generate Permission Set.
- Once complete, navigate to Setup and search for Permission Sets.
- Click the TX Decision permission set.
- Click the Manage Assignments button.
- Click the Add Assignments button.
- Click the checkbox next to any users that need access.
- Click Assign.
Assign manually
- Navigate to Setup and search for Profiles.
- Click the Profile that you wish to update permissions.
- Using the Permission Viewer, add the appropriate permissions outlined.
- Save your changes.
Step 4: Add the Files Related List to the object (eg, Essay etc.) layout
You’ll need to add the Files Related List to the appropriate Object layouts to add files related to the record:
- Navigate to Setup and click Object Manager.
- Choose the appropriate Object, such as Essay.
- Click on Page Layouts.
- Click on the appropriate Page Layout.
- Click on Related Lists.
- Drag Files into the Related Lists section.
- Save your changes.
Note: Salesforce Files are available in the Files home for users to share and manage. By contrast, an attachment to a record is available only from the record. Uploading a file as a Salesforce File rather than an attachment doesn't change its access. It makes the file available to share and manage beyond the specific record. This setting applies only to Salesforce Classic.
Step 5: Set file access to ‘Set by Record’ for files attached to records
Note: when enabled, users’ access to Files attached to a record follows their record access: Read/write record access provides Collaborator file access. Read-only record access provides Viewer file access. When disabled, all files attached to a record have Viewer access.
- Navigate to Setup and search for Salesforce Files.
- Click General Settings.
- Click Edit.
- Check the Field for Set file access to Set by Record for files attached to records.
- Save your changes.
[1] "Lightning FAQ". (2016, June). Retrieved from https://developer.salesforce.com/page/Lightning_FAQ
[2] Supported Browsers for Lightning Experience". Retrieved from https://help.salesforce.com/articleView?id=getstart_browsers_sfx.htm&language=en_US&type=0