Working in Salesforce Lightning and TargetX
Creating a Lightning Menu
Note: you can not update existing Classic(Managed) apps because Custom Apps that are managed only allow edit on certain attributes.
- Navigate to Setup, search for Apps, and click App Manager.
- Click New Lightning App.
- Enter the following:
- App Name
- Developer Name (will default based on App Name).
- Description
- App Branding (image, color, etc.)
- Click Next.
- Select the App Navigation options: standard or console
- Add a utility bar for common processes and tools, like Recent Items, Notes, etc.
- Customize which items appear in the app’s navigation bar.
- Select the Profiles that have access to this App.
- Click Save & Finish.
Accessing Classic email templates in Lightning
- Navigate to Setup and search for Global Action.
- Locate the Email action (use the one named Email from the TargetX Recruitment Manager package). You can click into each one to see the details.
- Click the Layout button, add the Email Template field to the layout.
- Save your changes.
- Ensure the page layout is assigned to those Profiles that need to access Classic email templates.
For additional information on Classic Email Templates, please see the Salesforce Help & Training article: Considerations for Using Your Classic Email Templates in Lightning Experience.
Customizing your Salesforce Lightning Home Page
-
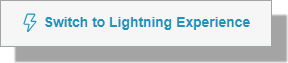
To begin to customize your Home Page, you'll first need to be using the 'Lightning Experience'. You can switch by selecting the 'Switch to Lightning Experience' link:
- Navigate to the Home tab in your Org.
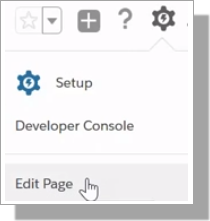
- Navigate to the Setup menu and select Edit Page; this opens the Lightning App Builder:
- Pages will display the most recently updated pages.
- Back button takes you back to the Home page, this does NOT save your work; it will exit from the App Builder.
- The left-side pane will display Lightning components that you can use; including both Standard and Custom Lightning components.
- You have the option to add Dashboards, Report Charts and shortcuts to specific List Views.
-
Hover over the component and drag and drop it to add it to the page. Depending on the component, additional elements may display in the right-side pane (for example, 'List View').
- To remove a component, click on the component and then select the X in the upper right of the component.
- To move items, click on the component and drag it to the new location.
Note: if you add too many items to a page, you will receive a notification from Salesforce. For example: "Too many List View components on one page can cause page perfomance issues. Use them sparingly."
You can define additional details for List Views added to the Home Page. List views allow you to select:
- Object
- Filter
- Number of records to display
- Hide the Action Bar
- Enable inline edit
For Dashboards added to the Home Page, you can select:
- Which Dashboard to display
- Max Height
- Whether to hide the dashboard if an error occurs.
Note: select the i icon for additional information on each option.
- Save your changes.
- Activate the changes.
When you finish configuring your new Home Page, you will need to Activate it in your Org. Activation allows you to set an org-wide default OR to set the home page for specific profiles. TargetX recommends that you begin with an 'Org-wide default' for your pages as this creates a seamless experience. You can define profile-specific pages as you increase your use of the CRM.
Set Component Visibility allows you to define which audience sees the component. For more information on Component Visibiity, please see Salesforce Help & Training article "Dynamic Lightning Pages."
Customizing your Salesforce Lightning Contact Page
There are two components of the Contact (Students) page that you'll want to customize; the Page and the Page Layout:
- Start with customizing your Salesforce Lightning Home Page to familiarize yourself with navigation and available components.
- Customizing the Page Layout; is similar to updating Page Layouts in Salesforce Classic.
- To begin to customize your Contact Page, you'll first need to be using the 'Lightning Experience'. You can switch by selecting the 'Switch to Lightning Experience' link.
- Navigate to the Contact tab in your Org.
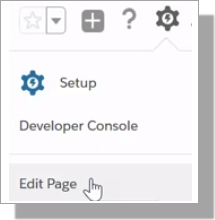
- Navigate to the Setup menu and select Edit Page; this opens the Lightning App Builder:
- Click on the element you want to customize.
- To change the order of the tabs, drag and drop the tabs in the right-hand pane.
- To set the default tab, select the Default Tab list and select one of the available tabs.
- Included by default is the Salesforce Potential Duplicates component. If you are using a third party tool to detect potential duplicates, TargetX recommends that you REMOVE this from the page layout as it can lead to confusion for users. To remove, click on the component and then select the X.
- If you aren't using Chatter, you can also remove that from the right column in the Page. To remove, click on the component and then select the X.
To embed the Activity feed into the main window, select the element where you want to add:
- Select Add Tab in the right-hand pane
- Select Activity
- Click on the new tab and drag and drop the Activity component onto the new tab.
To customize the Contact Preview/Highlights section:
- Click on the section. The right-hand pane will display the options, which comes from you Compact Layout and Actions on your Page Layout.
- You can preview the System Default layout by clicking on the link, or view your Custom Compact Layout.
- To change the Compact Layout, click Assign Compact Layouts. This will open a new tab where you can review/update Compact Layout assignments.
- Save your changes.
- Activate the changes. Activation allows you to set an org-wide default OR to set the home page for specific profiles. TargetX recommends that you begin with an 'Org-wide default' for your pages as this creates a seamless experience. You can define profile-specific pages as you increase your use of the CRM.
- Set Component Visibility allows you to define which audience sees the component. For more information on Component Visibiity, please see Salesforce Help & Training article "Dynamic Lightning Pages".
Replacing S-Controls for Lightning compatibility
There are three places where S-Controls need to be updated to VF pages because the S-Controls don't work properly in Lightning: Contact, Campaign, and Broadcast.
Update CONTACT Page Layout
- Navigate to Setup and search for Object Manager.
- Select the Contact object (This could also be named 'Student').
- Select Page Layouts.
- Select Edit for the Contact Page Layout (This could also be named 'Student Page Layout').
- Remove the Custom S-Control 'Individual Activity Report'
- From the page layout palette, select the Visualforce Pages group.
- Select the ind_activity_contact_vf visualforce page and drag it onto your page layout
- Click on the wrench icon.
- Click the checkbox for Show Scrollbars.
- Click Ok.
- Save your changes.
- Repeat for any other Page Layouts where you want this information to display.
Update CAMPAIGN Page Layout
- Navigate to Setup and search for Object Manager.
- Select the Campaign object.
- Select Page Layouts.
- Select Edit for the Campaign Page Layout.
- Remove the Custom S-Control 'Campaign Intelligence Report'.
- From the page layout palette, select the Visualforce Pages group.
- Select the campaign_intelligence_vf visualforce page and drag it onto your page layout.
- Click on the wrench icon.
- Click the checkbox for Show Scrollbars.
- Click Ok.
- Save your changes.
Update BROADCAST Page Layout
- Navigate to Setup and search for Object Manager.
- Select the Broadcast object.
- Navigate to the Page Layouts section.
- Select Edit for the Email Broadcast Layout (This could also be named expEmail_Broadcast Layout).
- Remove the Custom S-Control 'Campaign Intelligence Report'.
- From the page layout palette, select the Visualforce Pages group.
- Select the broadcast_intelligence_vf visualforce page and drag it onto your page layout.
- Save your changes.