Application Review Tool and Salesforce Lightning
Read Application button
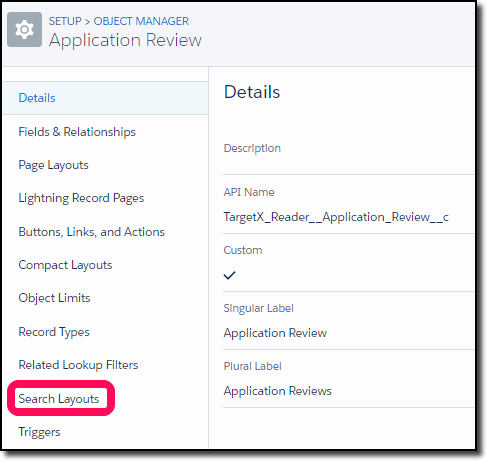
When Lightning is enabled, you must complete the following steps to properly view the Read Application button.
- Navigate to Setup and click Object Manager.
- Select the Application Review object.
- Click Search Layouts.
- Select to Edit the Default layout. You will need to click the link to open the page in Salesforce Classic:

- In the Custom Buttons section, under Available Buttons, Add the Update Owner and Read Applications buttons:

- Remove the Read Applications button already listed (it will be at the top of the list under Selected Buttons).
- Save your changes.
Notes:
- The App Reader will include Notes and Attachments classified as Content Document type. Content Document is an attachment type that is generated in Lightning Experience. These notes display with HTML code.
Using Salesforce files in the Application Review Tool
Step 1: Enable the Files tab in the User profile
Note: Ensure that the user who’s running the cache scheduled job or the user who’s viewing the App Reader page has access to Files.
- Navigate to Setup and search for Profiles.
- Click the Profile that you wish to enable Files.
- Click Object Settings.
- Click the Files object.
- Verify that the Tab Settings are set to Default On.
- Save any changes.
Step 2: Assign API Access
- Navigate to Setup and search for Profiles.
- Click the Profile that you wish to update permissions.
- Click System Permissions.
- Click Edit.
- Check the field for API Enabled.
- Save your changes.
Step 3: Assign Decision permissions
You can either assign Decision permissions manually or via a Permission Set.
Assign via a Permission Set
- Navigate to the Permission Scanner tab.
- In the Product/Feature field, select Decision.
- Select the appropriate Version, such as 2106.1.
- Click Generate Permission Set.
- Once complete, navigate to Setup and search for Permission Sets.
- Click the TX Decision permission set.
- Click the Manage Assignments button.
- Click the Add Assignments button.
- Click the checkbox next to any users that need access.
- Click Assign.
Assign manually
- Navigate to Setup and search for Profiles.
- Click the Profile that you wish to update permissions.
- Using the Permission Viewer, add the appropriate permissions outlined.
- Save your changes.
Step 4: Add the Files Related List to the object (eg, Essay etc.) layout
You’ll need to add the Files Related List to the appropriate Object layouts to add files related to the record:
- Navigate to Setup and click Object Manager.
- Choose the appropriate Object, such as Essay.
- Click on Page Layouts.
- Click on the appropriate Page Layout.
- Click on Related Lists.
- Drag Files into the Related Lists section.
- Save your changes.
Note: Salesforce Files are available in the Files home for users to share and manage. By contrast, an attachment to a record is available only from the record. Uploading a file as a Salesforce File rather than an attachment doesn't change its access. It makes the file available to share and manage beyond the specific record. This setting applies only to Salesforce Classic.
Step 5: Set file access to ‘Set by Record’ for files attached to records
Note: when enabled, users’ access to Files attached to a record follows their record access: Read/write record access provides Collaborator file access. Read-only record access provides Viewer file access. When disabled, all files attached to a record have Viewer access.
- Navigate to Setup and search for Salesforce Files.
- Click General Settings.
- Click Edit.
- Check the Field for Set file access to Set by Record for files attached to records.
- Save your changes.