Resolving Code Coverage errors for Communities
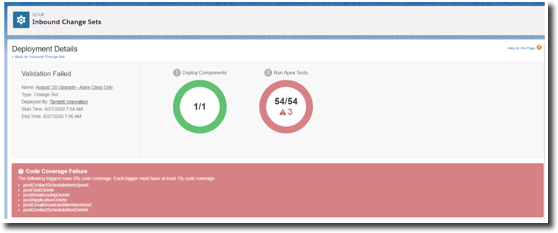
Issue: code Coverage Failure errors when Deploying or Validating the changeset for Communities upgrades for items NOT related to the items in your changeset. Such as: “The following triggers have 0% code coverage…”
Resolution Option 1: Run single Test Class
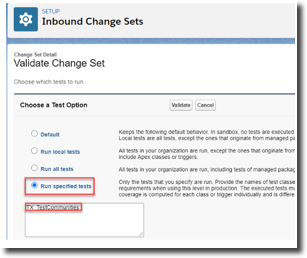
When you validate the Changeset, run only the Communities Test Class (TX_TestCommunities); this is the Test Class for everything related to Communities:
- Navigate to Setup and search for Inbound Change Sets.
- Click the Validate link for the change set you previously created.
- Click the option to Run specified tests.
- Enter TX_TestCommunities.
- Click Validate. If you still receive errors, contact TargetX Support.
Note: while we still recommend to Run all Tests, the above option should be used if you get an error.
Resolution Option 2: Update TX_TestCommunities
The other option you have is to update the TX_TestCommunities Apex Class.
Step 1 Log into your Sandbox
Ensure that your Sandbox has been refreshed before continuing.
Step 2 Update TX_TestCommunities Apex Class
- Navigate to Setup and search for Apex Classes.
- Click the TX_TestCommunities apex class.
- Select Edit.
- Add the following code to the end of testSiteLoginController ():
PageReference pageRef = Page.TX_SiteLogin;
Test.setCurrentPage(pageRef);
ApexPages.currentPage().getParameters().put('startURL','testurl');
System.PageReference selfRegURL = controller.getSelfRegURL();
System.assert(selfRegURL != null);
For example:

- Save your changes.
Step 3 Test the changes in your Sandbox
- Login to your Community using an existing test user.
- Verify they can create an Application, submit payment, etc.
- Register a new test user.
- Verify they can create an Application, submit payment, etc.
- Test any additional processes that are important to your institution.
Step 4 Create an Outbound Change Set
- Navigate to Setup and search for Outbound Change Sets.
- Select New
- Name the Change Set, for example, Community Code Coverage.
- Add a Description and Save your changes.
- In the Change Set Components section, select Add.
- Select a Component Type of Apex Class.
- Click the checkboxes for the following Apex Class:
- TX_TestCommunities
Step 5 Upload your Change Set
- From the Change Set you created above, select the Org you want to send the Change Set to.
- Click Upload.
Note: uploading the Change Set will send it to the Target Org; it will NOT change your production Org until you Deploy the Change Set.
Step 6 Validate the Change Set in your production Org
- Login to your production Org.
- Navigate to Setup and search for Inbound Change Sets.
- The Change Set you uploaded should be available under Change Sets Awaiting Deployment.
- Click the Change Set you want to deploy.
- Click Validate.
If you get Code Coverage errors, please see the article: How do I fix Code Coverage errors when validating an Inbound Change Set for Communities?
Step 7 Deploy the Change Set in your production Org
- Login to your production Org.
- Navigate to Setup and search for Inbound Change Sets.
- The Change Set you uploaded should be available under Change Sets Awaiting Deployment.
- Click the Change Set you want to deploy.
- Click Deploy.
For additional information on deploying Change Sets, please see Salesforce Help & Training article Deploying a Change Set.