Creating and Updating Email Campaigns
Creating a new email campaign
The Campaign Builder guides the user through a series of steps to build an Email Campaign, including the campaign details, recipient list, email content, and schedule. The following article explains how to navigate through each step of the process.
When sending a new email campaign, you must create the Campaign record and define a few baseline details.
- Navigate to the Campaign Builder tab.
- Select the Campaigns icon in the bottom navigation bar.
- In the Campaign list window, select +
Note: You can sort on any of the columns in the Campaign list by clicking the arrows in the column header.
-
Enter a Campaign Name and Campaign Description.
Note: Do NOT use an ampersand (&) in the Campaign Name, as it will not allow you to schedule a broadcast. Special Characters can sometimes cause similar issues and should be avoided.
- Select a Folder, or to create a New Folder, click Add New Folder. Enter a Folder Name and click Create.
- Enter From Name and Email. This is the sender name that will be displayed to the recipient, such as your institution's or department's name and email address.
- Default values will pre-populate based on your Email Preferences. You may replace the settings that defaulted on a campaign-by-campaign basis.
- If checked, Use Record Owner will populate the Contact/Lead Owner's Name and Email in the FROM fields. You will not be able to change the value.
-
Enter Reply Name and Email. This is the reply to name and address that will be display to the recipient.
- Default values will pre-populate based on your Email Preferences. You may replace the settings that defaulted campaign-by-campaign basis.
- If checked, Use Record Owner will populate the Contact/Lead Owner's Name and Email in the REPLY fields. You will not be able to change the value.
Note: Special characters are NOT supported in the From or Reply Name fields. This includes commas (,).
- If you wish to track link clicks, select the toggle for "Track click-throughs in message." When set, the system will track clicks on individual URLs within the email body content and the statistics recorded at the broadcast and campaign levels.
- Select Next to define the Email Campaign Recipients.
- Select Next to define the Email Campaign Content.
- Select Next to define the Email Campaign Schedule.
- Once you've scheduled or updated your Campaign, you will be directed to the Summary window for the Campaign.
Notes:
- Test messages should never have URL Tracking ON.
- Preview of HTML emails will not show all fonts and line breaks accurately when viewed in Firefox.
- Choose Test Record allows users to select a Contact.
- Test emails that include merge fields on objects unrelated to Contacts or Leads may not be sent.
Using 'Time-Based' values in Campaigns Queries
If you are basing Time-Based queries on a Campaign - be sure you consider that when your org is importing broadcast member data, the criteria used may send the email a day later than expected.
Prior to
Prior To means before your specified date if you use a specific date. If you're using this with relative dates (last N days), the message was sent BEFORE your range, aka, this message was sent more than N days ago.
The most common filter used in query-based campaigns, the Prior To operator, would be employed in a scenario where you want to send students a message from Campaign B 14 days after they get a message from Campaign A. In this case, you'd use the query "Email Campaign A with status SENT, Prior To last 13 days" to indicate that the recipients should have been sent Campaign A before the last 13 days or 14 or more days ago.
Equals
Equals, when used with a specific date, means the message was sent on that date. However, when it's used with a relative date (last N days), it means that the message was sent within the specified period.
For example, if you want to target students who were sent a message within the last seven days, you would use the filter "Email Campaign A with status SENT, equals last seven days." This filter is often used with the Prior To operator to ensure an exact lapsed date value.
Not Equal to
Not Equal to, when used with a specific date, means the message was NOT sent on that date. When this is used with a relative date (last N days), it means that the message was NOT sent within the specified period.
You'd use Not Equal To if you wanted to target a group of students who may have been sent the same email over a long period, excluding those who have been sent the message in the last month. Your query might look like "Email Campaign A with status SENT, Not Equal To last 31 days."
After 
After, when used with a specific date, the message was sent after that date. When used with a relative date (last N days), it means that the message was sent after the specified period.
During or After
During or After, when used with a specific date, means the message was sent within or after that date. When used with a relative date (last N days), it means that the message was sent within or after the specified period.
During or Prior to
During or Prior to, when used with a specific date, means the message was sent during or before that date. When used with a relative date (last N days), it means that the message was sent during or before the specified period.
In the example of N=7, if you use the criteria of During or Prior to Last 7 Days, the query builder returns students who were sent the message before the last seven days or within the previous seven days.
Sending Emails to the Alternate Email Address
By default, Broadcast Emails will be sent to recipients using the email address in the standard "Email" field on the Contact record. If desired, Email Campaigns can be configured to send to either the primary email address or an alternate email address specified in the Alt Email address field on the Contact record.
Note: A single Email Campaign can only deliver to one of the two email fields. Sending the same message to *both* email address fields requires creating separate campaigns.
Creating Email Campaigns to Send to Alternate Email
- Navigate to the App Picker in the top right corner and select the Email tool.
- Click the Campaign Builder tab.
- Select the Campaigns icon in the bottom navigation bar.
- Select the Campaign to edit.
- In the Recipients step, select the toggle for Use Alternate Student Email Instead of Primary.
- Complete the required steps for your Campaign and schedule.
Notes:
- Two fields are supported for emailing to an Alternate Email: Email and TargetX_Email__AltEmail__c.
- Sending to an alternate email address is only supported for emailing contacts, not parents.
Managing Alternate Email Address Opt-Outs and Bounces
When contacts receive emails to an alternative email address, they can opt out of future emails. Contacts who opt out of one email address (primary or alternate) will be opted out for both emails.
If an alternate email address bounces, the Has Alt Email Bounced field on the Contact record will be checked, and no emails will be sent to the alternate email address until the bounced flag is removed. For more information on email bounces, please see Email FAQ.
Including parents in your email campaign
- Create an email campaign and select recipients as described in Creating a new Email Campaign.
- In the Email Campaign Recipients window, in the Send Email to pick list, select which email addresses associated with the student records to use in the campaign:
- Contacts (default choice): will send to only the student email for each record that matches the query
- Parents: will send to ALL parent email addresses in family relationship records associated with student records that match the query. Parents are identified by matching the following status choices in the Relationship drop-down: Mother, Father, Legal Guardian, Parent, or Other.
- Contacts & Parents: will send the same message to both populations above.
Merge Fields
The Add Merge Field option contains standard fields, and custom fields. Options for the student to unsubscribe and update their profile are set during Campaign setup in the new UI.
Parent Opt-Out Functionality
Parent Opt-out functionality works similarly to student opt-out functionality. If the same parent email is in family relationship records for two different students, the opt-out will only remove them from future emails related to the student associated with the email where they clicked the opt out link.
Statistics and Reporting Functionality
For campaigns to parents and contacts, Reports show separate statistics for parents, contacts, and total.
Specifying which template to use in your email campaign
When creating or updating an email campaign using the TargetX Email tool, you can select the desired email template (created in advance) on the Content page.
- If you are creating a new campaign, the Campaign Builder wizard will navigate you directly to the Content step, and you may proceed to Step 2 below.
If you update an existing campaign, navigate to the Campaign Builder tab. If you do not see your campaign, use the search box to find it. Once located, click the pencil icon next to your existing campaign and select the Content option from the bottom navigation to edit the recipient list used by the campaign.
- On the Content step, select the Template Folder where the Email Template for this campaign is stored.
- Select the Email Template Name.
- You can choose to Display Links in Email Footer by selecting from the following options:
- Forward message to a friend - this feature has been deprecated.
- Update my information - if checked, a link to a brief bio/dem update form will be included in your email template's footer.
Note: More information on these features is available in the Email Preferences article.
Changing an Email Campaign's folder
You can change the folder for an Email Campaign from the Campaign list or from the Campaign details.
Change folder from the Campaign list
- Navigate to the Campaign Builder tab.
- Click the elipses [
] next to the Campaign you want to edit.
- Click Move to Folder, select the folder where you wish to move the Campaign or select Managing Campaign Folders.
Change folder from Campaign
- Navigate to the Campaign Builder tab.
- Click the Edit icon next to the Campaign you want to edit.
- Click the Details tab.
- Select a folder for the Campaign or select the link to Add New Folder.
- Save your changes.
Cloning an Email Campaign
- Navigate to the Campaign Builder tab.
- Select the Campaigns icon in the bottom navigation bar.
- In the Campaign list window, select
from the Campaign list.
- Save your changes. The cloned campaign will NOT be saved until you select to Save the new campaign.
Note: Cloned campaigns will be given a default name of 'Copy of <original campaign name>.' If the new name already exists, the default name will be set to 'Copy # of <original campaign name>.'
- For the new, cloned, Campaign the Owner will be set to the person performing the clone. No other related objects will be copied, including Broadcasts.
Deleting an existing email campaign
Deleting a campaign will also delete any related child broadcasts, either sent or unsent. If you do not wish to delete prior broadcast data for sent messages, you will want to use the Future Broadcast Deletion Trigger. If you wish to delete the entire campaign and all of its corresponding data, you can use the steps below:
- Navigate to the Campaign Builder tab.
- Select the Campaigns icon in the bottom navigation bar.
- Search or scroll to locate the campaign you want to delete.
- Click the delete (trash can) icon, where you will be prompted to confirm you wish to delete.

-
Once confirmed, the campaign and any associated broadcasts, both sent and unsent, will be deleted. The campaign will no longer be displayed in the campaign list.
Editing Email Campaigns
- Navigate to the App Picker in the top right corner and select the Email tool.
- Click
for the row with the Email Campaign you wish to modify.
Note: Changing the delivery schedule of an existing campaign will create additional broadcasts without deleting the originally scheduled broadcasts. For more information on how to delete future broadcasts, please see Deleting Email Broadcasts that are scheduled in the future.
- Proceed through the wizard's steps by selecting Next or selecting the option you wish to update (e.g., Details, Recipients, Content, Schedule).
- Make desired changes.
- Click the Update button to save with the existing schedule.
Scheduling your email to be delivered
The Schedule option in the Campaign Builder will allow you to set the frequency with which your broadcasts will be sent. The Frequency field will prompt you to select Immediate, Once, Daily, Weekly or Monthly.
The TargetX email tool supports adding a schedule to new campaigns or updating the existing Schedule on a campaign.
Scheduling a New Campaign
The final step in the campaign builder wizard is Schedule, where you will define the frequency with which the email is sent using the steps below:
- Choose a Frequency for your Email Campaign.
- Immediate - will send the email immediately after clicking the Schedule button.
- Once - will send the email once on the day and time specified.
- Daily - will send the email daily, as defined in the "repeat by" settings.
- Weekly - will send the email weekly, as defined in the "repeat by" settings.
- Monthly - will send the email monthly, as defined in the "repeat by" settings.
- Define additional schedule options specific to the selected frequency. Selecting a frequency of "Immediate" will not display any additional options.
- Enter the Start Date and Start Time.
- Enter the End Date. All campaigns require an end date and will need to be rescheduled for more broadcasts if they should continue after the specified end date.
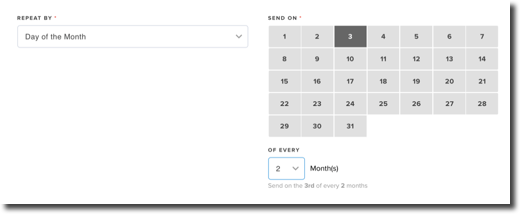
- Enter the Repeat By value for Daily, Weekly, or Monthly emails.
- Daily emails - repeat every n days.
- Weekly emails - repeat every n weeks on a given day of the week
- Monthly emails - repeat every n months on a given date or day of the week.
Example: Repeat every Day of the Month on the 3rd of every two months will send the email every other month on the 3rd.
Example: Repeat every Day of the Week on the 1st Sunday of every month(s) will send the email every month on the first Sunday.

- When finished, click the Schedule button in the top right corner. You won't be able to use the Schedule button until a valid schedule has been selected.
Note: Email Broadcasts have a limit of 1,000 broadcast records per Campaign.
Updating an Existing Schedule
If your existing email Campaign has ended (i.e., the end date has been reached), or you wish to adjust the current Schedule, you can use the Campaign Builder to update the Campaign.
- Navigate to the Campaign Builder tab in the CRM.
- Select the Campaigns icon in the bottom navigation bar.
- Click the pencil icon to select your Campaign from the Campaign list. If you do not see your Campaign listed, use the search bar to locate it.
- Select Schedule in the bottom navigation bar.
- Choose a Frequency for your Email Campaign.
- Define additional schedule options specific to the selected frequency. Selecting a frequency of "Immediate" will not display any additional options.
- Enter the Start Date and Start Time.
- To avoid duplicate Broadcast records, the Start Date should be the first date after the existing End Date on the Campaign record. Check to see what final Broadcast record exists and use the Start Date for the day after. For example, the original Start Date is 11/1 and the End Date is 11/30. I know I need to extend to 12/5, so to avoid duplicate records for 11/22-11/30, use the Start Date of 12/1 and the end date for 12/5.
- Enter the End Date.
- For frequencies of Daily, Weekly, or Monthly, enter the repeat value (e.g., n days/weeks/months, day of the week, or day of the month)
- Enter the Start Date and Start Time.
- When finished, click the Update button in the top right corner. You will not be able to click the Schedule button until a valid schedule has been selected.
Setting up Drip Campaigns
Drip campaigns are campaigns where the receipt of subsequent messages in the “arc” is based on the receipt of prior messages. For example, in the New Inquiry arc, a student enters the drip when they submit an inquiry, which triggers an email acknowledgment of that inquiry. Seven days later, they get another email, 21 days later, another email, and so on and so forth.
Creating Drip Campaigns with Reports
First, you must ensure that Email Broadcast Member Data is enabled. Once EBM data is enabled, you can follow the steps below to create Reports for your drips.
- Create a new report using the report Type 'Broadcasts with Email Broadcast Members and Contact.'
For Parent-Only Emails: When sending Parent-Only emails -- you can use a report Type of Contacts with Relationships and Cross-filter on the Relationship with EBM (Email Broadcast Members). Note: Cross-filter is only an option if Family_Relationship__c is on the EBM object.
- Add the following fields to your report:
- ContactID (first column)
- Broadcast Name - Name
- Broadcast Date
- Any other desired fields
- Add the following filters to your report to define the Broadcast and "activity" your recipients should have on their record to qualify them for the upcoming Broadcast:
- Broadcast: Broadcast Name - Name of the prior Broadcast in your drip
- Activity Status: Which status should the prior message have (Sent)
- Add additional filter(s) to define the elapsed time between the prior and the upcoming Broadcast using the COMPLETE DATE field.
This planning sheet provides additional information and recommendations for setting up your time-based filters for Reports.
Generally, you'll use one filter for Complete Date less than N Days Ago, and another for Complete Date equals Last N Days.
- Add any additional criteria your records need to meet to "qualify" for the new drip (i.e., status, stage, etc.)
- Schedule your campaign, as usual, to run daily. The report will pick up new contacts meeting your specified criteria each day the campaign runs.
Please Note: Due to the report type required to set up drip campaigns, you are limited in the data you can merge into the email templates associated with the campaign that uses this report. Since all merge fields in your template must have their object ID in the report, you may only merge in data from the Contact object, Broadcast object, or Email Broadcast Member object.
Using the Legacy Email UI
- Select the Email application from the application picker in the top right corner.
- Click the Email Campaigns tab.
- In the Step 1: Select your criteria section, make the following selections:
- Data Type = Campaign
- Fields/Activity = Sent/Bounce/HTML View/etc
- Operator = include
- Value = <Click the Search icon to select the previous campaign>
- Select a Campaign and any Date Filters that you would like to add.
- Continue creating as you would a new email campaign.
Note: Drip campaigns using conditional content templates MUST use EBM data. Conditional content does not function with query-based recipient lists.