Managing Recipients lists
Creating a query-based email recipient list
Email Recipient Lists (queries) are lists of recipients for your email campaign. Lists can be saved and used, or reused, in Campaigns.
- Navigate to the Campaign Builder tab.
- Select the Recipients icon in the bottom navigation bar.
- In the Queries list window, select + to add a new Email Query.
- Enter a Name and a Description.
- Select the Object to Query On (Contact or Lead).
- Select the Conditions tab.
- Select the Add button [
] to add a condition.
- Select the Object Name, Field Name, Operator, and Value for each condition.
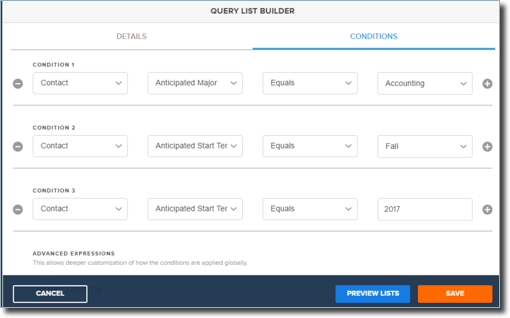
- Operators will vary depending on which Object was selected.
- Add additional options to your condition using the Add button [
].
- Preview your results to ensure it's displaying the expected recipients.
You can define Advanced Expressions if you have complex criteria (such as Value1 OR Value2).
Deciding which operator to use in your Email Recipient list
Operators are used when defining Email Recipient Lists to allow flexibility in defining criteria.
Operators will vary depending on which Object was selected.
- Equals - supports a single value, includes records that match exactly
- Does not equal - supports a single value, excludes records that match exactly
- Greater than - Supports numbers, dates, and text, including values greater than when ordered alphanumerically or by date.
- Greater than or equal to - Supports numbers, dates and text, including values greater than or equal to when ordered alphanumerically or by date.
- Less than - Supports numbers, dates and text, including values less than when ordered alphanumerically or by date.
- Less than or equal to - Supports numbers, dates and text, including values less than or equal to when ordered alphanumerically or by date.
- Contains - supports a single value, includes records where the string is contained in the CRM field value.
- Is included in - supports a list of text or picklist values, includes records where the CRM field value is one of the values in the list.
-
Must enter list as ‘value1’,’value2’,’value3’
-
- Starts with - supports a single value, includes records where the CRM field value begins with the specified string of characters.
- Ends with - supports a single value, includes records where the CRM field value ends with the specified string of characters.
Sorting and filtering email Recipient lists
You can quickly access sorting and filtering options using the icons in the top right of the window:
The icon allows you to switch from an Ascending sort to a Descending sort quickly.
The Sort/Filter icon allows you to edit sort and filter options on the window. Selecting the icon displays the default sort (Name). Select the chevron [>] to expand more Sort options; Name, Description, and Modified Date.
To Filter, select the chevron [>] to expand filtering options for Modified Date.
Your selections will display at the bottom of the window, along with an option to Clear. Selecting Clear will remove ALL filters. You can remove individual choices by selecting the X:

The list will update automatically as you make selections. A count of the number of filters applied will display on the icon.

Notes:
- Sorting and Filtering will apply to ALL data, not just the data visible in the window.
- The report may contain more than one row for the same student. For example, if a student has more than one application that meets the criteria, they will have a row for each application.
- Gmail and possibly other email providers will filter out messages mistakenly detected as identical and may only deliver one of the several similar messages you intended to send to the same recipient. You can prevent this by including a merge field in the subject line (like application number) that ensures each message will have a unique subject.
Using Advanced Filtering Logic in the Advanced Expression editor
You can use the Advanced Expression editor in Email (when building a query-based email recipient list), Portal, or Group Assignment to create advanced filter logic. Using advanced expressions, each criteria line in the condition set is given a numerical value. The Advanced Expression editor then uses that number in a boolean expression.
For example, if your filter had the following criteria and wanted to look for EITHER Pennsylvania or New York students who had the listed majors and were interested in Main Campus, you could use advanced logic.
Criteria:
- Mailing State/Province Equals PA
- Anticipated Major Contains ‘English’,’History’,’Philosophy’
- Mailing State/Province Equals NY
- Campus Does not Equal Main
Advanced Logic:
( {1} OR {3} ) AND {2} AND {4}
Advanced Filtering Formatting in the Advanced Expression Editor
When adding advanced logic, you must surround all criteria numbers with curly brackets { }, and use parentheses to group. The following are examples of how to write advanced logic:
- OR logic:
{1} OR {2} OR {3} OR {4} - Parenthetical groups:
({1} AND {2}) OR {3} OR {4} - Nested parenthetical groups:
({1} AND ({2} OR {3})) OR {4} - Multiple parenthetical groups:
({1} AND {2}) OR ({3} AND {4}) - NOT logic:
{1} AND NOT({2}) AND ({3} OR {4})
Note: The NOT functionality requires adding parentheses around the criteria number, such as:
NOT({2})
Using a report to define your email recipient list
Note: Any changes to report types, including package updates that change report types, may change the fields available for filtering campaign reports, so care should be taken to ensure that the recipient lists remain correct.
The TargetX Email tool supports Reports for defining your recipient list or population.
When using a report in the TargetX Email tool, please keep in mind these essential guidelines:
- Reports must be saved in a folder accessible to all users - do not save reports in the "My Personal Reports" folder.
Note: Reports which use a Report Type based on the Campaign Member object AND using the Id field can NOT be used as a source for Email Campaigns.
- The first column of the report must contain the field Contact ID.
- If your message contains merge fields from objects other than Contact or utilizes condition sets built on objects other than Contact (also called Student), ensure the report contains a column with the Salesforce ID of each object AND those fields are immediately AFTER the Contact ID.
- DO NOT summarize fields at the column level in reports for emails, as Summary Report types are not supported by email.
- DO NOT use Unique Counts in field columns.
- DO NOT use Row Level formulas.
- DO NOT enable Count Unique Values in Report in a Lightning Report, as this configuration is not supported by email.
- After saving the report, you are ready to build your Email Campaign.
Previewing Email Recipient lists
The Preview Lists button lets you preview the records that will be included in your list. After adding Details and Conditions, select the Preview Lists button. If you want to search for a specific record, use the Find Contacts search box.
- Create your Email Query.
- Select the Preview Lists button.
- You can close the window using the X and edit your conditions, Save or Cancel.

Editing a query-based email recipient list
Email Recipient Lists (queries) are lists of recipients for your email campaign. Lists can be saved and used or reused in Campaigns. Follow these steps to edit your Recipient list:
- Navigate to the Campaign Builder tab.
- Select the Recipients icon in the bottom navigation bar.
- Select either the Queries or Test Lists tab at the top of the window:

- Search for the Query you want to update and select the Edit icon:
- Select the Conditions tab to edit the criteria.
- Use the Preview Lists button to validate your results.
Note: Cloned lists will be given a default name of 'Copy of <original list name>.' If the new name already exists, the default name will be set to 'Copy # of <original list name>.'
Setting the recipient list in your email campaign
You can select which Contacts or Leads should receive your email message on the Recipients step in the TargetX Campaign Builder.
-
If you are creating a new campaign, the Campaign Builder wizard will navigate you directly to the Recipients step, and you may proceed to Step 2 below.
If you update an existing campaign, navigate to the Campaign Builder tab. If you do not see your Campaign, use the search Field to find it. Once located, click the pencil icon next to your existing Campaign and select the Recipient option from the bottom navigation to edit the recipient list used by the Campaign. -
On the Recipients step, select where the list of recipients should be generated from Reports, Contacts Query, or Leads Query.
-
If you select Reports, you must specify the appropriate report Folders and report Name.
-
Notes:
-
Only Reports containing data for contacts/leads and directly related objects can be used in email campaigns. The Campaign Builder UI does not validate that the report contains data unrelated to contacts/leads. If the report is incorrectly formatted, the system will detect this during the broadcast and notify the user of the error via a Salesforce task.
-
Users will ONLY see folders to which they have access and that ALSO contain Reports to which they have access. (The legacy UI showed ALL folders a User had access to (even if the folder was empty).
-
For Contacts Query or Leads Query, you must specify the appropriate Email Recipient list, which must be created in advance.
-
Select the Send Email To to specify whether the email will be sent to Students, Parents, or BOTH. The system default is Students.
-
Indicate whether to Use alternate student email instead of primary. When checked, the Campaign will send messages to the value in the Alternate Email field on the Contact record instead of the primary email address. This option only applies to emails sent to Contacts (not Leads) using Reports (not queries).
-
Specify whether to Limit to Members of Email Group(s), which allows you to further limit your recipients by only including those contacts who have opted in to receive emails of a particular type or Email Group.
-
If you wish to send the Campaign to a test list, use Send to Members of Test list (up to 10) to select the appropriate test list(s). You may choose up to 10 test lists to ensure the members on the lists receive copies of every broadcast sent for the Campaign.
-
Limit the Number of Recipients to be included in each broadcast defines the maximum number of recipients that will receive messages in a single broadcast. All recipients will receive the message, but if you limit recipients per broadcast, it may take multiple broadcasts to send all messages. Enter the number of recipients. This setting is helpful if you want to restrict the traffic to your site.
Note: If you use this setting, you MUST schedule the Campaign to accommodate ALL recipients. For example, if you set a limit of 1,000 recipients for each broadcast and your Campaign contains a total of 30,000 recipients, you must make sure you schedule the Campaign to send 30 times.
- Allow only One Broadcast per Recipient for this Campaign toggle; by selecting this option, if a given contact is eligible for multiple broadcasts throughout this Campaign but has already received one previously, they will not receive any more broadcasts. Leaving this unchecked will include the contact in every broadcast they are eligible for.
- Allow more than One email to a Recipient per Broadcast toggle; by selecting this option, they will receive all ten emails if a given contact is eligible for ten emails in a single broadcast. Leaving this unchecked will limit the contact to one of those emails, whichever is found first in the report or query.
Notes:
- Will this setting ENABLED, students may receive more than one email in a single broadcast. For example, if your Campaign is based on Inquiry records and a Contact has three inquiry records, they will get the email three times.
- If this setting is OFF, and a Contact has multiple Inquiry records with the same email, only one email will be sent (randomly selected from the available records). Since the record is chosen randomly, you should create Recipient lists with as few duplicates as possible.
- When using Merge Fields, the recipient will receive an email for each record with distinct merge data. Be sure to use the Contact Schedule Item object for Events merge fields, as OrgEvent merge fields are not supported by the Broadcast tool.