Managing Event attendance
Options to manage Event attendance
Event Preferences offers several options to help limit, track, and manage attendance at your Events.
Maximum Attendees is a required field that must be populated with a number. This value is ignored if Unlimited Attendees is checked.
- You can set a cap on the total headcount for your Event.
- Includes registrants and any guests.
Unlimited Attendees, if checked, will override the limitation set in Maximum Attendees.
Waiting list: If checked, any registrants over the maximum number of attendees will be added to a waitlist:
- When a spot opens up, the first registrant on the waitlist will be automatically added as an attendee, and a confirmation email will be sent.
- If left unchecked, a registrant attempts once the maximum number of attendees has been reached will see a notification that the Event is full.
Email Waitlist Promotion
- For a PAID EVENT, when an available spot opens, everyone on the waitlist will be emailed an invitation to register and pay fees associated with the Event. The spot will be awarded to whoever completes the registration first.
- For a FREE EVENT, turn on the Email Waitlist Promotion by checking the Field. It will email everyone on the waitlist to offer an invitation to register, rather than only emailing the first person to offer the spot.
Allowed Guests allows you to cap the number of guests a registrant may bring.
- Setting the allowed guests to 2, for example, would result in three possible attendees: 1 registrant and two guests.
Indicating a Student Attended an Event
To monitor student attendance for your event, follow these steps to update the event details:
- Navigate to the Events application by selecting it from the application picker located in the top right corner.
- Choose the Organization Calendar and then select the specific event either by clicking on its name in the calendar view or by applying Filter Criteria.
- Scroll down to the Attendees section, which is positioned at the bottom of the page.
- Indicate attendance by checking the checkbox in the Attended column next to the name of the attendee you wish to mark as present.
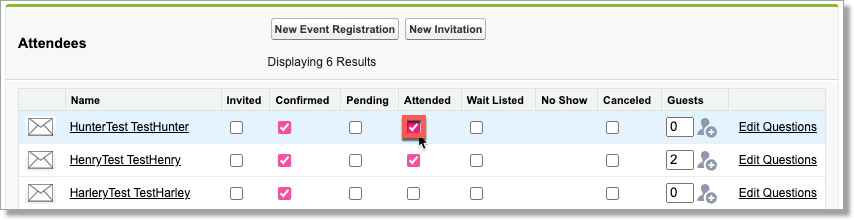
Notes:
- The system will auto-save with each check.
- If you are updating the number of guests, click outside the Guests Field or press the tab key on your keyboard to trigger the auto-save.
Filtering attendees in the Event Details window
For Events with a large number of registrants, you may wish to filter the Attendee list:
- Navigate to the Organization Events tab.
- Click the Event Name where you want to view Attendees.
- Scroll to the Filter section of the page.
- Enter the name you wish to search in the Registrant Name Filter field.
- You must enter the characters from the start of the name.
- Example: To search for Smith, enter Smi
- You can also enter * to display ALL registrants.
Note: If your Event has over 250 registrants, only 250 will be displayed.
- Select Apply Filter.
Synchronizing the Event Attendee list
This functionality is only available in the Event Check-In App when the user has Internet connectivity. When a user clicks the sync button, the Events staff can push updates to the TargetX Event for any student(s) marked as Attended, plus their guests. You can also Sync to refresh all Event Attendee lists so that additional students who may have registered after the user downloaded those events to the app can be added to the attendee lists. The synchronization process ensures the app always contains the latest, most up-to-date information from the TargetX Events.
- Click the Sync icon. A pop-up notification states: "Sync all attendees for all events?" Click OK.
- Once the sync is complete, the user will see this message: "Attendees have been successfully synced." Click OK.
- During the synchronization process, a spinning sync icon appears along with visual indicators of the sync progress will appear:
- Percent complete will appear with the "syncing" message
- Text will display what stage of the sync is happening
- A notification will display if the sync fails
- An indicator will display if a sync is impossible (i.e., if no network connection is available or a network connection is lost.)
Note: The Attendees list will display color checkmarks for synced attendees (Green) and unsynced attendees (Blue).
- Do not close the app or disconnect from WiFi while syncing.
- The user will be notified whether a successful synchronization is complete or failed.
Note: Multiple synchronizations by the same user are supported. The last/most recent synchronization will override any prior synchronizations.