Branding your Events
Adding Images to your Events
There are two (2) types of images that can be configured for TargetX Events: Global images and Event-Specific images.
- Global default images are used as a fallback option when event-specific images are not configured.
- Event-specific images take precedence over the global default images.
For each of these 'types,' you can configure both a Poster image and a Thumbnail image:
-
- Poster Image is a larger image that is prominently displayed on the Event Detail page, providing a detailed view of the event.

- Thumbnail Image is a smaller image shown when an event is designated as a Featured Event. It appears in the Featured Events carousel and offers a quick preview of the event.

- Poster Image is a larger image that is prominently displayed on the Event Detail page, providing a detailed view of the event.
Notes:
- When attaching an image to the event, you MUST use Salesforce Classic, not Lightning.
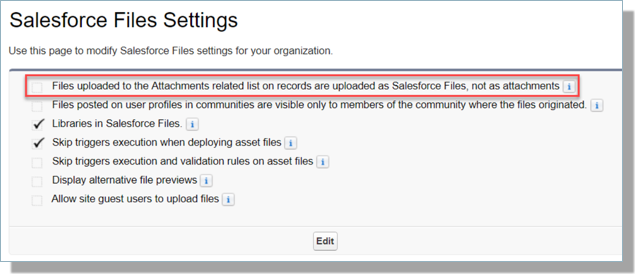
- The setting Files uploaded to the Attachments-related list on records are uploaded as Salesforce Files, not attachments, needs to be unchecked on the Salesforce File Settings page.
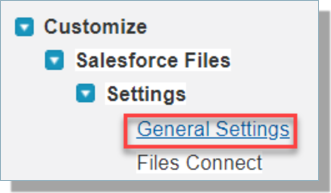
- Navigate to Setup and search for Files, then select General Settings:
- Deselect the checkbox for Files uploaded to the Attachments related list on records that are uploaded as Salesforce Files, not as attachments:
Adding a Global Poster Image
- Ensure the desired default images are saved and accessible as image files.
- Navigate to Setup and search for Static Resources. Click the link for Static Resources.
- Click New:
-
- Enter the Name as: eventsDefaultPoster
- Select and upload your default Poster file image
- The optimal image size is 768 x 1024
- Set Cache Control to Public
- Click Save
Adding a Global Thumbnail Image
- Ensure the desired default images are saved and accessible as image files
- Navigate to Setup and search for Static Resources. Click the link for Static Resources.
- Click New:
-
- Enter the Name as: eventsDefaultThumbnail
- Select and upload your default Thumbnail file image
- The optimal image size is 500 x 410
- Set Cache Control to Public
- Click Save
Adding Event-specific images
- Locate and save the images you would like to use for your event.
- Rename the images with the following file naming convention:
- For Poster images, filename must START WITH "poster."
- For Thumbnail images, filename must START WITH "thumbnail."
Note: Image filenames are NOT case-sensitive. For example, any of the following will work:
- POSTER_filename1.jpg
- Poster_filename1.jpg
- Poster_filename2.jpg
- THUMBNAIL_filename2.png
- Thumbnail_filename2.png
- thumbnail_filename2.png
- Go to the Organization Events (list View) tab.
- Select the Events record where you would like to add an image.
- Scroll to the Notes & Attachments area.
- Upload the files related to this event.
- Repeat for each desired event.
Updating the Logo on your Events site
The following steps will allow you to update the Community Theme page layout, including logos and images. The Community Theme is a set of Properties associated with a Community, such as styling and configuration.
- Create a Static Resource for your Header Logo. This image is 70 x 60 px and is a good size for using a shield or your mascot.
- Navigate to your Community Theme and Edit.
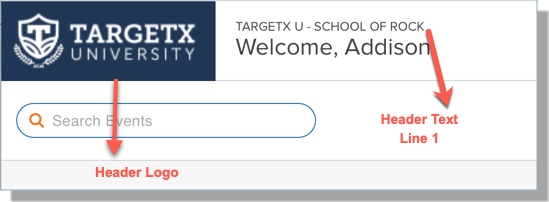
- Enter the name of the Static Resource for your Header Logo and Header Text Line 1.
- Add your Events site as a Related Site.
- Save your changes.
- The Header Logo is the logo that appears at the top left of the page. This is the name of the Static Resource that contains the logo. This image is 70 x 60 px and is a good size for using a shield or your mascot.
- Header Text Line 1 is the text that appears in the first line of the Header. We recommend you use your School Name.
- You can also customize colors, buttons, and labels.