Creating and Updating Events
Use the Event Setup Guide for a detailed guide on creating events.
Creating/Editing an Event from the Organization Calendar
- Select the Events application from the App Launcher in the top left corner.

- Click the Organization Calendar tab.
- To Create a New Event: Click the Create Event button at the top left of the calendar, or double-click any date on the calendar.
- To Edit an Event: Click on the Event Name in the Calendar for the Event you wish to edit.
Creating/Editing an Event from the Organization Events tab
- Select the Events application from the App Launcher in the top left corner.
- Click the Organization Events tab.
- To Create a new Event: Click the New button.
- To Edit an Event: Click on the Event Name for the Event you wish to edit and then click the Edit button.
The following details in General Information need to be completed with each new event created in the system:
- Name that appears on the Calendar for the event.
- Description of the Event. This is displayed under the Name of the Event
- Classification is the value used to differentiate between Events and Interviews
The page for creating events has seven sections, General Information, Preferences, Email Messages, Custom Questions, Travel Details, and Notes. For details on each section and the fields available, see Event Details.
Once an event has been created/saved, additional related lists become visible:
- Registration Link
- Attendee Totals
- Notes
- Resources
- sub-events
- Filter
- Staff and Volunteers
- Attendees
For more information on creating multi-session events, see the article: Creating Multi-Session Events.
Understanding Public and Private Events
To ensure that an event remains private, it is crucial to uncheck the Public checkbox located in the Preferences section. By clearing this checkbox, you effectively prevent the event from being displayed when users search the Events Calendars. When an event is designated as Private, it will not appear in any search results. The only method for individuals to access the event registration page is by receiving the registration page URL, usually sent via email, from the event organizer.
For instructions on how to build and embed the event registration page URL in a broadcast email, see Obtaining the Event-Specific URL and Creating an HTML Email and Limiting which events display to registrants using URL parameters?
Adding Notes to an Event
Utilize the Notes section to add any remarks about the event. To compose a note, click the triangle to expand the Notes field (as shown by the red arrow below), then enter the note in the text editor and click Save.

Cloning an Event
Events provide the ability to clone events both independently (using the Clone button) or to clone a parent Event and all corresponding child events (using the Clone with Children button).
- Cloning events will copy all existing fields in the event, except Event Name.
- The Public Field in the cloned event defaults to false and can be set to true when the newly cloned event is ready to be published.
- Clone with Sub-Events will appear only for parent events with corresponding child events.
- The parent-child relationship is maintained in Clone with Sub-Events and will populate the Parent field on the cloned child events with the name of the cloned parent event.
- After the cloned parent event is saved, the child events are copied with all fields from the original child events, including Event Name, and will maintain the date/time relationship to the cloned parent event.
- Example: Parent Event of Open House Weekend from 9 AM, Friday, June 29 until 5 PM Saturday, June 30, with Child Event of Lunch at 12 PM on Saturday, June 30 will clone with Open House Weekend beginning on Day 1 at 9 AM, ending on Day 2 at 5 PM, with Lunch on Day 2 at 12 PM.
- To publish or mark public all child events for a single parent event, click the Publish Sub-Events button at the top of the parent event's Event Details Page (accessible only through the Organization Events tab).
Deleting an Event
You can delete an Event from either the Event Edit page or the Event Detail page. Click the Delete button and confirm the action to remove the Event.
Deleting an Event that is Part of a Series
If the event you attempt to delete is part of a series, you will be prompted to delete the event and all of its sub-events.
Note: If you are canceling an event that has registrants, we recommend marking the event "Canceled" to retain registration information for the affected registrants.
Configuring Events Nearby
To ensure that the Events Nearby search functionality works, the Google Maps API Key must be populated with a valid API key:
- Navigate to Events Custom Settings.
- Click the Edit button to add the Google Maps API Key.
- Once you add the Google Maps API Key, save your changes.
Setting Up Events Nearby (Locations)
To utilize the Events Nearby (Locations) feature in Events 6.x and higher, it is necessary to have a Google API key. This key must also be configured in the default base custom settings. Furthermore, a remote site setting is required for https://maps.googleapis.com. This configuration enables the automatic population of geolocations for each address, allowing the Google Map API to accurately calculate the distance between the current location and the event location.
Step 1: Configure Events Custom Settings
For more information about Events Custom Settings, see Custom Settings for Events.
- Use the following instructions to configure Events custom settings and navigate to the Events Settings page:
- Copy your Salesforce URL, up and including the .com
Example: https://na10.salesforce.com
- Append your Salesforce URL with /apex/targetx_eventsb__eventssettings
Example: https://na10.salesforce.com/apex/targetx_eventsb__eventssettings
- Under the Advanced Options section, confirm the following Events Settings are defined based on your institutional preferences; see below for details on each setting:
- Number of Featured Events Displayed
- Use Location Lookup
- Google Maps Geocoding API Key (the Google Maps API Key must also be entered in TargetX CRM Base Settings).
- Header Logo URL
- The number of Featured Events Displayed (Number Field) Indicates the maximum number of Featured Events that will appear in the Featured Events Carousel.
Example:
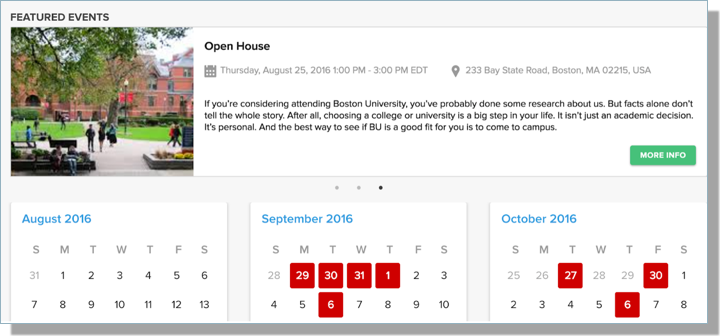
Events will rotate through the Featured Events carousel starting with the current date forward, showing no more than the number defined in this setting.
- The default Number of Features Events Displayed is four (4) - if this custom setting field is left blank.
- TargetX recommends setting the Number of Featured Events Displayed between two (2) and five (5) Featured Events.
- To avoid or set the Number of Features Events no larger than twenty (20)
- Do not set the Number of Featured Events Displayed higher than twenty (20) - to ensure proper display to students.
- Use Location Lookup (Checkbox) If checked, Events can be filtered and searched for using the Location lookup object, which supports geolocation searches. Use of this feature requires that your institution obtain a Google Maps Geocoding API Key to function properly.
Note: If Location Lookup is checked, Events will no longer use the Location picklist field on the Organization Event object when filtering or searching for events. Existing event URLs that use the Location picklist field will not work unless a matching Location record is created in the Location object.
For more information on how to use and create Locations, please see Location Lookup Object.
- Google Maps API Key (String Field) Supports populating geolocation information related to event locations (Latitude & Longitude) and the new Nearby Events search functionality. To use this feature, you must have a valid Google Maps Geocoding API Key from Google.
To obtain a Google Maps Geocoding API Key from Google, follow the steps in the article: Configuring Google Maps API Key
Notes:
- Events leverage the Standard API Keys (not Premium API Keys).
- Please copy this Google Maps API Key to a safe location. You will use this Google Maps API Key in a subsequent step.
- Header Logo URL (String Field) This URL will redirect students to the specified website when they click the Header Logo Image.
- Upon completing the Advanced Options settings, Save your changes.
Step 2: Configure TargetX CRM Base Settings
To complete the configuration of the new Events Nearby search functionality, you must update the Google Maps Geocoding API Key in the TargetX CRM Base Settings. This will ensure your Location records can get geolocation information (latitude, longitude) any time Location records are inserted or updated with new address information.
- Navigate to Setup and search for Custom Settings.
- Click Manage next to the TargetX CRM Base Settings.
- Click Edit next to the Default custom setting.
- Add your Google Maps Geocoding API Key and Save your changes.
Step 3: Configure Remote Site Setting for Google Maps Geocoding API
- Navigate to Setup and search for Remote Site Settings.
- Click New Remote Site.
- Enter the following:
- Remote Site Name = Google_Maps_Geocoding_API
- Remote Site URL = https://maps.googleapis.com
- Active = Checked
- Save.
Creating a One-time Event
- Click the Organization Events tab.
- Click the New button.
- Set up the General Information about the event, including name, description, classification, time and date. For descriptions of each field available, see Event Details.
- Select the appropriate category and type.
Note: You can assign the event a specific calendar color to make it easy to identify on your internal calendar.
- Since this event only occurs a single time, Leave the recurring event? checkbox unchecked.
- Validate the time zone option to ensure this reflects the area in which the event is being held.
- Update any Preferences for the Event for items such as Event Cost, Max Attendees, etc. For descriptions of each available Preference, see Event Details.
Note: If you're creating a public event, when you Save, the event is published to your event site. If you're not ready for the event to be public, uncheck the Public checkbox and then re-check when you're good to go.
- Save the Event.
Once you save the event, you'll see that there's now a Registration Link available beneath the time zone setting. The link is only available after the event has been saved.
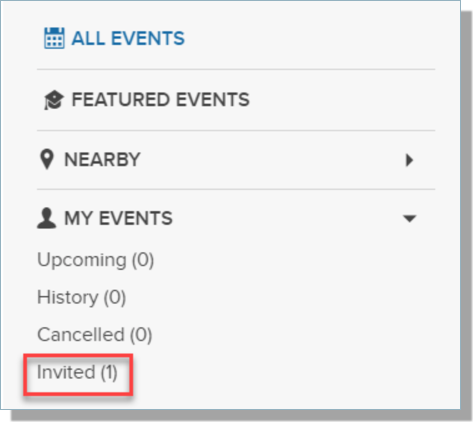
Creating an Invitation-Only Event
When events reference an Invitee Campaign, members of that campaign are considered to be invited to the event. As Invitees, the members of the Invitee Campaign will be able to see the event on the Events search page. Reports and search functions are available to keep your campaign membership current.
Note: You can NOT set Sub-Events as 'Invitation only.'
For example, you may hold an Admitted Students Open House and only want admitted applicants to see the event on your site. While you can make the event private and send the Event Specific Registration link in an email, you can also use the Invited Event feature to limit visibility to only those in the invitation campaign.
- Create a Campaign for your event invitations. Ex: Open House Event Invite
- Add members to your campaign by way of a report or via search.
-
To add Campaign Members via Reports, please see the Salesforce Help & Training article Add Campaign Members from Reports.
-
To add Campaign Members via the Campaign "Manage Members" Button:
- Click on the Campaigns Tab.
- Select the record of the Campaign that you would like to add members to. This will bring you to the Campaign Detail page.
- In Classic, this will bring you to the Campaign Detail page. Click the Manage Members button.
-
Select how you would like to Add Members, either by searching or by importing them.
-
-
In Lightning, select the Related tab and locate the Campaign Members related list.
-
Select to Add Leads or Add Students to add additional Member Status Values.
-
-
Note: If you choose to import, select Update & Add Campaign Members - Import File and then Update & Add Campaign Members to import the members as contacts rather than leads.
-
After you have created the member list, click Add with Status and choose a status of None.
-
- Create your Event record and search for your campaign in the Invitee Campaign field on the event.
- Check the Public checkbox.
- Check the Invite Only checkbox. This prevents users who are not 'Invited' from seeing the event.
- Save your changes.
For someone to register for an Invite-only Event, the event must be marked 'Public.' They won't be able to register for the event if it is not Public.
Notes:
- The Active checkbox on the Campaign Create / Edit screen does not impact the event invitation status. Campaign members are still considered to be invited if the event is inactive.
- Inactive events will not appear as options in the Invitee Campaign lookup field.
- You can manually add an invited student to an event using the New Invitation button.
- You must email the invited students an Event-Specific URL so your invitees can register for the event. Invitees must be authenticated to register for the event.
Event-Specific URL format:
https://<EVENTS SITE URL>/TargetX_Eventsb__events#/esr?eid={!TargetX_Eventsb__OrgEvent__c.Id}&cid={!Contact.Id}&k={!Contact.TargetX_Base__Access_Key__c}
- Until invited students register, the event is available in their invited list on your event's site:
Reporting on Invitation-only Registrations
You can use the TargetX Delivered report: Events Attendees, next 30 days to report your Invitation-only events and the status of Invitees. Customize the report by adding a filter on Event Type = <User Defined> or any additional filters that meet your business needs.
Configuring Recurring Events
When you select the Recurring Event checkbox, the "Recurring Event Details" section appears. You will need to activate Allow Activities on the Organization Event object in order for recurring events to work correctly.
- Navigate to Setup and select Object Manager.
- Click the Organization Event object.
- Select Edit.
- Under the Optional Features section, click the checkbox for Allow Activities.
- Save your changes.
Note: a recurrence can only be established during the initial creation of a new event. You will not be presented with this option while editing an existing event. However, you can edit recurring events either as single standalone dates or as a recurrence. - Enter the following:
- recurrence frequency
- recurrence details
- recurrence end date
Note: You can specify the following maximum occurrences for a recurring event: Daily: 100; Weekly: 53; Monthly: 60; Yearly: 10.
Creating Multi-Session Events
Events allow users to create child events, or sub-events, of a primary parent event. While sub-events are linked to the primary event during the registration process, they are distinct events that allow users to specify separate registrants for each sub-event and include custom questions specific to the sub-event.
Designating Sub-Events
- Navigate to the App Picker in the top right and select Events.
- Click Create Event.
- Under the Preferences section, click the lookup icon next to the Primary Event field.
- Select the corresponding Primary Event.
Notes:
- At registration, sub-events appear in a collapsible list underneath the primary event. Sub-events may only be selected during registration if the corresponding primary event is not currently in a "wait list" status due to the event being full.
- There is no limit to the number of sub-events that can be created.
- To prevent students from registering for multiple sub-events, see Preventing students from registering for multiple sub-events at the same time.
Important Notes Regarding Sub-Event Functionality
Except as detailed below, Sub Event functionality is identical to all other events.
Public Facing
- Sub-events do not appear as Featured Events.
- Sub-events MUST be marked Public for registrants to be able to select them (even if the Parent event is NOT Public).
- The overlap between a sub-event and its primary event is not treated as a conflict, regardless of whether "Allow Overlap" is selected in Event Preferences.
- If a registrant cancels their registration for a primary event, all related sub-event registrations for them will be automatically canceled. A notification will appear to the registrant before confirming the cancellation.
- If a child object matches the search criteria on the Events Plus page, the related primary event will appear in the search results.
Internal Only
- Sub-events do not appear in the Organization Calendar but will appear in the Organization Events list.
- Sub-events MUST be marked Public for registrants to be able to select them (even if the Parent event is NOT Public).
- Sub-events will appear on the "Sub-Events" related list on the primary event's Event Detail page.
- Sub-events that require payment will allow the specification of "Max Attendees" but do not allow for the specification of a waitlist.
Note: Free sub-events (and all primary events, regardless of cost) support a waitlist.
- If an internal user cancels a primary event, all related sub-events will be automatically canceled.
- The registration link on the sub-events Event Detail Page will point to the Event Specific Registration for the corresponding primary event.
- Sub-events can NOT be set up as 'recurring' events.
Editing an Event that is Part of a Series
If the event you are editing is part of a series, specifically a sub-event or primary event, your options will vary depending on whether you modify the event date.
Changing the Date: If you alter the date of an event that is part of a series, it will no longer be included in the series. Upon clicking the Save button, a dialog box will appear to explain this. Select OK to save your changes and exclude this event from the series.
Note: Modifying the time of a recurring event will not detach it from the series.
Keeping the Same Date: If the event you are updating is part of a series and you do not change its date, you will have three options when you click the Save button.
Only This Event: This option will save the modifications you have made to this specific event, and this event alone. All other events within the series will remain unaltered. Note: If you select this option, your edited event will be detached from the series. It will become an independent event, and any future changes made to other events in the series will not affect this particular event.
Update All Events: This option will implement your modifications across every occurrence within this sequence.
Update Following Events: Choosing this option will implement the modifications you have made to the specific event you are editing, as well as to any subsequent events within the series that take place after the event in question. It is important to note that events occurring prior to the one you are currently editing will remain unaffected. All events will continue to be a part of the series.
Creating Events for High School or Group Fairs
- Create an Event.
- If your event is related to a school or group of schools, scroll to the Travel Details section.
- Enter the first part of the name in the School field or Travel Group field and click the magnifying glass to search for matching accounts.
- Select the appropriate account to associate.
Note: The group must be defined in the Travel Group object before you create an event to plan a visit to the group.
Travel Groups
To create a Travel Group:
- Click the Travel Groups tab.
- Give your Travel Group a Name and Description if desired.
- Search for the Accounts/Schools that should be associated with this group.
- Add Schools using the green Plus Sign.
- Click Save.