Setting the Student Stage to Inquiry when a person registers for an Event
The following steps outline how to build a Flow on the Contact Schedule Item object that sets the Student Stage based on the Confirmed record, where the Student Stage is Null.
Before you Begin
- Perform these steps in a sandbox environment before implementing them in your production instance.
- If you have Prevent Student Stage Rollback enabled in your Org and you want to create this flow, you will need to add additional logic using Decision elements to account for this. For information on Decision elements, see the Salesforce Help & Training article Flow Element: Decision.
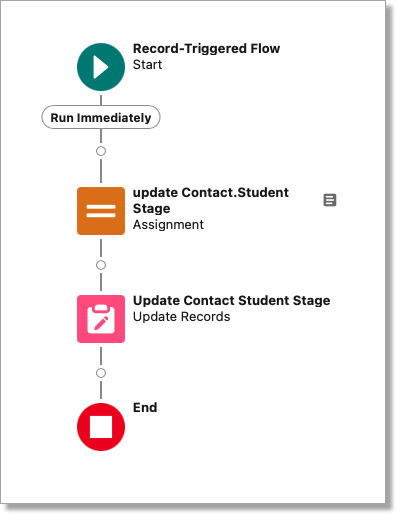
Step 1: Create a New Flow
- Go to Setup in Salesforce.
- In the Quick Find field, search for and select Flows.
- Click New Flow.
- Choose Start from Scratch
- Choose Record-Triggered Flow and click Create.
Step 2: Configure the Trigger
- Object: Select Contact Schedule Item.
- Trigger the trigger when: A record is created or updated.
Set Entry Conditions
- Condition Requirements: All Conditions are met (AND)
- Field = TargetX_Eventsb__Confirmed__c
- Operator = Equals
- Value = True
- When to Run the Flow for Updated Records = Only when a record is updated to meet the condition requirements.
- Optimize the Flow for: Choose Actions and Related Records.
- Click Save.

Step 3: Create a Variable
You’ll need to create a Variable on the Contact/Student object to define the data to be updated.
- Click New Resource.
- Choose Variable.
- Enter an API Name, such as “varcontact” and a Description.
- Set the following:
- Data Type = Record
- Object = Contact/Student
- Click Done.
Step 4: Add an Assignment Element
The Assignment element will reference the variable you created and will specify the records and fields to be updated.
Define Assignment
- Enter a Label, such as ‘Values to update for Contact.Student Stage’, the API Name will default.
- Enter a Description.
Set Variable Values
- Add the following two variable Values, replacing varContact with the name of the Variable you created.
- {!varContact.TargetX_SRMb__Status__c} equals Inquiry
- {!varContact.Id} Equals {!$Record.TargetX_Eventsb__Contact__r.Id}

Step 5: Add an Update Records Element
- Click the + icon after the Start element and select Update Records.
Update Records
- Add a Label, such as a Naming it something like "Update Contact Student Stage", the API Name will default.
- Enter a Description.
- Set the following:
- How to Find Records to Update and Set Their Values = Use the IDs and all field values from a record or record collection.
Select Records to Update
- In the Record or Record Collection field, choose the Variable you created.
- Click Save.

Step 6: Save and Activate the Flow
- Click Save.
- Give your Flow a name, such as "Update Contact Student Stage on ContactScheduleItem Update".
- Click Activate.
Step 7: Test the Flow
- Update a ContactScheduleItem record to ensure the Flow triggers and updates the Student Stage field on the related Contact.
- This Flow setup will ensure that whenever a ContactScheduleItem record is updated with Confirmed = True , the related Contact's Student Stag e field is also updated according to the logic you've defined.