Implementing Cohort-Based Success Scores in Retention
Note: This feature requires Retention 2008.3 or higher.
Step 1: Generate and Assign Permission Sets
Two permission sets are available in the TargetX Permission Scanner, which can be assigned to the appropriate users:
- Success Scores Admin for users that need to update and create Cohorts and Success Score Rules.
- Success Scores Advisor for users the need to view Student Success Scores.
Note: Users will also need API Enabled and ModifyMetadata system permissions in addition to the appropriate Permission Set.
These permission sets must be generated using the Permission Scanner before they can be assigned:
- Navigate to the Permission Scanner tab.
- Select:
- Product/Feature = Success Scores Admin
- Version = <select the version installed>
- Select the checkbox for Use @Future to generate Permission Set if you want to have the process run in the background.
- Click the Generate Permission Set button.
- The ‘Result’ section will display the new Permission Set Name.
Note: If you selected Use @Future to generate Permission Set, the Result section will indicate where you can view the results of the Apex Job.
- You can now assign the Admin Permission Set to Users.
- Repeat for the following:
- Product/Feature = Success Scores Advisor
- Version = <select the version installed>
- You can now assign the Advisor Permission Set to Users.
Step 2: Configure Remote Site Settings
- Navigate to Setup and search for Remote Site Settings.
- Click on New Remote Site.
- Enter a Remote Site Name = MDAPI.
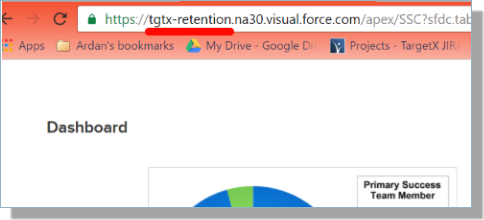
- Enter the following for the Remote Site URL: https://XXX.naYY.visual.force.com, updating the XXX with your custom domain name and YY with the value for your Salesforce instance.
Example: https://tgtx-retention.na30.visual.force.com
Note: If you are using a SANDBOX, replace "na" with "cs".
You can find your custom domain name by navigating to your Student Success Center and copying it from the URL:
- Check the Active checkbox.
- Save your changes.
Notes about Remote Site Settings:
- In Sandboxes, Remote Site settings will need to be recreated after a sandbox refresh.
- If Remote Site Settings are incorrect or missing, users will receive an error about an Unauthorized endpoint. To resolve this, copy the URL from the error message and create a NEW Remote Site Setting with the Callback URL = the URL in the error message.
Step 3: Update Contact Layout
Add new Student Success Score component to your Page Layout:
- Navigate to Setup and search for Object Manager.
- Click on the Contact/Student object.
- Click Page Layouts.
- Click on the Page Layout that you want to display Student Success Scores, such as Student Layout.
- In the Page Layout palette, select Section and drag it onto the page layout.
- Name the section Student Success Score
- Select Layout of 1-Column
- Click OK.
- In the Page Layout palette, select Visualforce Pages.
- Drag the StudentSuccessScore onto the page layout.
- Save your changes.
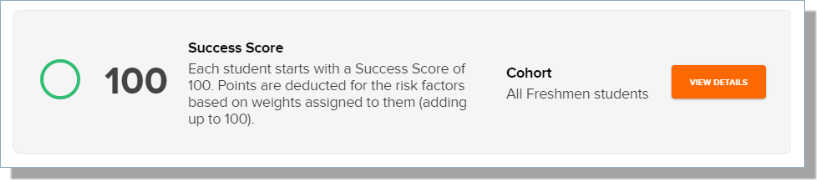
Step 4: Build Cohort and Success Score Rules
- Define the Success Rules for ALL Students Cohort:
- Navigate to the TargetX Builder tab.
- Click Success Scores.
- Locate the ALL Students Cohort (at the bottom) and click the Edit icon.
- Update the default rules as needed.
- Save the rules.
- Activate the rules.
- Build additional Cohorts and Success Rules as needed. For details on creating Cohorts and Success Score rules, please see Creating a Cohort for Success Scores.