Creating Surveys
You can distribute polls or surveys to specific student groups or any contacts within Salesforce. Gather the responses directly within the system and disseminate the results to fellow members within your organization.
Creating a New Survey
- Navigate to the Surveys tab.
- Select New to create a new survey.
- Enter the options detailed below:
- Survey Name: The unique name displayed in the Header of the survey when users respond.
- Redirect Link: Location the survey-taker will be directed after they submit the survey. This should be the full URL (including http:// or https://).
- Include Response Review: Allows users to review their responses before submitting the survey.
- Include Backwards Navigation: Allows users to return to questions and change their responses.
- Progress Bar: Displays the users' progress in completing the survey.
- Rating Style: Displays as Radio Buttons or Stars. The radio Button will display a number 1-5 with a radio button beneath it; Stars will display five stars (no numbers display).
- Survey Styling (CSS) options:
- Background Color: The background color for the survey page.
- Background Texture: Indicates the texture shown in the background of the survey. Its opacity is 75%, so it may be used with Background Color to create a colored background texture.
- Body Font Color: The color \used for the font in the body of the survey question. E.g. ‘Times New Roman’ or ‘Arial’
- Button Color: The color of the buttons used to navigate the survey.
- Button Font Color: The color of the font on the buttons.
- Button Font Family: The font used for the questions. E.g. ‘Times New Roman’ or ‘Arial’
- Header Image: The image displayed on the top of the survey page. This must be a URL. It is recommended that you use an image 1140px x 200 to 300px
- Header Font Family: The font that will be used for the ‘Header’ of the survey.
- Header Font Color: The color that will be used for the font in the ‘Header’ of the survey.
- Progress Bar Color: The color that will display for ‘% complete’ as the respondent moves through the survey.
Note: Color fields accept labels (ie. white or red) or hexadecimal (i.e. #FFFFFF)
- Save the Survey details and begin creating Survey Questions.
Creating Survey Questions
- Navigate to the Survey where you want to add questions.
- Under the Survey Questions related list, select New Survey Question. The Survey Name will default.
- Indicate whether the question is Active. When a new question is created, this will default to checked.
- Indicate the Order in which the question should appear on the survey. If left blank, the system will default it to the next available number.
- Select the Question Type for the survey question. You can select Plaintext, 1-5 Rating or Picklist.
- If you selected a Picklist Question Type; indicate the picklist options by entering each item on a separate line.
- Note: When entering picklist values, be sure that no extra spaces are included at the end of each value; otherwise, your Survey reports will not display properly.
- Enter the Question Text. This will display above the response options.
- Indicate whether the question is Required.
- Save the question or select Save & New to create another question.
Deploying Surveys
In order to ‘deploy’ a Survey, several steps need to be completed after you’ve created the Survey and associated questions.
Step 1: Quick Test/Preview
- Navigate to Setup and search for Visualforce Pages.
- Select the SurveyResponder page and click Preview.
- On the end of the URL, add ?id=[SurveyID], replacing value with your Survey ID.
Example:
…/SurveyResponder?id=a021a000001qheB
Locating the Survey ID
The Survey ID is important to deploy your survey and view survey results. Once you’ve created your survey and saved you can find the Survey Id by following these steps:
- Navigate to the Surveys tab.
- Select the Survey from the list.
- The 15-18 digits at the end of the url represent the Survey Id.
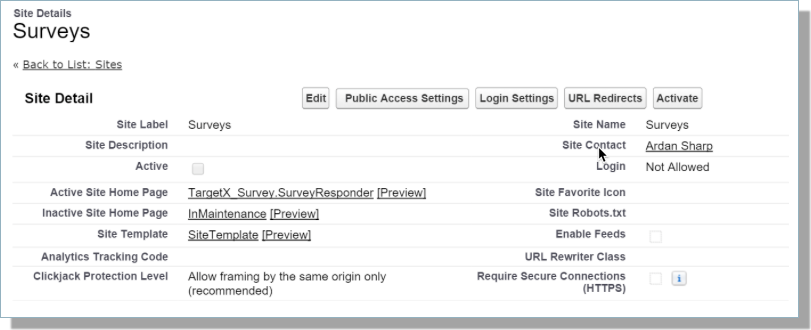
Step 2: Create a Survey Site
- Navigate to Setup and search for Sites.
- Enter a Site Label, Site Name and Site Description.
- For Site Contact, select the User who will be contacted regarding this site.
- Default Web Address will be populated and you must enter a Suffix. Enter ‘Survey’.
- For the Active Site Home Page enter ‘SurveyResponder’.
- Save your changes.
- Select the Activate button to check the ‘Active’ checkbox the Site.
Disable Lightning Features for Guest Users
The Salesforce setting, Lightning Features for Guest Users, is enabled by Default. TargetX products do not require Lightning features, so we recommend you turn this setting OFF to limit access to your Sites:
- Navigate to Setup and search for Sites.
- Click the Site Label.
- Click Edit.
- Uncheck the Field for Lightning Features for Guest Users.
- Save your changes.

Step 3: Enable VisualForce page access
Step 4: Configure Access to the Survey Site
Step 5: Sharing Settings Considerations
Step 6: Sharing a Survey
Access Keys are utilized when users click a Survey link. Users can have an email sent to them with an updated link. The email will use the direct Site Path example, as shown below.
Surveys can be shared to collect respondent names or anonymously, depending on your preference.
- Surveys linked to a respondent - where the survey responses are linked to a specific individual - a specific Student/Contact record (Contact Id).
- Anonymous Surveys - where responses are not related to an individual respondent.
Sending Surveys by TargetX Broadcast Email Campaigns
Note: You MUST use the Email Template Builder for Survey emails.
Step 1: Locate the Survey ID
- Navigate to the Surveys tab.
- Select the Survey from the list.
- The 15-18 digits at the end of the url represent the Survey ID.
Step 2: Create an Email
Create an Email which includes your survey ‘Site’ link plus the following URL parameters:
?id=<<Survey Id>>&sid={!Contact.Id}&k={!Contact.TargetX_Base__Access_Key__c}
Note: Be sure to re-add the merge field for Contact ID when customizing your email template.
Step 3: Create and schedule an Email Campaign
Deploying Surveys linked to a respondent
To send a link to a survey that will track the responses related to a specific individual, include the Contact Id as a URL parameter (in addition to the Survey Id) when deploying your Survey link (URL)
Step 1: Locate the Survey ID
- Navigate to the Surveys tab.
- Select the Survey from the list.
- The 15-18 digits at the end of the url represent the Survey Id.
Step 2: Create an Email Template
Create an Email which includes your survey ‘Site’ link plus the following URL parameters:
id=<<Survey Id>>&sid={!Contact.Id}&k={!Contact.TargetX_Base__Access_Key__c}
Example 1: Using a Survey Site path
targetxsite.secure.force.com/surveys?id=<<Survey Id>>&sid={!Contact.Id}&k={!Contact.TargetX_Base__Access_Key__c}
Example 2: Using a Direct Site Path
targetxsite.secure.force.com/surveys/apex/TargetX_Survey__SurveyResponder?id=<<Survey Id>>&sid={!Contact.Id}&k= {!Contact.TargetX_Base__Access_Key__c}targetxsite.secure.force.com/apex/TargetX_Survey__SurveyResponder?id=<<Survey Id>>&sid={!Contact.Id}&k= {!Contact.TargetX_Base__Access_Key__c}
Step 3: Create and Schedule an Email Campaign
When a contact uses the link in their email, the survey responses will be linked to that Contact.